
Cloudflare Tunnel is one of the most common recommendations when people search for ways to access their Raspberry Pi remotely without port forwarding. The approach works — run cloudflared on the Pi, connect it to your Cloudflare account, and your Pi’s services become reachable through Cloudflare’s edge network.
But for Raspberry Pi projects that go beyond a single device or a simple web service — especially when you need SSH access to a fleet of Pis, OTA update delivery, or device health monitoring — Cloudflare Tunnel’s toolset runs out quickly. And even for a single Pi, there are meaningful reasons to consider a purpose-built alternative.
Setting Up Raspberry Pi SSH via Cloudflare Tunnel — What’s Required
To use Cloudflare Tunnel for SSH access to a Raspberry Pi, you need:
- A Cloudflare account (free tier available)
- A domain name managed through Cloudflare DNS
cloudflareddaemon installed and running on the Raspberry Pi- For browser-based SSH: Cloudflare’s browser-rendered SSH terminal, which works without client-side software
- For native terminal SSH:
cloudflaredinstalled on your laptop plus aProxyCommandentry in your~/.ssh/config
All traffic between your device and the Pi travels through Cloudflare’s global network. The Pi’s SSH session data passes through Cloudflare’s infrastructure before reaching your browser or terminal.
This works. For a personal Raspberry Pi project where you’re comfortable with Cloudflare’s network handling your SSH traffic, it’s a reasonable approach. The friction points emerge at scale and in contexts where network routing matters.
Setting Up Raspberry Pi SSH via SocketXP — What’s Required
- A SocketXP account (30-day free trial, no credit card)
- The SocketXP agent binary installed on the Raspberry Pi
- A
/etc/socketxp/config.jsonpointing to the Pi’s SSH daemon
No domain name required. No DNS configuration. No client software on your laptop for browser-based access.
Step 1: Install the SocketXP Agent on Your Raspberry Pi
Follow the download and installation instructions for your Pi’s architecture (ARM64 for Pi 4/5, ARMv7 for Pi 3/Zero 2W, ARMv6 for original Pi Zero).
Step 2: Authenticate the Pi
sudo socketxp login
Your auth token is available in the SocketXP web portal after signing up. This registers the Pi with the SocketXP Cloud Gateway and generates a unique device credential on the Pi.
Step 3: Create the Configuration File
Create /etc/socketxp/config.json:
{
    "tunnels": [
        {
            "destination": "tcp://127.0.0.1:22"
        }
    ]
}
Step 4: Install as a Persistent systemd Service
sudo socketxp service install --config /etc/socketxp/config.json
sudo systemctl daemon-reload
sudo systemctl enable socketxp
sudo systemctl start socketxp
Verify the agent is running:
sudo systemctl status socketxp
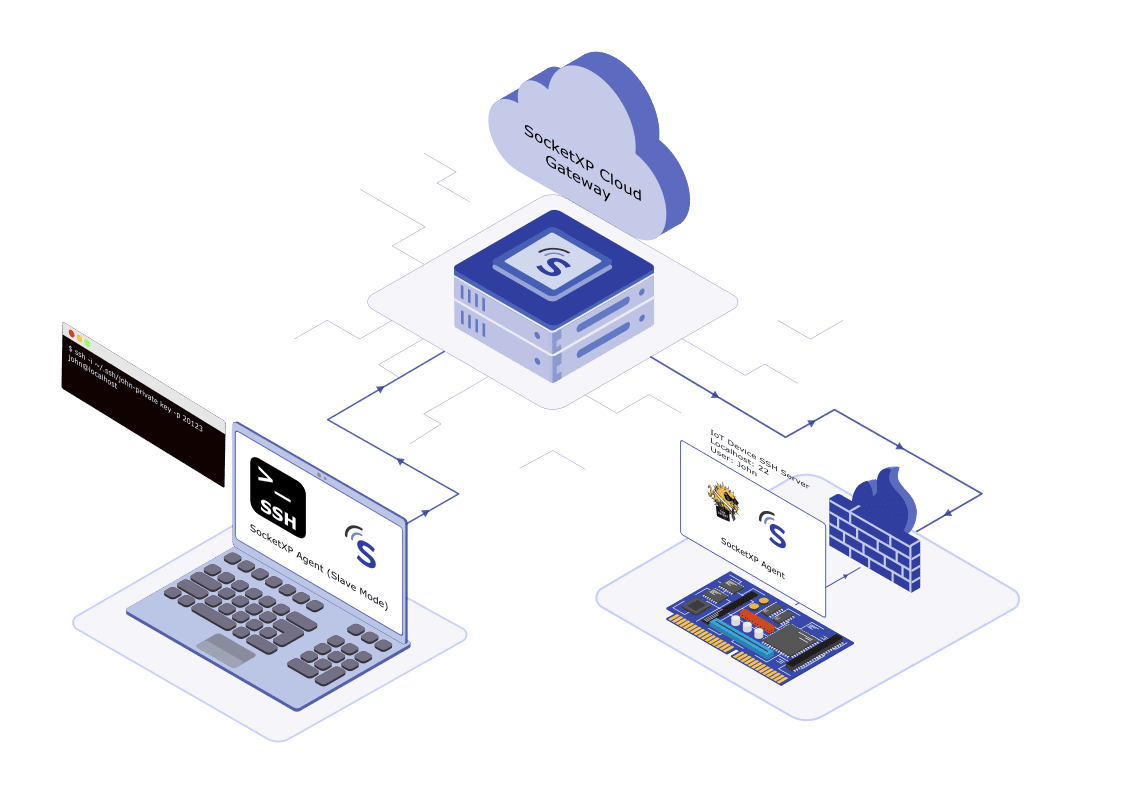
Your Pi now appears in the SocketXP portal Devices list. The agent maintains an outbound SSL/TLS tunnel to the SocketXP gateway and reconnects automatically if the network drops or the Pi reboots.
Step 5: SSH Into Your Pi From Anywhere
From a browser: Open the SocketXP portal → Devices → select your Pi → click SSH. A full terminal opens in the browser tab. No client software, no ProxyCommand, no SSH key setup.
From a native terminal: Install the SocketXP agent on your laptop in slave mode to create a local SSH proxy, then connect your regular SSH client to localhost on the proxy port.
Step 6: Expose a Web App or Dashboard Running on the Pi
If your Raspberry Pi runs a local web application — a Node-RED flow editor, a Grafana dashboard, a Python Flask API, or a custom IoT control panel — add an HTTP tunnel entry to config.json alongside the SSH entry:
{
    "tunnels": [
        {
            "destination": "tcp://127.0.0.1:22"
        },
        {
            "destination": "http://127.0.0.1:1880"
        }
    ]
}
Change 1880 to the port your web service listens on (e.g. 3000 for NodeJS, 5000 for Flask, 8080 for a custom app). After restarting the SocketXP service, the web app gets a permanent public HTTPS URL — accessible from any browser, anywhere, without port forwarding, without a domain name, and without routing through Cloudflare’s network. The URL does not change between Pi reboots.
For a quick one-off tunnel to a running service without changing config.json:
socketxp connect http://localhost:1880
This is where SocketXP directly matches Cloudflare Tunnel’s primary use case — HTTP service exposure — while doing so without requiring a Cloudflare account, a managed domain, or traffic traversing Cloudflare’s network.
Comparing the Two Approaches
| Cloudflare Tunnel | SocketXP | |
|---|---|---|
| Server-side daemon on Pi | cloudflared required | SocketXP agent required |
| Browser-based SSH | Yes | Yes |
| Native SSH (no client software) | Requires cloudflared + ProxyCommand | SocketXP slave mode on laptop |
| HTTP/HTTPS web app tunneling | Yes (requires Cloudflare domain) | Yes (permanent HTTPS URL, no domain needed) |
| Domain name required | Yes (managed in Cloudflare DNS) | No |
| Traffic routing | Through Cloudflare’s network | Through SocketXP Cloud Gateway |
| Works behind CGNAT | Yes | Yes |
| Port forwarding required | No | No |
| OTA software/firmware updates | Not included | Built-in |
| Device monitoring (CPU, memory, disk) | Not included | Built-in |
| Fleet management (multiple Pis) | Not included | Built-in |
| Self-hosted deployment option | Not available | Available |
| Agent size / embedded Linux fit | cloudflared (server/desktop-oriented) | Single static binary, ARM-optimized |
Managing a Fleet of Raspberry Pis with SocketXP
If you have more than one Raspberry Pi — whether it’s 5 Pis in a lab or 500 deployed in the field — SocketXP’s fleet features become the primary differentiator over Cloudflare Tunnel.
Group Your Pis at Registration Time
sudo socketxp login\ --iot-device-name "sensor-unit-042" \ --iot-device-group "field-sensors"
Every Pi registered with --iot-device-group "field-sensors" can be targeted as a group for OTA deployments and monitoring queries.
Enable Device Monitoring
Add to /etc/socketxp/config.json before installing the service:
{
    "tunnels": [
        {
            "destination": "tcp://127.0.0.1:22"
        }
    ],
    "device_monitoring": true,
    "device_monitoring_threshold": 80.0
}
After restarting the agent with sudo systemctl restart socketxp, the SocketXP gateway begins tracking CPU, memory, and disk utilization on the Pi. Register a webhook URL in the portal to receive alerts when any Pi goes offline or exceeds the resource threshold.
Push OTA Updates to All Pis in a Group
Package your update as a tar.gz archive containing the new binary (or script, or config file) plus an update.sh installation script. Upload it to the SocketXP Artifact Registry, create a deployment targeting field-sensors, and SocketXP delivers and executes it across all Pis in the group through their existing outbound tunnels — with per-Pi status tracking and automatic rollback on failure.
For a complete walkthrough of the OTA update process, see the IoT OTA update guide.
Provision Multiple Pis at Once
For deploying many Raspberry Pis simultaneously, SocketXP’s zero-touch provisioning approach uses a golden SD card image: configure one reference Pi, delete its device credential, add a first-boot auto-registration script, clone the image to all SD cards, and power on. Each Pi self-registers independently on first boot.
Security: mTLS vs Cloudflare’s Certificate Model
Both Cloudflare Tunnel and SocketXP authenticate device connections cryptographically. SocketXP uses mutual TLS (mTLS) — every Pi is issued a unique X.509 certificate at registration time. The SocketXP gateway verifies the Pi’s certificate before allowing any tunnel connection. A Pi that has been decommissioned or compromised has its certificate revoked in the portal, and the tunnel is immediately terminated.
SocketXP also uses automatic short-lived SSH key management: when you initiate an SSH session, SocketXP generates a single-use SSH key pair, syncs the public key to the Pi just for that login, and discards it immediately after you connect. No static SSH keys accumulate on the Pi over time.
Architectural Summary
Cloudflare Tunnel and SocketXP both solve the same fundamental problem for Raspberry Pi — remote access without port forwarding, behind any NAT or CGNAT. For a single Pi running a web service where you want Cloudflare’s CDN and edge network in front, Cloudflare Tunnel is a reasonable fit.
For SSH-first access to one or many Raspberry Pis, especially when you also need OTA software updates and device health monitoring, SocketXP is the more direct fit: an agent built for embedded Linux hardware, a browser-based SSH terminal that needs no client installation, and a fleet management platform ready to grow with your deployment from one device to thousands.
Try SocketXP free for 30 days.
Further reading:
- Raspberry Pi Remote Access
- IoT Remote Access
- IoT OTA Firmware Updates
- IoT Device Monitoring
- SSH Key Management
- Cloudflare Tunnel Alternative for IoT Fleets
- Self-Hosted Cloudflare Tunnel Alternative
- Zero-Touch Provisioning for IoT Fleets
- Tailscale Alternative for IoT Fleet Management
Frequently Asked Questions
What is the best Cloudflare Tunnel alternative for Raspberry Pi SSH?
SocketXP is a lightweight Cloudflare Tunnel alternative for Raspberry Pi SSH. Install the SocketXP agent on the Pi, create a config.json pointing to tcp://127.0.0.1:22, and install it as a systemd service. Your Pi appears in the SocketXP portal and is accessible via a browser-based SSH terminal or native SSH client — no cloudflared on either end, no port forwarding, works behind CGNAT.
Does Cloudflare Tunnel work for Raspberry Pi SSH?
Yes, Cloudflare Tunnel can be used for Raspberry Pi SSH. The cloudflared daemon runs on the Pi as the server-side component. For SSH access, Cloudflare offers a browser-rendered terminal option that requires no client-side software, or a native SSH option using cloudflared on the operator's machine with a ProxyCommand in the SSH config. All traffic routes through Cloudflare's global network.
Can I SSH into my Raspberry Pi from a browser without Cloudflare Tunnel?
Yes. SocketXP provides a browser-based SSH terminal in its web portal. Install the SocketXP agent on the Pi, configure it to tunnel port 22, and install it as a systemd service. Open the SocketXP portal from any browser, select your Pi from the Devices list, and click SSH. No client software, no ProxyCommand, no VPN.
Does SocketXP work for Raspberry Pi behind CGNAT?
Yes. The SocketXP agent on the Raspberry Pi initiates an outbound SSL/TLS connection to the SocketXP Cloud Gateway. Because the connection is outbound from the Pi, CGNAT, NAT routers, and firewalls are bypassed transparently — no port forwarding configuration needed on your router.
Can I manage multiple Raspberry Pis with SocketXP?
Yes. SocketXP is designed for fleet-scale management. Each Pi runs the SocketXP agent and appears in a central Devices dashboard. You can SSH into any Pi individually, push OTA software updates to a group of Pis simultaneously, and monitor CPU, memory, and disk usage across all Pis from a single view.
Does SocketXP support OTA updates for Raspberry Pi?
Yes. SocketXP lets you upload update packages (application binaries, Debian packages, scripts, or configuration files) to the SocketXP Artifact Registry and deploy them to one or many Raspberry Pis. The deployment runs securely through the established outbound tunnel, with per-device status tracking and automatic rollback if an update fails.
Is SocketXP free for Raspberry Pi remote access?
SocketXP offers a 30-day free trial with no credit card required. See socketxp.com for current pricing plans.