Table of Content

Table of Content
In this article, we will discuss how to setup secure SSH reverse proxy tunnels to remotely access your IoT or Linux devices behind a NAT router or firewall. SocketXP provides SSH based reverse proxy tunnels to remotely access and control Raspberry Pi and IoT devices behind NAT router or firewall.
Before we dive deep into the topic, let’s briefly discuss about what is reverse SSH tunneling.
Normally, an SSH client would connect to an SSH server for SSH access.
But, what if you want the SSH server to connect to the SSH client? That’s when you need to setup an SSH reverse proxy tunnel.
Hint: To better understand SSH reverse proxy tunnel, imagine two tubes (a smaller tube within a larger tube) connecting two endpoints.
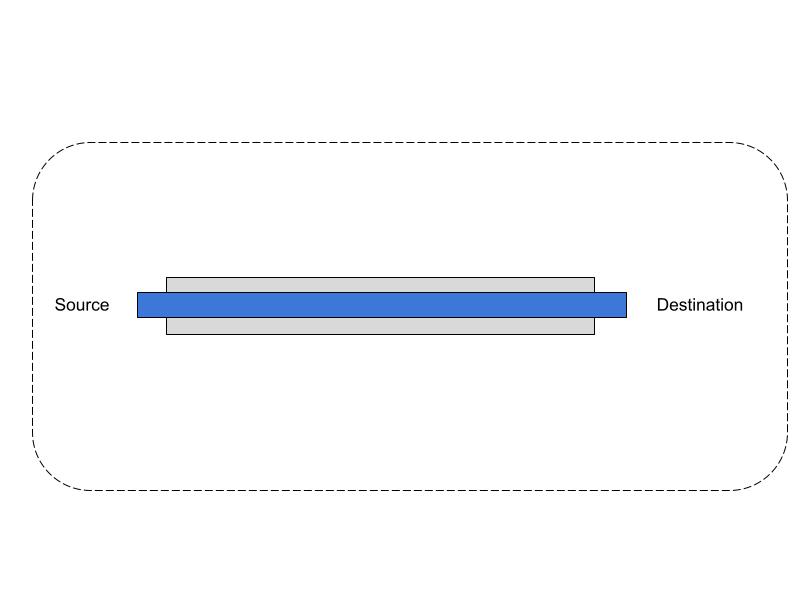
What is a reverse proxy tunnel
Let’s say you want to access an SSH client behind a NAT router or firewall from a public SSH server.
For this, you first need to create an SSH connection, also known as an SSH tunnel, from the SSH client to the SSH server (imagine a large tube connecting two endpoints).
Note the direction of this first SSH connection: it starts from the SSH client behind NAT and ends at the SSH server in the public internet.
Next, from the public SSH server, you can establish a second SSH connection to the SSH client through the SSH tunnel created in the previous step (imagine a smaller tube within the larger tube).
You access the client machine and its private network through this SSH tunnel (larger tube).
Note the direction of this second SSH connection: it starts from the public SSH server in the internet and ends at the SSH client behind NAT and firewall.
This is called SSH reverse proxy tunneling.
SSH reverse proxy tunneling is a secure method to set up remote access to your IoT device or any machine(server, laptop, PC) behind a NAT router or firewall.
This solution is great for hobbyists, hackers, and professionals tinkering with IoT device. However, the solution has some real security challenges when it comes to business use cases, which we’ll discuss in the end.
How to create a Reverse SSH tunnel
Let’s take the following scenario:
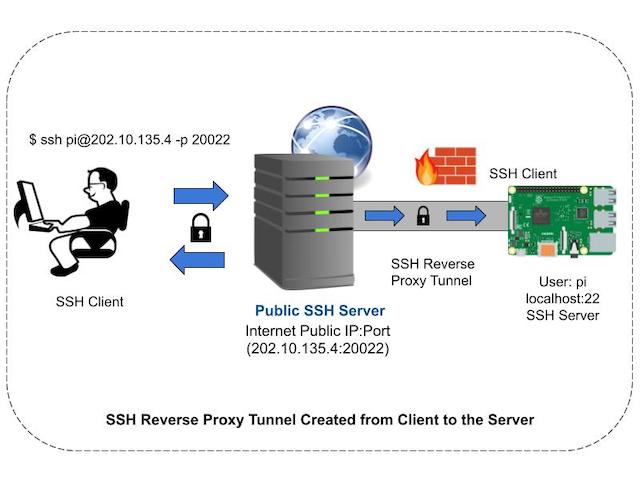
You have an SSH Server (with Public IP: 202.10.135.4) and you want to access a destination host (with local IP 192.168.1.1) behind a NAT router or firewall.
You want to access a service (SSH server or HTTP web server) running in the destination host via the Souce SSH Server.
Source (Public IP: 202.10.135.4) => Internet => NAT => Destination(Local IP: 192.168.1.1)
Step 1:
Using an SSH client, create a reverse SSH tunnel to the Source ( 202.10.135.4) from the Destination (192.168.1.1) using the following command:
$ ssh -fNT -R 20022:localhost:22 [email protected]
This will create a Reverse SSH Tunnel from the destination to the source.
The above command basically instructs the SSH server to listen for any connection on TCP port 20022 and blindly forward it to the destination host’s TCP port 22 (SSH server port).
Step 2:
Now, using an SSH client, you can SSH login into the Destination host behind NAT through the public SSH server(Source) and the reverse SSH tunnel created in step #1.
$ ssh -p 20022 [email protected]
In this scenario, there are two SSH connections established between the Source and the Destination, one within the other. We call this SSH Reverse Proxy tunneling.
The first SSH connection is created from the Destination to the Source. The second SSH connection is created from the Source to the Destination through the first SSH connection. All data transmitted over the second SSH connection will actually be going via the first SSH connection.
If you capture the packets arriving at the Destination using an IP packet sniffing tool like Wireshark, you’ll find that the arriving packets have two SSH headers, unlike regular SSH connections that have only one SSH header.
How to create a Reverse SSH tunnel with Port Forwarding ?
To explain the concept of Reverse SSH Tunnel with Port Forwarding, let’s use a HTTP web server example.
Let’s say you want to access a nodejs web application running in a server in the same local network as the Destination host behind a NAT router. Let’s assume the web application listens on TCP port 3000.
Let’s use the following simple nodejs web application for the demo.
$ cat myapp.js
var http = require('http');
//create a server object:
http.createServer(function (req, res) {
 res.writeHead(200, {'Content-Type': 'text/html'});
 res.write("<h2>Hello World!</h2>"); //write a response to the client
 res.end(); //end the response
}).listen(3000); //the server object listens on port 3000
$
We can use the Reverse SSH Tunnel Port Forwarding feature to access the web application running on any host present in the same local network as the Destination host.
Here is how to do it.
Source (Public IP: 202.10.135.4, Port: 20022) ==> Internet ==> NAT ==> Destination(Local IP: 192.168.1.1, Port: 3000)
Step 1:
Reverse SSH into the Source ( 202.10.135.4) from the Destination(192.168.1.1) by executing the below SSH command in the destination host.
$ ssh -fNT -R 20022:192.168.1.2:3000 [email protected]
The above command basically tells the public SSH server to blindly forward any TCP connections (including HTTP requests) to its port 20022 to the Destination host. The Destination host will eventually forward the traffic to the neighbouring host 192.168.1.2 port 3000 where the NodeJS web application runs.
Step 2:
From the Source, access the nodejs web application running in the Destination behind a NAT router, as follows:
$ curl http://202.10.135.4:20022
<h2>Hello World!</h2>
Problem:
The only problem with this approach to access the Destination behind a NAT router is that the Source needs to be accessible from the internet using a public IP. Otherwise, it is not possible to establish a Reverse SSH Tunnel from the Destination to the Source.
What if the Source is also behind a NAT and wants to access the Destination behind another NAT ? What if there are more sources and desinations behind NAT in different places?
Source (Local IP: 10.1.1.1) ==> NAT ==> Internet ==> NAT->Destination (Local IP: 192.168.1.1)
Consider the following example, where a web application is running in a server behind a NAT’ed network and firewall and the MySQL database running in a server behind another NAT’ed network and firewall.
The web app can talk to the DB over the internet using an SSH Reverse Proxy Tunnel with Port Forwarding enabled.
You can access the web app over the internet using another SSH Reverse Proxy Tunnel with Port Forwarding enabled.
You need to open up two ports in the public SSH server, say port 20021 for accessing the web app and 20022 for accessing the MySQL DB.
What if you have many sources and many destinations behind many different NAT’ed networks? Like having hundreds of thousands of IoT devices deployed in different customer sites around the world?
You’ll have to open up that many number of ports in the public SSH server to the internet and setup port forwarding, so that you can connect to all those destination hosts (like IoT devices) over the internet.
Is there a better solution to this problem than having to open up a large number of ports in a public SSH server to the internet?
The answer is yes!
A Better Solution:
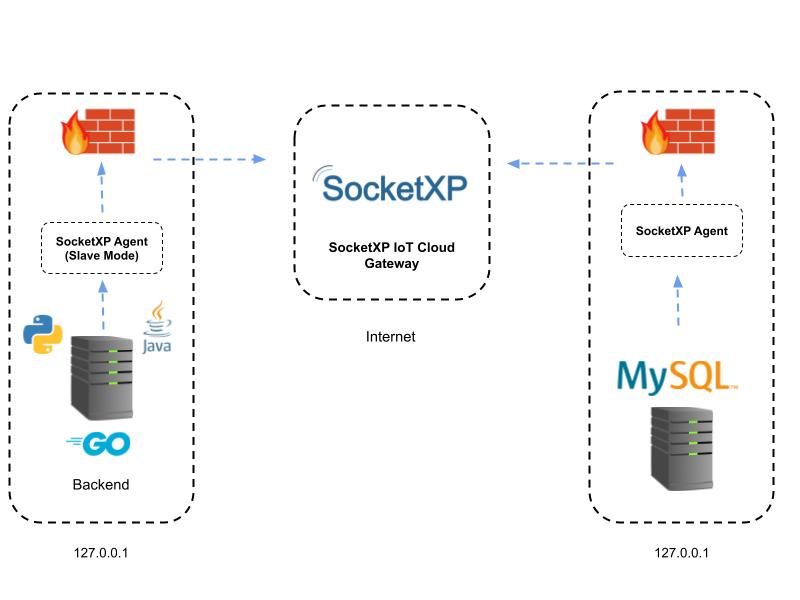
A better way to solve this security problem is to use a simple and easy to use remote access solution like SocketXP. SocketXP creates a secure SSL based reverse proxy tunnel from your device to the SocketXP cloud gateway.
SocketXP solution does not require opening up ports to the internet and it does not perform port forwarding. SocketXP uses a much smarter and secure method to remotely connect to a device behind NAT and firewall.
The SocketXP cloud gateway simply joins the tube originating from the source with the tube originating from the destination host. So that, the two hosts (behind NAT or firewall) could talk to each other securely over the internet. SocketXP cloud gateway performs the role of a internet relay server without using port forwarding.
How SocketXP IoT Remote Access solution works
First, you need to install a SocketXP IoT agent on your IoT device.
The SocketXP agent would connect the device to the SocketXP IoT Cloud Gateway by creating a secure SSL/TLS reverse tunnel.
You could then remote SSH into the IoT device from the SocketXP IoT Cloud Gateway’s web portal page (via this secure SSL/TLS tunnel).

Follow the below steps to setup SocketXP IoT agent and remote SSH into your IoT using SocketXP IoT Remote Access solution.
Step 1: Download and Install
Download and install the SocketXP IoT agent on your IoT device from here.
Step 2: Get your Authentication Token
Sign up at SocketXP Web Portal and get your authentication token.
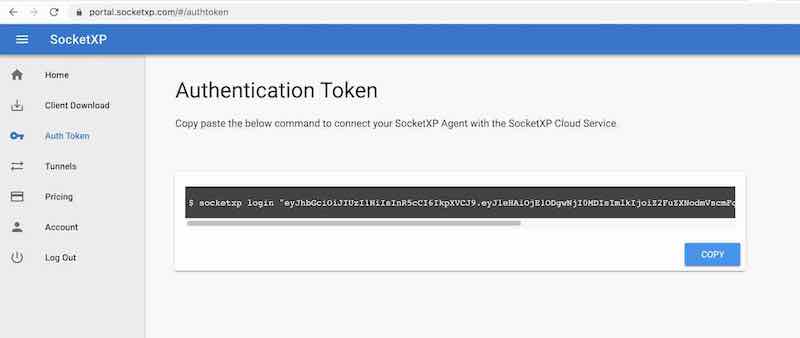
Use the following command to login to the SocketXP IoT Cloud Gateway using the auth token.
$ socketxp login [your-auth-token-goes-here]
Step 3: Create SocketXP SSL Tunnel Endpoint for Remote SSH
Use the following command to create a secure and private SSL tunnel endpoint at the SocketXP IoT Cloud Gateway.
 $ socketxp connect tcp://localhost:22

Connected to SocketXP Cloud Gateway.
Access the TCP service securely using the SocketXP agent in IoT Slave Mode.
Note:
For the security of your devices, SocketXP Remote Access Solution doesn’t open up ports in our public cloud gateway that can be connected by any SSH client from the internet.
SocketXP private tunnel endpoints are not exposed to the internet and can be accessed either from the web terminal in the SocketXP Web Portal page after a successful SSO login or by running SocketXP agent in IoT Slave Mode and authenticating using an authentication token.
More importantly, this also means port scanners or hackers from the internet cannot access your IoT device’s SSH server port.


The screen capture above shows the “htop” command being executed from an SSH session created using the XTERM window from the SocketXP Portal page using a web browser. You could use any browser of your choice to remote SSH into your IoT device.
Configuring SocketXP agent to run in slave mode
This is an alternate method for connecting to your IoT device from a remote location using the SocketXP solution.
If you don’t want to access your IoT device from a web browser and you want to access it using your SSH client (Eg: PuTTY, SecureCRT) then follow the instructions below.
First download and install the regular SocketXP agent software on your access device such as a laptop or PC running Windows or Mac OS.
Next, configure the agent to run in slave mode using the command option “–iot-slave” as shown in the example below.
$ socketxp connect tcp://localhost:3000 --iot-slave --peer-device-id "2233-4455-abcd-34445" --peer-device-port 22 --authtoken <auth token>

Listening for TCP connections at:
Local URL -> tcp://localhost:3000
You shall find the device ID of your IoT device from the SocketXP Portal page in the IoT Devices section.
The above command basically tells SocketXP agent to act like a local proxy server.
Accessing the IoT device SSH from your laptop
Now you can access your IoT device’s SSH server using the above SocketXP local endpoint, as shown below.
$ ssh -i ~/.ssh/john-private.key john@localhost -p 3000
The above method uses SSH private key based authentication to SSH into your IoT device. You can also use password based authentication.
You could use SocketXP Remote Access Solution to create a reverse SSH proxy tunnel to remote access any TCP service (SSH, HTTP, SMTP, MQTT, VNC, or RDP server) running in your local network behind NAT router and firewall.
Security Challenges of SSH Reverse Proxy Tunnel
There are some security challenges that need to be considered when using SSH server based SSH reverse proxy tunnel in a business environment.
One of the main security challenges with SSH reverse proxy tunneling is that it can be used to bypass firewalls. This means that an attacker could use this technique to gain access to a machine that is normally protected by a firewall.
Another security challenge with SSH reverse proxy tunneling is that it can be used to tunnel malicious traffic. This means that an attacker could use this technique to send malicious traffic through the SSH tunnel and into the network.
If you are considering using SSH reverse proxy tunneling in a business environment, it is important to carefully consider the security risks involved. You should also implement additional security measures to mitigate these risks.
Here are some additional security measures that you can implement to mitigate the risks of SSH reverse proxy tunneling:
- Use strong passwords for the SSH connections. Better yet, disable password based authentication and use SSH keys or SSH Certificates for authentication.
- Use a firewall to restrict access to the SSH server.
- Monitor the SSH connections and SSH logs for suspicious activity.
- Follow the SSH Server remote access security best practices.
By implementing these security measures, you can help to protect your network from the risks of SSH reverse proxy tunneling.
Advantages of SocketXP
Following are the advantages of using SocketXP IoT Remote Access Solution over SSH Server based Reverse Proxy Tunnel with Port Forwarding Solution:
- You don’t have to run and manage a dedicated SSH server or VM with a public IP address in the cloud.
- You don’t have to handle any DoS attacks on your SSH server, SocketXP server will handle them.
- SocketXP enforces Zero Trust Network Access using private Keys and authentication tokens to access your network and devices.
- SocketXP does not perform port-forwarding. Port-forwarding is not a secure solution. All traffic hitting a port on the public server will be simply forwarded the destination host behind NAT or firewall.
- SocketXP will not expose your IoT or Raspberry’s TCP ports publicly to the internet. No rogue users or hackers in the internet will be able to scan or directly connect to your IoT devices, without verifying their identity first with SocketXP Cloud Gateway using an authentication token or via SSO + MFA based login.
- SocketXP dashboard provides a sophisticated device management software to list, filter and view devices. Moreover, it provides you the ability to login to your device shell from a web browser. You don’t have to remember which device maps to which port in the SSH server(port forwarding), as your Raspberry Pi or IoT device fleet scales up.
- SocketXP offers open API’s to integrate your IoT application with SocketXP, so that you can have fine grain control over your IoT devices in the field.
Conclusion:
Creating SSH Reverse proxy tunnels using a public SSH server is a great way to selectively expose applications and network services (such as SSH servers, HTTP web server apps or databases) running in your private network to your customer applications running in your customer’s private network. But it comes with security caveats.
Creating secure reverse SSL/TLS tunnels using SocketXP, an IoT Device Management and Remote Access Platform, is a simple and secure way to selectively expose applications or services running in your private network behind NAT router and firewall to your customers or vendors. SocketXP solution addresses the security caveats introduced by SSH Reverse Proxy Tunneling.
For better security and to reduce the complexity associated with managing a large fleet of IoT or Raspberry Pi devices, an IoT Remote Access and Device Management Platform like SocketXP comes in handy. So that your team can focus on your core business function and offload the device management to SocketXP.
You can use SocketXP to not only remote access your raspberry pi or IoT device fleet, but also troubleshoot, debug, configure, monitor and update IoT device software.