
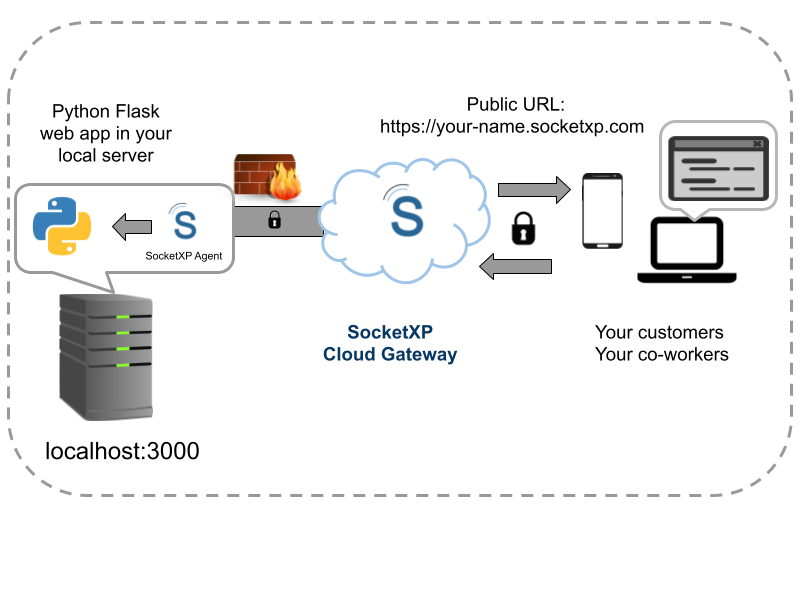
Short answer: Run a model locally with Ollama (ollama pull llama3.2), then point the OpenAI Python SDK at Ollama’s OpenAI-compatible endpoint, http://localhost:11434/v1, from a Flask route. Stream the reply back to a small HTML page, and you have a private, ChatGPT-style chatbot. No API keys, no cloud and no per-token cost.
What you’ll build
- A Flask web app with a chat UI that streams replies word by word
- Conversation memory, with history trimmed to fit the model’s context window
- Runs 100% locally with Ollama and Llama 3.2. Prompts never leave your machine.
- Optional: share it securely over a public HTTPS URL with SocketXP
All code in this guide was tested with Python 3.14, Flask 3.1, openai 3.42 and Ollama 0.32 running llama3.2.
Prerequisites
- Python 3.9 or later
- About 4 GB of free RAM for the 3B
llama3.2model. A GPU is optional. - Ollama installed for macOS, Linux or Windows
Step 1: Install Ollama and Pull a Model
After installing Ollama, download the model and check that the server is running:
$ ollama pull llama3.2
$ curl http://localhost:11434/api/version
{"version":"0.32.15"}
Ollama listens on localhost:11434 and serves an OpenAI-compatible API under /v1. That’s why the standard openai Python package can talk to it.
Want to compare Ollama with LM Studio, vLLM and others? See 7 Best Local LLM Tools in 2026 (Hands-On Comparison).
Step 2: Set Up the Project
flask-ollama-chatbot/
├── app.py
└── templates/
    └── index.html
$ mkdir -p flask-ollama-chatbot/templates && cd flask-ollama-chatbot
$ python3 -m venv venv
$ source venv/bin/activate        # Windows: venv\Scripts\activate
$ pip install flask openai
Step 3: Create the Flask Backend (app.py)
import os

from flask import Flask, Response, jsonify, render_template, request, stream_with_context
from openai import OpenAI

app = Flask(__name__)

# Ollama exposes an OpenAI-compatible API under /v1
client = OpenAI(
    base_url=os.environ.get("OLLAMA_BASE_URL", "http://localhost:11434/v1"),
    api_key="ollama",  # required by the SDK, ignored by Ollama
)

MODEL = os.environ.get("OLLAMA_MODEL", "llama3.2")
SYSTEM_PROMPT = "You are a helpful, concise assistant."
MAX_HISTORY = 20  # keep the last 20 messages to stay inside the context window


@app.route("/")
def index():
    return render_template("index.html", model=MODEL)


@app.route("/api/chat", methods=["POST"])
def chat():
    data = request.get_json(silent=True) or {}
    history = data.get("messages", [])

    if not history:
        return jsonify({"error": "messages is required"}), 400

    messages = [{"role": "system", "content": SYSTEM_PROMPT}] + history[-MAX_HISTORY:]

    try:
        stream = client.chat.completions.create(
            model=MODEL,
            messages=messages,
            stream=True,
        )
    except Exception as e:
        return jsonify({"error": str(e)}), 502

    def generate():
        for chunk in stream:
            if chunk.choices and chunk.choices[0].delta.content:
                yield chunk.choices[0].delta.content

    return Response(stream_with_context(generate()), mimetype="text/plain")


if __name__ == "__main__":
    app.run(host="127.0.0.1", port=5001, debug=False)
How it works:
base_urlends in/v1. This is the most common mistake. Without/v1you get a 404, because the OpenAI-compatible routes live under that path.api_key="ollama". The SDK requires a value, and Ollama ignores it.stream=Truereturns tokens as the model generates them. Thegenerate()generator yields each piece, and Flask’sResponsesends them to the browser as they arrive.stream_with_contextkeeps the request context alive while streaming.- History trimming. The browser sends the whole conversation every time, because LLMs are stateless. The backend adds a system prompt and keeps the last 20 messages so long chats don’t overflow the context window.
- Environment variables (
OLLAMA_MODEL,OLLAMA_BASE_URL) let you switch models, or point at Ollama on another machine, without editing code.
Step 4: Create the Chat Frontend (templates/index.html)
<!doctype html>
<html lang="en">
<head>
  <meta charset="utf-8">
  <meta name="viewport" content="width=device-width, initial-scale=1">
  <title>Local LLM Chatbot</title>
  <style>
    body { font-family: system-ui, sans-serif; max-width: 720px; margin: 0 auto; padding: 16px; }
    #log { border: 1px solid #ddd; border-radius: 8px; padding: 12px; height: 65vh; overflow-y: auto; }
    .msg { margin: 8px 0; padding: 8px 12px; border-radius: 8px; white-space: pre-wrap; }
    .user { background: #e8f0fe; margin-left: 15%; }
    .assistant { background: #f3f3f3; margin-right: 15%; }
    form { display: flex; gap: 8px; margin-top: 12px; }
    input { flex: 1; padding: 10px; font-size: 16px; }
    button { padding: 10px 16px; font-size: 16px; }
  </style>
</head>
<body>
  <h2>Local LLM Chatbot <small>({{ model }})</small></h2>
  <div id="log"></div>
  <form id="chat-form">
    <input id="prompt" placeholder="Ask something..." autocomplete="off" required>
    <button id="send">Send</button>
  </form>

  <script>
    const log = document.getElementById("log");
    const form = document.getElementById("chat-form");
    const input = document.getElementById("prompt");
    const button = document.getElementById("send");
    const messages = [];

    function addBubble(role, text) {
      const div = document.createElement("div");
      div.className = "msg " + role;
      div.textContent = text;
      log.appendChild(div);
      log.scrollTop = log.scrollHeight;
      return div;
    }

    form.addEventListener("submit", async (e) => {
      e.preventDefault();
      const text = input.value.trim();
      if (!text) return;

      messages.push({ role: "user", content: text });
      addBubble("user", text);
      input.value = "";
      button.disabled = true;

      const bubble = addBubble("assistant", "");
      let reply = "";

      try {
        const res = await fetch("/api/chat", {
          method: "POST",
          headers: { "Content-Type": "application/json" },
          body: JSON.stringify({ messages }),
        });
        if (!res.ok) throw new Error((await res.json()).error || res.statusText);

        const reader = res.body.getReader();
        const decoder = new TextDecoder();
        while (true) {
          const { done, value } = await reader.read();
          if (done) break;
          reply += decoder.decode(value, { stream: true });
          bubble.textContent = reply;
          log.scrollTop = log.scrollHeight;
        }
        messages.push({ role: "assistant", content: reply });
      } catch (err) {
        bubble.textContent = "Error: " + err.message;
        messages.pop();
      } finally {
        button.disabled = false;
        input.focus();
      }
    });
  </script>
</body>
</html>
The page keeps the conversation in a messages array, posts it to /api/chat, and reads the streamed response with res.body.getReader(). That makes the answer appear word by word, as it does in ChatGPT. Replies are inserted with textContent rather than innerHTML, so model output can never inject HTML or scripts into the page.
Step 5: Run the Chatbot
$ python3 app.py
 * Serving Flask app 'app'
 * Debug mode: off
 * Running on http://127.0.0.1:5001
Press CTRL+C to quit
Open http://localhost:5001 and start chatting. You can also test the API directly with curl. The -N flag shows the streamed text as it arrives:
$ curl -N -X POST http://localhost:5001/api/chat \
    -H 'Content-Type: application/json' \
    -d '{"messages":[{"role":"user","content":"Say hello in exactly five words."}]}'
Hello, I'm here to assist.
The app uses port 5001 because, on macOS, AirPlay Receiver already occupies Flask’s default port 5000.
Step 6: Share Your Chatbot Securely Over the Internet
Right now only your own machine can reach the chatbot. To let teammates, clients or your own phone use it from anywhere, without port forwarding or a cloud GPU bill, put it behind a secure tunnel.
1. Add a login first. A public chatbot lets anyone use your CPU or GPU. Add the HTTP Basic Auth snippet from Protect Your Public Flask App to app.py and set APP_PASS before starting the app. Keep debug=False, because the Werkzeug debugger allows remote code execution.
2. Create the public URL:
$ socketxp login [your-auth-token]
$ socketxp connect http://localhost:5001
Public URL -> https://679aa48b-1162-44f7-b6c6-59129dd68b58.socketxp.com
Open that HTTPS URL from any device on any network. The model still runs on your machine. Only the chat traffic travels through the encrypted tunnel.
Share Your Local AI Chatbot in Seconds
Give your Flask + Ollama chatbot a permanent public HTTPS URL. No port forwarding, no cloud GPU.
For the full walkthrough, including ProxyFix, running the app with gunicorn and keeping the tunnel up after reboots, see Expose a Flask App to the Internet Without Port Forwarding.
If you’d rather give other apps or IDEs access to the model API itself instead of the chat UI, see How to Access Ollama, vLLM or LM Studio Remotely. It covers private endpoints through the SocketXP AI Gateway with per-user access keys.
Running It 24/7 with Gunicorn
The Flask development server isn’t built for long-running use. Streaming responses hold a connection open for the whole reply, so use threads to handle more than one chat at a time:
$ pip install gunicorn
$ gunicorn -w 1 --threads 4 -b 127.0.0.1:5001 app:app
On Windows, use waitress instead: pip install waitress, then waitress-serve --listen=127.0.0.1:5001 app:app.
Keep a single worker. The model runs inside Ollama, not inside Flask, so extra worker processes add nothing, and threads are enough to serve concurrent streams.
Troubleshooting
| Problem | Cause | Fix |
|---|---|---|
NotFoundError: Error code: 404 from the OpenAI SDK | base_url is missing /v1 | Use http://localhost:11434/v1 |
Connection refused on port 11434 | Ollama isn’t running | Start the Ollama app or run ollama serve |
Error code: 404 - model 'llama3.2' not found | Model not downloaded | ollama pull llama3.2 |
| Reply appears all at once instead of streaming | A proxy is buffering the response | Test with curl -N. Disable response buffering in Nginx with proxy_buffering off |
| Very slow replies | Model too large for your RAM or CPU | Use a smaller model, or a machine with a GPU |
Address already in use on port 5000 (macOS) | AirPlay Receiver | Use port 5001, as in this guide |
Next Steps
- Swap models:
OLLAMA_MODEL=qwen2.5 python3 app.py - Render Markdown: the model often replies in Markdown. Add a library such as
markedplus a sanitizer likeDOMPurifyto render it safely. - Persist chats: store the
messagesarray in SQLite, keyed by user, to keep history across page reloads. - Run it on a Raspberry Pi 5 with a small model, and reach it from anywhere using the Raspberry Pi web app remote access guide.
Frequently Asked Questions
Can I build a chatbot with Flask and Ollama without an OpenAI API key?
Yes. Ollama runs the model on your own machine and exposes an OpenAI-compatible API at http://localhost:11434/v1. The OpenAI Python SDK requires an api_key value, but Ollama ignores it, so any placeholder such as 'ollama' works. Nothing is sent to OpenAI.
Why does my Flask app get a 404 from Ollama?
The OpenAI-compatible endpoints live under /v1. Set base_url to 'http://localhost:11434/v1', not 'http://localhost:11434'. Without /v1 the SDK calls /chat/completions on the Ollama root, which doesn't exist.
Which Ollama model should I use for a chatbot?
llama3.2 (3B, about 2 GB) is a good default that runs on most laptops without a GPU. For better answers on a machine with 16 GB+ of RAM or a GPU, try a larger model such as llama3.1:8b, qwen2.5 or gemma. Change the OLLAMA_MODEL environment variable to switch models without editing code.
How do I make the chatbot remember the conversation?
LLMs are stateless, so the browser keeps the conversation in a messages array and sends the whole history with every request. The Flask backend adds a system prompt and trims the history to the last 20 messages so it stays inside the model's context window.
How do I stream the response word by word in Flask?
Call client.chat.completions.create with stream=True, then return a Flask Response wrapping a generator that yields each chunk's delta.content. In the browser, read the response with res.body.getReader() and append each decoded chunk to the chat bubble.
How do I share my local Flask chatbot with others?
Add a login (for example HTTP Basic Auth) so strangers can't use your GPU, keep debug mode off, then run 'socketxp connect http://localhost:5001'. SocketXP returns a public HTTPS URL that forwards to your laptop, with no port forwarding or cloud server needed.
Is a local Flask and Ollama chatbot private?
Yes. The model runs on your machine and prompts never leave it unless you choose to expose the app. If you share it over a tunnel, traffic is encrypted with HTTPS between the user and your machine.