
You started with Tailscale. It was the right call at the time.
A handful of Linux edge nodes, a team of engineers who could install the Tailscale client on their laptops, a network that mostly cooperated with WireGuard peer negotiation. Tailscale’s zero-config mesh worked, and it worked well. That’s not in dispute.
But now the fleet has scaled. You have 5,000 Linux edge devices deployed at customer sites across three continents, behind cellular carriers running CGNAT. The devices are a mix of Raspberry Pi 4s, NVIDIA Jetson Orin modules, and custom ARMv7 boards running a stripped Yocto build. You need to SSH into any device on demand, monitor CPU and memory across the fleet in real time, and push firmware updates to 2,000 devices simultaneously — with per-device rollback if an update fails.
Tailscale is not engineered for this job. And the friction compounds at every layer: the mesh peer overhead, the DERP relay fallback, the WireGuard kernel dependency on your custom kernels, and the complete absence of OTA updates or device monitoring in the Tailscale feature set.
This article explains why — and what a purpose-built alternative looks like.
The Core Architecture Difference
Tailscale and SocketXP solve a similar surface problem — getting network access to devices you can’t reach directly — but from opposite architectural starting points.
Tailscale builds a full WireGuard mesh VPN. Every node in the tailnet (your devices, your operator laptops, your CI servers) gets a WireGuard interface and peer entries for every other node it’s authorized to communicate with. The Tailscale control plane distributes public keys and negotiates direct peer-to-peer connections where NAT traversal succeeds. When it fails — which it regularly does behind CGNAT or symmetric NAT — Tailscale falls back to its DERP relay servers (Designated Encrypted Relay for Packets), adding a relay hop in the data path.
Every device in a Tailscale network must run the Tailscale client. Every operator who needs to connect to a device must also run the Tailscale client. All devices are members of the same flat mesh namespace. This is an elegant design for connecting a team’s laptops and servers. It is a significant operational burden for a heterogeneous field device fleet where you cannot control the software environment on operator machines, where devices run on custom kernels that may not ship with wireguard.ko, and where access is always operator-to-device rather than device-to-device.
SocketXP uses a hub-and-spoke reverse proxy model. Each device runs the SocketXP agent, which establishes a single outbound SSL/TLS tunnel to the SocketXP Cloud Gateway on startup. That’s the only persistent network connection the device needs to maintain. When an operator wants to SSH into a device, their request enters the gateway and is routed through the device’s existing outbound tunnel. The device never opens an inbound port. No mesh. No peer negotiation. No kernel module.
The architectural consequence: adding a device to a SocketXP fleet adds exactly one tunnel to the gateway. Adding a device to a Tailscale mesh adds peer state that must be distributed across every other authorized node in the tailnet. At tens of thousands of devices, these are different scaling curves.
Where Tailscale Hits Operational Limits in IoT Fleets
The WireGuard Kernel Module Dependency
WireGuard performs best as a kernel module (wireguard.ko). On mainstream Linux distributions — Ubuntu, Debian, Fedora — it ships by default. On embedded Linux, it frequently does not.
Custom Yocto builds ship exactly the kernel features you specify in your BSP. OpenWRT builds kernel modules from a curated list. Armbian for older SBCs may predate the WireGuard merge into the mainline kernel. If wireguard.ko is not in your device image, Tailscale falls back to wireguard-go, the userspace WireGuard implementation — which is significantly heavier on CPU and memory than the kernel implementation.
For a device with 256 MB RAM running a production workload, a 30–60 MB background daemon consuming elevated CPU for cryptographic operations on every packet is a real constraint. Embedded Linux fleet operators routinely discover this problem after deploying Tailscale to a pilot cohort and before committing to it at scale.
SocketXP’s agent has no kernel module dependency. It is a statically-linked Go binary that opens a standard outbound TLS socket. Any Linux kernel from the past decade can do that.
DERP Relay Fallback and Cellular IoT Networks
CGNAT is the default condition for cellular IoT deployments. Your field devices on LTE or 5G modules almost certainly sit behind carrier-grade NAT — they share public IPs with thousands of other subscribers, have no stable public address, and are fundamentally unreachable via inbound connections.
Tailscale’s NAT traversal works through UDP hole-punching. CGNAT breaks hole-punching because the carrier’s NAT is stateful at a scale that prevents the timing required for successful hole-punch coordination. When hole-punching fails, Tailscale routes traffic through DERP relay servers.
DERP adds latency. More importantly, it creates a dependency on Tailscale’s hosted relay infrastructure — or on your own DERP servers if you self-host, which is an additional piece of infrastructure to operate and maintain. In high-reliability IoT scenarios, adding a relay server in the data path is a new potential point of failure.
SocketXP’s outbound TLS tunnel is not affected by CGNAT. The device’s agent initiates the TLS handshake outbound over port 443 — the same port as HTTPS web traffic, which virtually no firewall or carrier filter blocks. The tunnel is established from the device side; no hole-punching, no relay fallback, no dependency on NAT traversal success.
Tailscale Is a Networking Tool — IoT Fleets Need a Platform
This is the most important practical limitation. Tailscale gives you secure encrypted network connectivity. That is one layer of what managing a Linux IoT fleet requires.
IoT fleet operations also require:
- OTA firmware and software updates delivered to device groups, with per-device rollback on failure
- Device status monitoring — real-time visibility into which devices are online and which are not
- Resource monitoring — CPU, memory, and disk utilization per device with configurable alerting thresholds
- Fleet segmentation by group — so you can target an OTA update to a specific hardware revision or deployment region without touching the rest of the fleet
Tailscale provides none of these. You build them separately, on top of the Tailscale VPN layer, using separate tooling. That is a valid architecture for infrastructure engineers with the time and headcount to build and operate it. It is not what most IoT teams can sustain.
SocketXP packages all of these capabilities — remote access, monitoring, and OTA updates — in the same agent that manages the tunnel. You are not assembling a stack; you are deploying one platform.
Step-by-Step: Deploying SocketXP Across a Linux IoT Fleet
The following covers a production-grade fleet deployment: agent installation, tunnel configuration, device grouping, monitoring, and OTA updates. All commands and configuration parameters shown here are drawn directly from SocketXP documentation.
Prerequisites
- Linux IoT devices (Raspberry Pi, NVIDIA Jetson, any ARMv6/v7/ARM64/x86_64 board running a Debian/Ubuntu/Yocto-based image)
- A SocketXP account (sign up at socketxp.com)
- Your SocketXP auth token (available in the SocketXP web portal after account creation)
- Devices may be behind any NAT or CGNAT — no static IP, port forwarding, or firewall rules required
Step 1: Download and Install the SocketXP Agent
Follow the SocketXP download and installation instructions for your device architecture. The agent is a single binary.
After installation, authenticate the device with your account auth token:
sudo socketxp login
For fleet deployments where you want devices organized into groups from the start, pass the device name and group at login time:
sudo socketxp login\ --iot-device-name "factory-line-a-unit-042" \ --iot-device-group "factory-line-a"
The --iot-device-group flag registers the device in the named group, which you later use as the target for OTA deployments. The device key generated at login is stored at /var/lib/socketxp/device.key — this is the device’s long-term identity credential. The auth token itself is not stored locally.
If your devices are located in the EU region, add --region="eu" to route the device through SocketXP’s EU gateway:
sudo socketxp login\ --iot-device-name "berlin-sensor-099" \ --iot-device-group "eu-sensors" \ --region="eu"
Step 2: Create the /etc/socketxp/config.json Configuration File
Before installing the SocketXP systemd service, create the agent configuration file at /etc/socketxp/config.json. This file defines which local services the agent tunnels and enables optional features like device monitoring.
Minimal SSH fleet config:
{
    "tunnels": [
        {
            "destination": "tcp://127.0.0.1:22"
        }
    ]
}
This configuration tells the agent to establish an outbound tunnel to the local SSH daemon on port 22. Operators can then SSH into the device from the SocketXP web portal or an SSH client — without knowing the device’s IP address, and without the device opening any inbound port.
With device resource monitoring enabled:
{
    "tunnels": [
        {
            "destination": "tcp://127.0.0.1:22"
        }
    ],
    "device_monitoring": true,
    "device_monitoring_threshold": 80.0
}
device_monitoring: true enables real-time CPU, memory, and disk usage monitoring on the device. device_monitoring_threshold sets the alert threshold in percentage — if any of these resources exceeds 80%, the SocketXP platform sends a webhook alert to the URL you register in the portal (more on this in the Monitoring section).
If your device also runs a local web service or diagnostic endpoint that you want to access remotely, add it to the tunnels array:
{
    "tunnels": [
        {
            "destination": "tcp://127.0.0.1:22"
        },
        {
            "destination": "http://127.0.0.1:8080"
        }
    ],
    "device_monitoring": true,
    "device_monitoring_threshold": 80.0
}
Step 3: Install SocketXP as a systemd Service
With the config file in place, install the SocketXP agent as a persistent systemd service:
sudo socketxp service install --config /etc/socketxp/config.json
sudo systemctl daemon-reload
sudo systemctl enable socketxp
sudo systemctl start socketxp
Verify the agent is running and connected:
sudo systemctl status socketxp
● socketxp.service - SocketXP Agent
     Loaded: loaded (/etc/systemd/system/socketxp.service; enabled)
     Active: active (running) since Thu 2026-07-24 09:15:33 UTC; 12s ago
View live agent logs:
journalctl -u socketxp.service -f
From this point, the device appears in the SocketXP portal Devices list. It establishes its outbound tunnel and maintains the connection across reboots. If the network drops, the agent reconnects automatically when connectivity is restored — no manual intervention required.
To restart the agent after a config change:
sudo systemctl restart socketxp
Step 4: SSH into Any Fleet Device
Once a device is online in the SocketXP portal, SSH access requires no knowledge of the device’s IP address and no Tailscale-equivalent client software on the operator’s machine.
Via the SocketXP web portal: Navigate to Devices → select the target device → click the SSH button. A browser-based terminal opens directly into the device’s shell.
Via a local SSH client: Install the SocketXP agent on your operator workstation in slave mode, which creates a local TCP proxy forwarding to the target device’s tunnel. Then connect your normal SSH client to localhost on the proxy port.
Neither path requires the operator’s machine to be registered in a VPN mesh, install a WireGuard interface, or be listed as an authorized peer on the device. This is the practical difference in access model: Tailscale requires all parties (device and operator) to be members of the same tailnet. SocketXP routes operator access through the control plane — the operator authenticates to the gateway, the gateway routes to the device’s tunnel.
For a fleet of 10,000 devices, this means your operations team accesses any device the same way regardless of what’s on their laptop or whether their machine was in Tailscale when the device was provisioned.
Step 5: Enable Fleet-Wide Device Monitoring
SocketXP monitoring has two layers: device status and resource utilization.
Device status monitoring (online/offline) is automatically active for every device once you register a webhook URL in the SocketXP portal (Monitoring tab). When any device goes offline or comes back online, SocketXP posts a JSON payload to your webhook:
{
  "DeviceId": "2222-bbbb-ccccc-ddddd1234",
  "DeviceName": "factory-line-a-unit-042",
  "Status": "DOWN"
}
This integrates directly with Slack (using an incoming webhook URL), PagerDuty, or any custom alerting endpoint that accepts HTTP POST.
Device resource monitoring requires the device_monitoring: true setting in config.json (Step 2 above). When CPU, memory, or disk usage exceeds device_monitoring_threshold on a device, SocketXP sends a resource alert to the same webhook:
{
  "DeviceId": "1234aaaa-bbbb-ccccc-ddddd1234",
  "DeviceName": "factory-line-a-unit-042",
  "CPUUsagePercent": "91",
  "MemUsagePercent": "72",
  "DiskUsagePercent": "43"
}
Resource alerts are throttled to one notification per 5-minute window per device, preventing alert storms during transient spikes. All alerts are also logged in the Activity Logs section of the portal for audit and retrospective analysis.
With Tailscale, you would build this monitoring layer separately — a metrics agent (Prometheus Node Exporter, telegraf), a scraping infrastructure (Prometheus server or Grafana Agent), a storage backend (Prometheus TSDB, InfluxDB), and alerting rules (Alertmanager, Grafana alerts). That stack is powerful and appropriate at mature engineering organizations. It is a substantial build-and-operate investment that SocketXP replaces with a configuration parameter.
Step 6: Push OTA Firmware or Software Updates to a Device Group
SocketXP’s OTA update workflow is built around a two-step model: upload an artifact to the SocketXP Artifact Registry, then create a deployment targeting a device group.
Supported artifact types:
- Application binaries
- Firmware files
- Debian/APT packages
- Docker container images
- Configuration files
- Shell scripts
The artifact structure: Package your update as a tar.gz archive containing the payload (the binary, package, or config file) and an update.sh shell script that handles the installation logic on the device side. The SocketXP agent extracts the archive to /tmp and executes update.sh.
A production update.sh for a binary update looks like this:
#!/bin/bash
# stop the running service
systemctl stop myapp

# back up the existing binary
mv /usr/bin/myapp /usr/bin/myapp.bkup

# deploy the new binary
mv myapp /usr/bin/myapp

# start the updated service
systemctl start myapp

# verify the update succeeded
if systemctl --quiet is-active myapp; then
    rm -f /usr/bin/myapp.bkup
else
    # rollback to the previous version
    mv /usr/bin/myapp.bkup /usr/bin/myapp
    systemctl start myapp
fi
This pattern — stop, backup, deploy, verify, rollback on failure — is the standard IoT OTA workflow. The execution logic lives in your script; SocketXP handles the secure delivery and per-device status tracking.
Deployment flow via the portal:
- Navigate to OTA Updates → Artifacts → Upload new artifact
- Upload your
tar.gzfile and specify the version
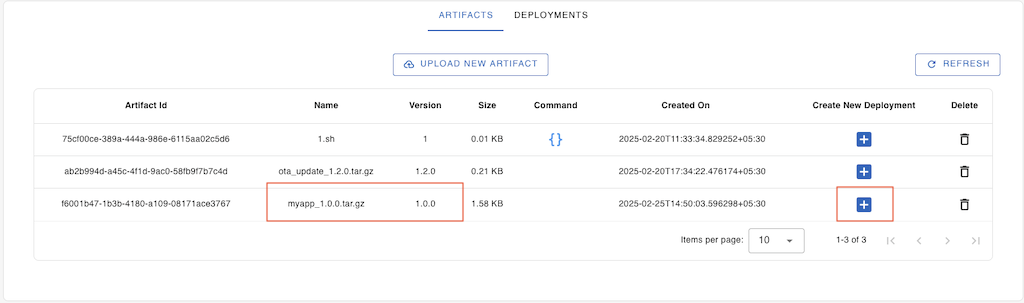
- Click the
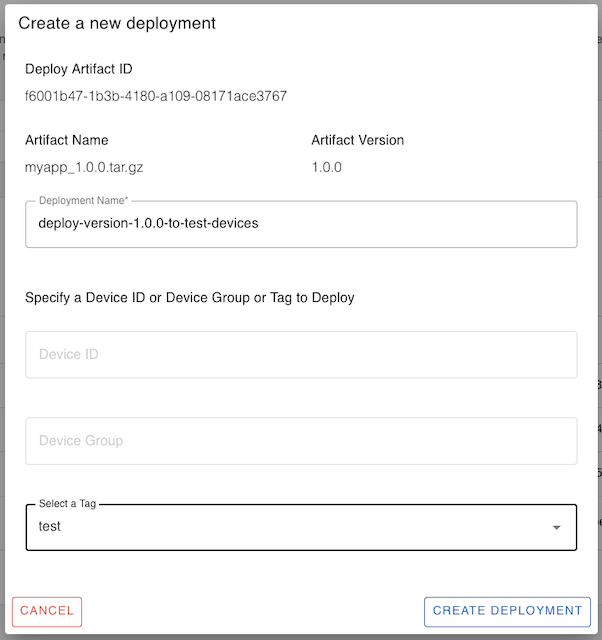
+icon next to the artifact to create a new deployment - Specify the target: a single device ID, or an
--iot-device-groupname set at login - Click Create Deployment
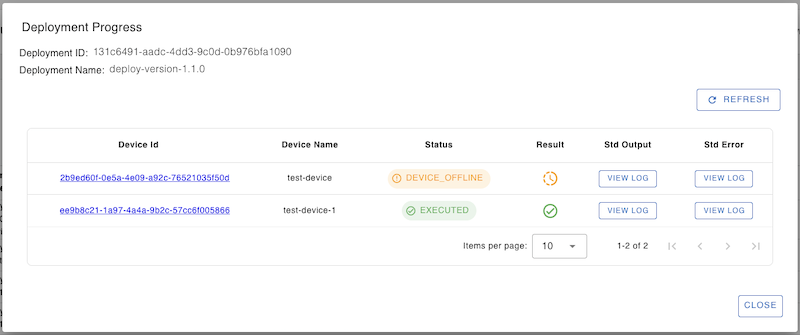
SocketXP delivers the artifact to each device in the target group via its outbound tunnel (no new inbound ports required), executes update.sh, and reports per-device status — pending, downloading, installing, success, or failed — in real time in the portal. You can view stdout and stderr from the update script on a per-device basis for diagnosing failures.
With Tailscale, deploying firmware to a device group is not a built-in capability. You would build it: an SSH-based script that iterates device IPs over the Tailscale network, or a configuration management tool (Ansible, Salt) layered on top of the VPN.
Deploying to a Fleet: Zero-Touch Provisioning
For fleet-scale deployment, you should not run socketxp login manually on each device. SocketXP’s mass installation approach uses a golden disk image: configure one reference device, clone its image to every device in the fleet, and let a first-boot script handle per-device registration automatically.
The workflow in brief:
- Install the SocketXP agent on a reference device and create
/etc/socketxp/config.json - Delete
/var/lib/socketxpto strip device-specific credentials before cloning - Add a first-boot script at
/etc/network/if-up.d/register_device.shthat callssocketxp loginwith a DEVICE_REGISTRATION token, starts thesocketxpservice, and self-deletes after successful registration
#!/bin/bash

AUTH_TOKEN="your-device-registration-token-here"

# Skip if already registered
if [ -f /var/lib/socketxp/device.key ]; then
  echo "Already registered. Exiting." >> /var/log/register_device.log
  exit 0
fi

# Wait for internet connectivity
while ! ping -c 1 google.com > /dev/null 2>&1; do
  sleep 10
done

# Register this device with SocketXP
sudo socketxp login $AUTH_TOKEN >> /var/log/register_device.log 2>&1

# Verify registration succeeded
if [ ! -f /var/lib/socketxp/device.key ]; then
    echo "Error: registration failed." >> /var/log/register_device.log
    exit 1
fi

# Start the SocketXP agent
systemctl start socketxp

# Self-delete — no longer needed after first registration
rm /etc/network/if-up.d/register_device.sh
- Capture a golden disk image with
ddand clone it to every device’s SD card - Power on — each device independently generates its own unique
device.key, connects to the SocketXP gateway, and appears in the portal within seconds
No technician involvement, no manual per-device steps.
For the complete dd image creation and flashing commands, see the zero-touch provisioning - IoT fleet mass installation guide.
Security Architecture: No Inbound Ports, mTLS, Isolated Device Connectivity
Outbound-Only Tunnels
Every SocketXP device tunnel is initiated outbound by the device agent. From a firewall perspective, the device makes an outbound TLS connection to the SocketXP gateway — the same network behavior as any HTTPS client making a web request. No inbound ports are opened. No firewall rules must be added. A network security audit of the device sees outbound TLS traffic on port 443; it does not see a listening VPN socket.
Mutual TLS Authentication — Zero Trust for Every Device Connection
mTLS is a major requirement across IoT security frameworks — NIST 800-213, IEC 62443, and ISO/IEC 30141 all require mutual authentication between devices and the management plane. SocketXP implements mTLS natively on all device tunnel connections.
Standard TLS vs mTLS — the critical difference:
In standard TLS, only the server presents a certificate. The client verifies the server’s identity, but the server accepts connections from any client. This is the model used for HTTPS websites — sufficient when you trust any browser connecting to your site, not sufficient when managing a fleet of IoT devices where every connecting device must prove it is authorized.
In mTLS, both the device and the gateway present and verify X.509 certificates before the connection is established. The SocketXP Cloud Gateway verifies each IoT device’s TLS client certificate against its trusted Certificate Authority. Any connection using a certificate not issued by that trusted CA is rejected outright — a counterfeit device or a rogue agent cannot even complete the handshake.
How SocketXP implements mTLS:
- Every IoT device registered with SocketXP is issued a unique TLS certificate and key at provisioning time.
- The SocketXP Cloud Gateway is configured to require and verify client certificates on all device tunnel connections — no certificate, no connection.
- The gateway’s built-in PKI CA module acts as a private Certificate Authority — it issues certificates to IoT devices and to end users, and signs all certificates with its own root. Only devices and users holding a certificate issued by this CA can authenticate.
- For organizations with strict data residency or compliance requirements, the self-hosted SocketXP deployment supports BYOCA (Bring Your Own Certificate Authority) — you anchor your own private CA on-premises to issue certificates to devices and access endpoints, with the built-in PKI CA as an optional fallback.
Why this matters more than WireGuard’s handshake:
Tailscale uses WireGuard’s own key exchange protocol (Noise Protocol Framework) for peer authentication — which is cryptographically sound but uses raw public keys, not X.509 certificates.
X.509 certificates carry identity metadata (subject, issuer, SAN fields, expiry), can be issued and revoked by a CA, and integrate directly with existing PKI infrastructure and compliance audit trails.
For IoT fleets subject to industrial security standards, the X.509/mTLS model is what auditors and certification bodies specifically require — it maps directly to the certificate management controls in IEC 62443-3-3 and NIST SP 800-213.
Device Isolation
In a Tailscale mesh, a compromised node has WireGuard network connectivity to every other node in the tailnet it is authorized to reach. A compromised field device could potentially reach your staging infrastructure or other field devices at the network layer.
In SocketXP’s hub-and-spoke model, devices do not have direct network connectivity to each other. All traffic routes through the gateway control plane. A compromised field device’s tunnel can be revoked in the SocketXP portal immediately — the device loses all connectivity to the control plane, and the blast radius is contained to that single device.
SSH Key Management at Fleet Scale
For large fleets, managing SSH public keys across thousands of devices becomes an operational problem: distributing keys means touching every device, and key rotation compounds that at scale.
SocketXP eliminates this entirely through automatic short-lived SSH key management. Rather than distributing long-lived SSH public keys to devices, SocketXP’s built-in SSH key management tool automatically generates a single-use SSH public/private key pair at the moment an operator initiates a session.
It syncs the public key to the target device just for that login, and immediately cleans it up — trashes it — as soon as the user logs in. The next SSH session by the same operator requires a brand new key pair. No static keys reside on the device between sessions.
Access to initiate a session is gated by SSO authentication — operators must complete a successful SSO login (with 2FA) through your organization’s OAuth provider (Microsoft 365 or Google G-Suite) before SocketXP will issue and sync a key.
This means the SSH key lifecycle is controlled by your existing identity provider: when an operator leaves the team and their SSO account is disabled, they cannot authenticate to obtain a key — no key rotation across 10,000 devices required.
Tailscale vs. SocketXP: Side-by-Side for IoT Fleet Engineers
| Dimension | Tailscale | SocketXP |
|---|---|---|
| Network model | WireGuard mesh VPN | Outbound SSL/TLS reverse proxy |
| Kernel module requirement | Yes (WireGuard kernel mod preferred) | None |
| CGNAT support | DERP relay fallback | Outbound TLS — always works |
| Client required on operator machine | Yes (Tailscale must be installed) | No (browser terminal or SSH via portal) |
| SSH fleet access | Via Tailscale SSH feature | Built-in |
| Device monitoring (CPU, memory, disk) | Not included | Built-in |
| OTA firmware/software updates | Not included | Built-in |
| Fleet device grouping | Not included | Via --iot-device-group at login |
| Artifact registry for updates | Not included | Built-in |
| Scalability target | Strong for team/dev infrastructure | Designed for 100K+ IoT devices |
| Embedded Linux compatibility | Requires wireguard.ko or wireguard-go | Single static binary, no dependencies |
| Device authentication | WireGuard Noise Protocol (raw public keys) | mTLS with X.509 certificates (CA-issued, revocable) |
| Compliance-ready PKI | No (no X.509 / CA chain) | Yes (PKI CA or BYOCA) |
When Tailscale Is the Right Choice
This is worth stating directly because the engineering context determines the right tool.
Tailscale is an excellent choice when:
- You are connecting a team’s development machines, servers, and CI runners into a private network where everyone can install the Tailscale client
- Your nodes run mainstream Linux distributions (Ubuntu, Fedora, Debian) on hardware where
wireguard.kois available and supported - The primary use case is device-to-device communication rather than operator-to-device access
- Fleet size is in the tens or low hundreds of nodes, not tens of thousands
- You do not need OTA updates, resource monitoring, or device group targeting as platform features
For internal infrastructure networking — connecting your build machines, staging servers, and developer laptops — Tailscale is purpose-built and excellent. For a production Linux IoT fleet deployed at customer sites, in the field, on cellular networks, running on embedded hardware — the tool-to-problem fit breaks down.
Production Hardening Checklist
Before treating a SocketXP-managed IoT fleet as production-ready, verify each of these:
- Auth token scoping: Use a separate auth token per environment (dev, staging, production). If a production token is compromised, revoke it from the portal without affecting staging devices.
- Device group taxonomy: Establish group naming conventions at provisioning time (
--iot-device-group). OTA deployments target groups — a poorly named or over-broad group can trigger an update on the wrong devices. - Device monitoring thresholds calibrated to workload: The default
device_monitoring_thresholdis 80%. For a device running a memory-intensive workload at steady state, set the threshold above the normal operating range to avoid false alerts. - Webhook reliability: Register a webhook endpoint that is genuinely reachable from the SocketXP gateway. Test it by taking a device offline and confirming you receive the
"Status": "DOWN"payload. An unreachable webhook silently drops alerts. update.shrollback path tested: Run the rollback path of your OTA update script deliberately in a staging environment before production deployment. The rollback branch executes only on failure — it is the branch most likely to have untested bugs.- Artifact checksums: Include a checksum file in your
tar.gzartifact alongside the binary, and verify the checksum at the start ofupdate.shbefore stopping the running service. This catches corrupted transfers before a potentially destructive installation step. - systemd service hardening: Add
Restart=alwaysandRestartSec=10to the SocketXP systemd unit to ensure the agent recovers from transient crashes without operator intervention on unattended field devices. - Journald forwarding for audit trails: Forward
journalctl -u socketxp.servicelogs to your centralized log infrastructure (Loki, Splunk, CloudWatch Logs) viaForwardToSyslog=yesin/etc/systemd/journald.conffor compliance and post-incident analysis. - Revoke departed operators promptly: Access control is managed at the SocketXP account level. When an engineer leaves the team, remove their account access in the portal. Their ability to SSH into fleet devices, trigger OTA deployments, or view monitoring data terminates immediately.
- Combine with
iptablesDROP-all inbound: SocketXP’s outbound-only tunnel removes the need for inbound network access. Reinforce this by configuringiptablesto drop all unsolicited inbound traffic on IoT devices. If a SocketXP agent is misconfigured or compromised, there is no inbound socket for an attacker to reach.
Architectural Summary
The fundamental difference between Tailscale and SocketXP for Linux IoT fleet management is not a feature checklist. It is an architectural one.
Tailscale solves a networking problem: creating encrypted, authenticated connectivity between nodes. It solves that problem well for the case where all nodes are general-purpose Linux machines with mainstream kernels and where the network topology is flat — every node can potentially talk to every other node. That architecture matches internal infrastructure; it does not match the IoT field deployment model, where devices are constrained, kernels are custom, CGNAT is the norm, access is always operator-to-device, and the platform must also handle firmware updates and health monitoring.
SocketXP solves an IoT fleet management problem: giving engineering and operations teams persistent, secure access to a large, heterogeneous fleet of Linux edge devices — with the ability to monitor their health and push software updates — from a single platform, without any of the per-device networking prerequisites that Tailscale requires.
If your environment is a massive Linux IoT fleet deployed in the field, on cellular, on embedded hardware, SocketXP is the right architectural choice. Start a 30-day free trial with no credit card required.
For further reading on SocketXP’s IoT capabilities:
- IoT Remote Access
- IoT OTA Firmware Updates
- IoT Device Monitoring
- Raspberry Pi Remote Access
- Zero-Touch Provisioning
- SSH Key Management
- Cloudflare Tunnel Alternative for IoT Devices
- Cloudflare Tunnel Alternative for Raspberry Pi
- Self-Hosted Cloudflare Tunnel Alternative
- ngrok Alternative for IoT Production
Frequently Asked Questions
What is a lightweight alternative to Tailscale for Linux IoT fleet management?
SocketXP is a lightweight alternative to Tailscale built specifically for Linux IoT fleet management. Instead of a WireGuard mesh VPN, SocketXP uses outbound SSL/TLS reverse proxy tunnels — a hub-and-spoke model that scales linearly, requires no kernel module, and runs on constrained hardware like Raspberry Pi, NVIDIA Jetson, or any ARMv6/v7/ARM64 device. It also includes SSH remote access, device monitoring, and OTA firmware updates in a single agent binary.
Why does Tailscale not scale well for large IoT fleets?
Tailscale's mesh architecture means every node maintains WireGuard peer entries for every other node it can talk to, which grows in complexity as fleet size increases. It also requires the Tailscale client on every machine that needs access — including operator laptops — and does not include OTA firmware updates, resource monitoring, or fleet management features that IoT deployments require.
Does SocketXP require a WireGuard kernel module like Tailscale?
No. SocketXP's agent is a single statically-linked binary that establishes outbound SSL/TLS tunnels. It has no kernel module dependencies, making it compatible with custom Yocto builds, Armbian, OpenWRT, and any embedded Linux kernel that ships without WireGuard support.
How does SocketXP handle CGNAT for field-deployed IoT devices?
SocketXP agents initiate outbound TLS connections to the SocketXP Cloud Gateway. Because the connection originates from the device, CGNAT, symmetric NAT, and enterprise firewalls are bypassed transparently — no router configuration, no port forwarding, and no relay fallback is required.
Can SocketXP replace Tailscale for SSH access to 10,000 Linux IoT devices?
Yes. SocketXP is designed for SSH remote access to large Linux IoT fleets. Each device runs the SocketXP agent, which maintains an outbound tunnel. Operators can SSH into any device via the SocketXP web portal or an SSH client — without needing to install any client app on the access device, and without knowing the device's IP address.
Does SocketXP support OTA firmware updates for Linux IoT fleets?
Yes. SocketXP includes an OTA update platform. You upload an artifact (application binary, firmware, Debian package, Docker container, config file, or shell script) to the SocketXP Artifact Registry, then create a deployment targeting a device group or individual devices. The agent on each device downloads and executes the payload, and deployment status is tracked per device in the portal.
How do I provision SocketXP across a large IoT fleet?
Run 'sudo socketxp login
--iot-device-name --iot-device-group ' on each device during provisioning — either manually, via Ansible, or by baking the login command into a first-boot cloud-init script. After login, install SocketXP as a systemd service with 'sudo socketxp service install --config /etc/socketxp/config.json' so the agent starts automatically on every boot. Does Tailscale include IoT device monitoring or OTA updates?
No. Tailscale is a networking tool that creates encrypted mesh VPN connections between devices. It does not include device status monitoring, resource alerting, OTA firmware updates, or fleet management dashboards. These capabilities require separate tooling on top of Tailscale, whereas SocketXP bundles them into a single platform.