
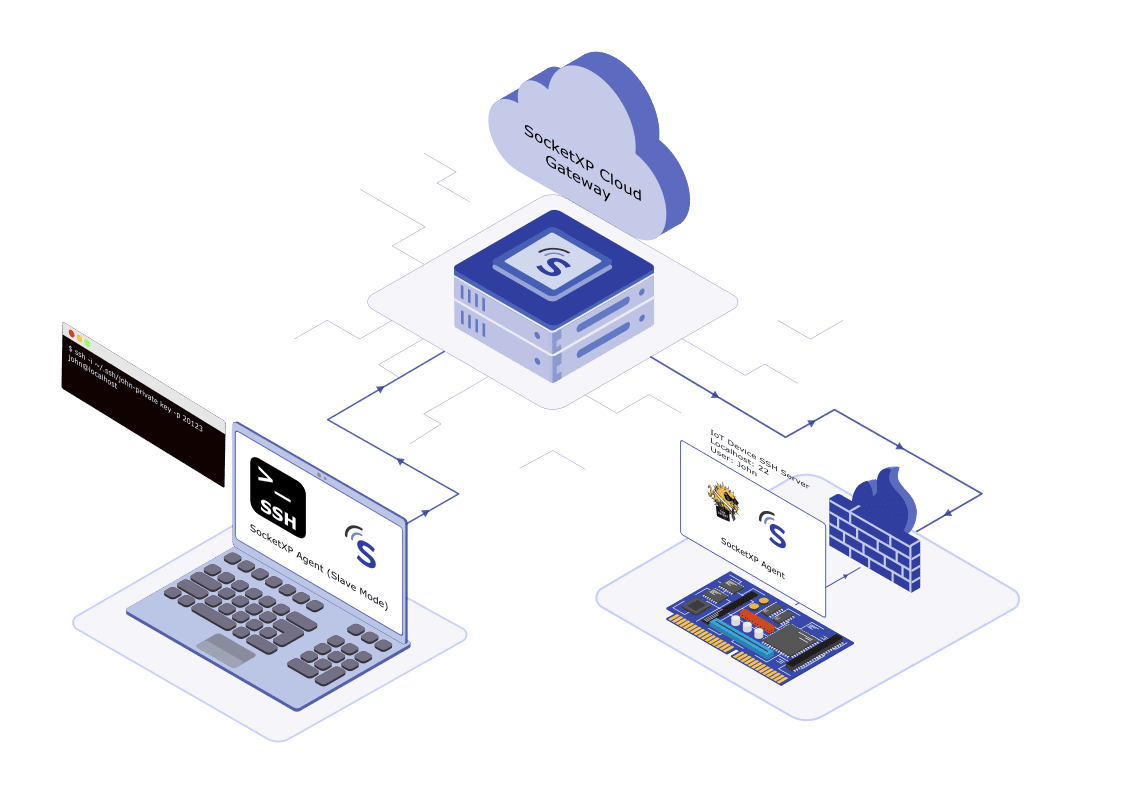
A headless Raspberry Pi setup — one without a connected monitor, keyboard, or mouse — is the standard deployment model for production IoT projects, home automation controllers, edge compute nodes, and remote field devices. It is more compact, power-efficient, and operationally practical than maintaining a desktop peripherals stack per device. For the complete Raspberry Pi remote access solution covering SSH, VNC, web apps, and more, see the SocketXP overview.
Headless Pi remote access in 4 steps:
- Flash the SD card using Raspberry Pi Imager — use the gear icon (⚙) to pre-configure SSH, WiFi SSID/password, and user credentials before writing
- First boot — insert the SD card, power on; the Pi connects to WiFi and starts SSH automatically (no monitor or keyboard needed)
- Install SocketXP on the Pi via local SSH (
socketxp login <token>, thensocketxp connect tcp://localhost:22) - Access from anywhere — SSH into your Pi via the SocketXP web terminal in any browser, or use an SSH client via SocketXP slave mode on your laptop
No monitor, no keyboard, no port forwarding — ever.
The Headless Setup Challenge
The fundamental challenge with headless Raspberry Pi deployment is the bootstrap problem: you need to be able to SSH into the Pi to configure it, but SSH is disabled by default and WiFi credentials are not pre-configured. Traditionally, this required either:
- Connecting a monitor and keyboard for initial configuration
- Manually creating configuration files on the microSD card from another computer
- Using a wired Ethernet connection to get initial network access
Raspberry Pi Imager (v1.7+) solves the bootstrap problem entirely by embedding SSH enablement, WiFi credentials, and user account configuration directly into the image before writing — eliminating the need for any manual file editing or peripheral connection.
Once the Pi is running and accessible on the local network, SocketXP solves the remote access challenge: it creates a secure outbound tunnel that makes the Pi accessible from anywhere over the internet, even behind NAT, CGNAT, and firewalls.
Phase 1: Headless First-Boot Configuration
Step 1: Install Raspberry Pi Imager
Download and install Raspberry Pi Imager on your laptop (available for Windows, macOS, and Ubuntu).
Step 2: Configure the OS Image with SSH and WiFi
- Open Raspberry Pi Imager
- Click Choose OS → Raspberry Pi OS (other) → Raspberry Pi OS Lite (64-bit) (or 32-bit for Pi 2/Pi Zero)
- Click Choose Storage and select your microSD card
- Click the gear icon (⚙) to open Advanced Options — this is the key step
In Advanced Options, configure:
Advanced Options:
  ✅ Enable SSH
     ○ Use password authentication     ← select this for initial setup
     ○ Allow public-key authentication only

  ✅ Set username and password
     Username: pi
     Password: [your-secure-password]

  ✅ Configure wireless LAN
     SSID: [your-wifi-network-name]
     Password: [your-wifi-password]
     Wireless LAN country: [your-country-code, e.g., US]

  ✅ Set locale settings
     Time zone: [your-timezone]
     Keyboard layout: us
- Click Save, then Write. Raspberry Pi Imager writes the OS image to the microSD card with all these settings pre-embedded.
Step 3: Boot the Raspberry Pi Headlessly
Insert the microSD card into your Raspberry Pi and power it on. No monitor or keyboard is needed.
The Pi performs its first-boot initialization (resizes the filesystem, applies the pre-configured settings) and then:
- Connects to the WiFi network using the credentials you configured
- Starts the SSH server
- Becomes reachable on the local network within approximately 60–90 seconds
Step 4: Verify Local SSH Connectivity
From your laptop (on the same WiFi network), test that the Pi is reachable:
$ ping raspberrypi.local
PING raspberrypi.local (192.168.1.45): 56 data bytes
64 bytes from 192.168.1.45: icmp_seq=0 ttl=64 time=2.4 ms
SSH into the Pi on the local network to confirm it’s working:
$ ssh pi@raspberrypi.local
The authenticity of host 'raspberrypi.local (192.168.1.45)' can't be established.
ED25519 key fingerprint is SHA256:xxxxxxxxxxxx.
Are you sure you want to continue connecting (yes/no/[fingerprint])? yes

pi@raspberrypi:~ $
You are now in a shell on your headless Raspberry Pi. The local network verification step is complete — the Pi does not need to be on the same network for the SocketXP step.
Troubleshooting: If raspberrypi.local does not resolve, use your router’s admin panel DHCP client list to find the Pi’s IP address, or use nmap -sn 192.168.1.0/24 to scan for new devices.
Phase 2: Remote Access from Anywhere with SocketXP
Local SSH works only when your laptop and Pi are on the same network. To access your headless Pi from anywhere over the internet, install SocketXP.
Step 5: Install the SocketXP Agent on the Raspberry Pi
From your local SSH session (established in Step 4), follow the download and install instructions to install the SocketXP agent on your Pi.
The SocketXP portal provides a single-touch installation command that installs, configures, and starts the SocketXP agent as a systemd service in one step:
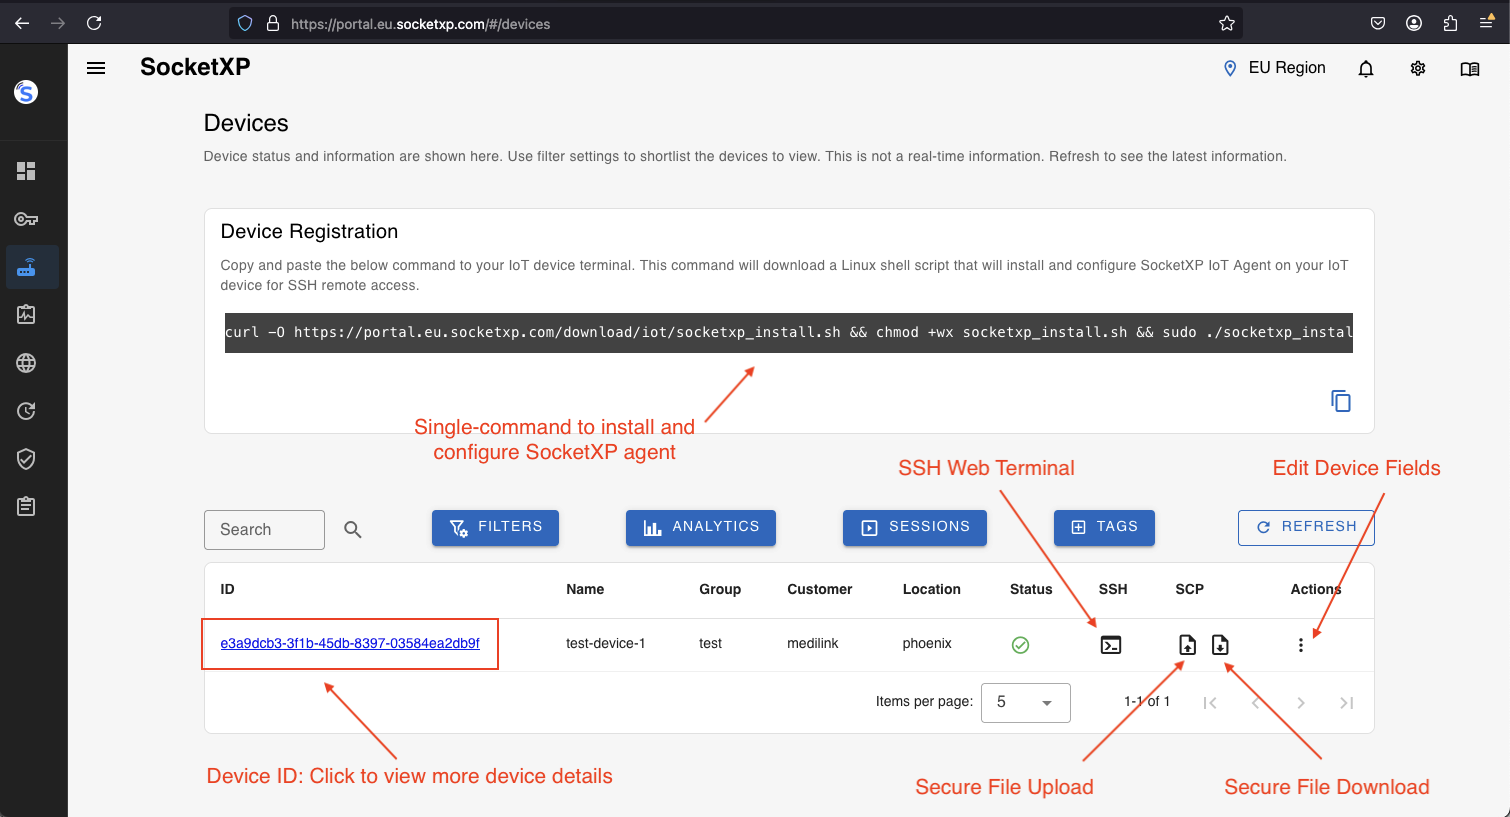
Copy and paste the command from the portal into your Pi’s SSH session.
Step 6: Authenticate and Connect to SocketXP Cloud Gateway
If installing manually rather than via the single-touch command:
$ socketxp login [your-auth-token-goes-here]
Create the secure SSH tunnel:
$ socketxp connect tcp://localhost:22

Connected to SocketXP Cloud Gateway.
Access the device securely using the SocketXP agent in IoT Slave Mode.
Your headless Raspberry Pi now appears in the SocketXP Devices portal as online.
Step 7: Configure SocketXP as a Persistent systemd Service
To ensure the SocketXP tunnel survives reboots and network disruptions without requiring manual intervention:
$ sudo systemctl enable socketxp
$ sudo systemctl start socketxp
$ sudo systemctl status socketxp
The single-touch installation command from the portal configures this automatically.
Phase 3: Accessing Your Headless Pi from Anywhere
Via Browser (No SSH Client Needed)
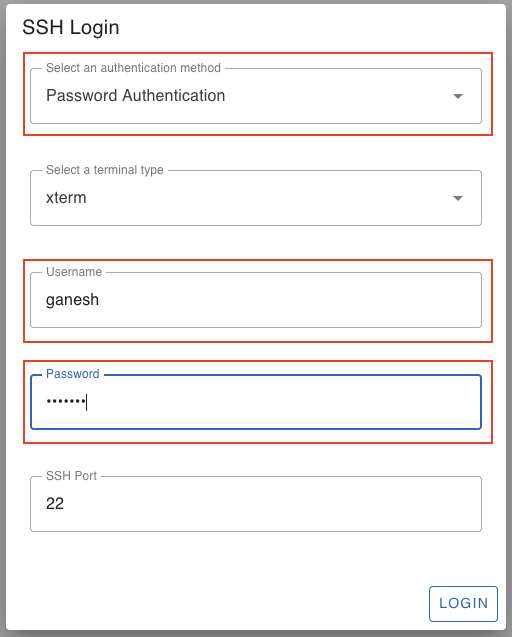
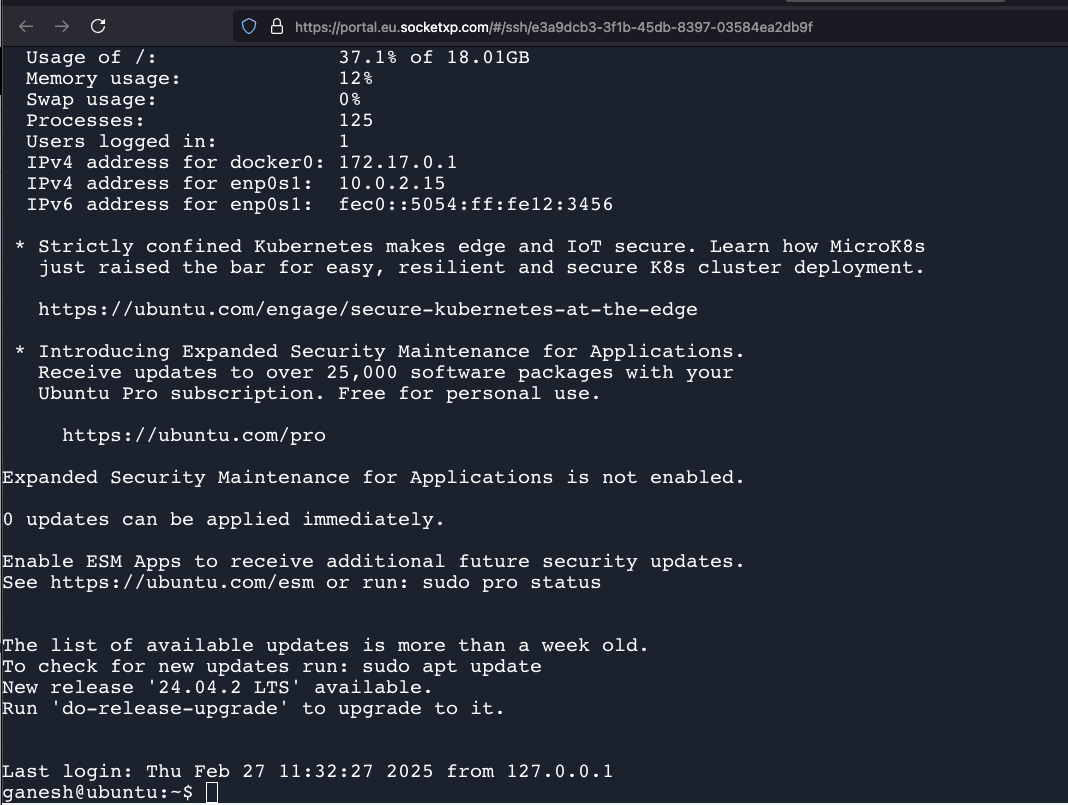
Log into the SocketXP Web Portal from any browser on any device. Navigate to Devices, find your headless Raspberry Pi, and click the terminal icon. You get a full SSH shell directly in the browser.
Via SSH Client (PuTTY / ssh CLI)
On your access device (Windows, Mac, or Linux), install SocketXP in slave mode and create a local proxy:
$ socketxp connect tcp://localhost:3000 \
    --iot-slave \
    --peer-device-id "your-raspberry-pi-device-id" \
    --peer-device-port 22 \
    --authtoken your-auth-token

Listening for TCP connections at:
Local URL -> tcp://localhost:3000
Then SSH in using your preferred client, say OpenSSH client:
$ ssh -i ~/.ssh/id_rsa pi@localhost -p 3000
pi@raspberrypi:~ $
You can try SSH remote login using any SSH client (PuTTY) of your choice.
Zero-Touch Deployment: Automating SocketXP on First Boot
For deploying multiple headless Raspberry Pi devices without manual SSH setup on each one, embed the SocketXP install command in a first-run script on the microSD card.
Create a file named firstrun.sh in the /boot partition of the microSD card after writing the OS image:
#!/bin/bash
# Install SocketXP agent on first boot
curl -O https://portal.socketxp.com/download/arm64/socketxp
chmod +x socketxp
sudo mv socketxp /usr/local/bin/

# Authenticate and configure as systemd service
sudo socketxp login "your-auth-token-here"
sudo socketxp connect tcp://localhost:22

# (The single-touch command from the portal handles this in one step)
The SocketXP portal’s single-touch installation command is the recommended approach — it handles download, install, authentication, tunnel configuration, and systemd service setup in a single command, designed specifically for zero-touch fleet provisioning.
SocketXP vs Tailscale vs ngrok for Headless Raspberry Pi Deployments
Headless Raspberry Pi devices — deployed in remote locations with no physical access — demand remote access tools that are robust, lightweight, and manageable at scale. Here is how the common alternatives compare:
| Criterion | ngrok | Tailscale | SocketXP |
|---|---|---|---|
| Works on headless Pi (no GUI) | Yes | Yes | Yes |
| Zero-touch deployment support | Limited | Limited | Yes — single-touch install command |
| IoT fleet management portal | No | No | Yes |
| Remote OTA updates | No | No | Yes — push firmware/scripts to fleet |
| Device health monitoring | No | No | Yes — CPU, memory, disk metrics |
| Works behind CGNAT | Yes | Yes (DERP relay) | Yes |
| Scales to 10,000+ headless devices | Not designed for IoT | Complex mesh | Native IoT architecture |
| VPN client on access device | No | Yes | No — browser terminal available |
| Session time limits | Yes (free tier) | No | No |
| Agent resource footprint | Low | Moderate (kernel VPN) | Minimal userspace binary |
For one or two Raspberry Pi devices in a hobby project, any of the three tools works. For production headless deployments at scale — factory devices, field sensors, remote edge nodes — the differences are critical:
ngrok is not built for IoT device management. It has no fleet portal, no OTA update mechanism, and the free tier imposes session time limits that disrupt persistent device connections. It is designed for developer use cases (webhook testing, demo sharing), not for managing fleets of headless production devices.
Tailscale requires its VPN client on every machine that needs access — including every engineer’s laptop and phone. For visiting technicians, field support teams, or anyone using a shared device, this is operationally cumbersome. Tailscale also provides no IoT-specific management features: no OTA updates, no device health dashboards, no centralized device portal.
SocketXP provides a zero-touch deployment workflow for headless Pi fleets: the single-touch installation command from the portal installs the agent, authenticates it, configures the tunnel, and sets up the systemd service in one step — across as many headless devices as needed. The SocketXP portal then shows all devices with their online/offline status, and provides SSH, OTA updates, and monitoring from a single browser interface — without any VPN client required on the access side.
Security Best Practices for Headless Deployments
- Switch from password to SSH key authentication immediately after first boot — passwords are brute-force targets. Generate a key pair on your laptop (
ssh-keygen -t ed25519) and add the public key to~/.ssh/authorized_keyson the Pi, then setPasswordAuthentication noin/etc/ssh/sshd_config - Change the default username from
pito a non-obvious name to prevent targeted login attempts - Disable root SSH login: set
PermitRootLogin noin/etc/ssh/sshd_config - Keep Raspberry Pi OS updated (
sudo apt update && sudo apt upgrade) — headless devices often miss manual update cycles; automate withunattended-upgrades - Use SocketXP RBAC to restrict which team members can access which Pi devices
- Rotate auth tokens for SocketXP periodically; revoke tokens for decommissioned Pis immediately
- Monitor SSH access logs via
journalctl -u sshor ship logs to a centralized SIEM
Conclusion
Headless Raspberry Pi deployment is the production-grade approach for all serious IoT, home automation, and edge compute projects. The combination of Raspberry Pi Imager’s advanced configuration (for zero-touch first-boot setup) and SocketXP’s outbound tunnel (for permanent remote access from anywhere) eliminates the need for any physical access after the SD card is written and the device is powered on.
This approach works equally well for a single Pi in your home and for deploying hundreds of Pi devices in the field — with SocketXP’s portal providing centralized visibility and access control across the entire fleet.
For the full list of Raspberry Pi remote access options — SSH, VNC, web app tunnels, Windows, Mac, and mobile — see the complete SocketXP solution page.
Frequently Asked Questions
How do I SSH into a headless Raspberry Pi without finding its IP address?
Use 'ssh pi@raspberrypi.local' — the Pi broadcasts its hostname via mDNS (Avahi/Bonjour). On Windows, install Bonjour Print Services if mDNS resolution doesn't work. Once SocketXP is installed on the Pi, you no longer need the local IP at all — access is via the SocketXP portal from anywhere.
Can I configure WiFi on a headless Raspberry Pi without a monitor?
Yes. Raspberry Pi Imager's advanced options (the gear icon) let you pre-configure WiFi SSID, password, SSH, and user credentials before writing the image. The Pi connects to WiFi automatically on first boot without requiring a monitor or keyboard.
Does headless Raspberry Pi remote access work behind CGNAT?
Yes. SocketXP's outbound tunnel architecture works regardless of ISP NAT type. The Pi initiates an outbound TLS connection to the SocketXP cloud gateway, bypassing CGNAT, NAT, and firewall restrictions without any router configuration.
Can I automate SocketXP installation on a headless Raspberry Pi at first boot?
Yes. Use Raspberry Pi Imager's 'first-run script' feature or add a cloud-init script to the microSD card to install and configure SocketXP automatically on first boot. This is particularly useful for zero-touch deployment of multiple Pi devices in the field.