
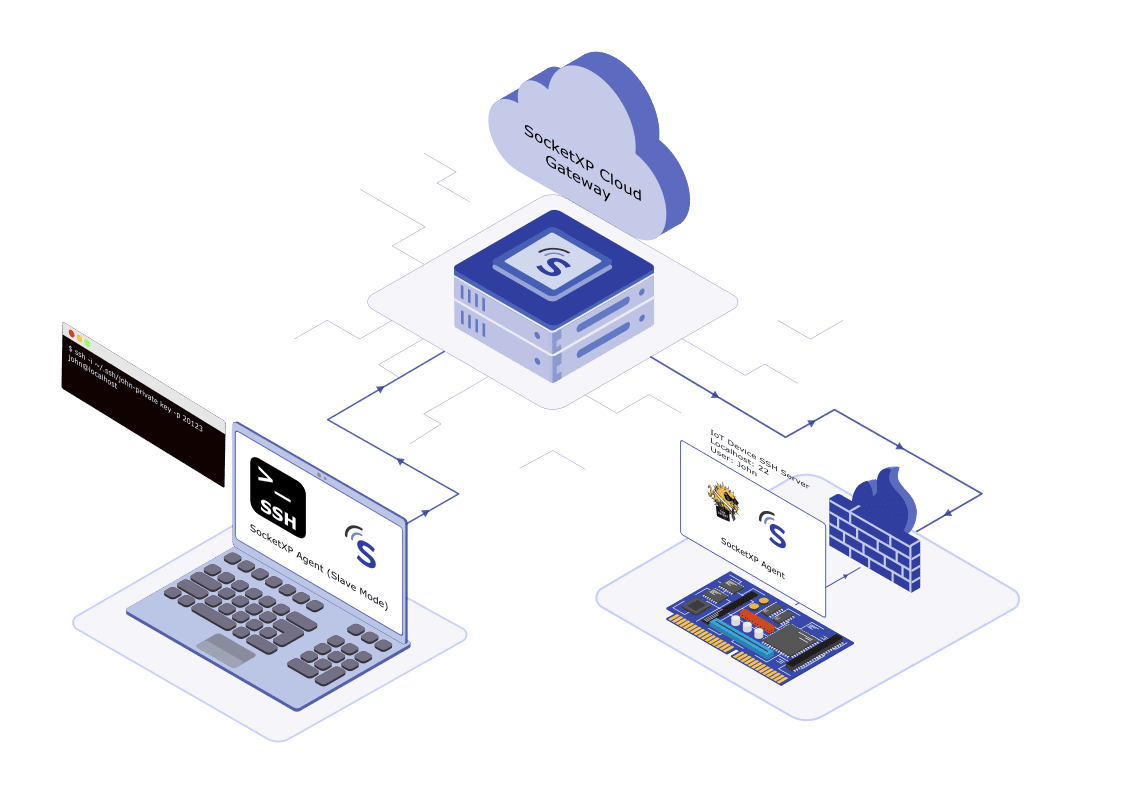
If you’ve tried to SSH, VNC, or RDP directly into your IoT device from outside your network and gotten a connection timeout or “connection refused,” you’ve hit the NAT/firewall wall. This article is the practical fix — how to confirm that’s actually what’s happening, and how to set up a working connection without touching your router.
Confirm It’s Actually NAT or a Firewall
Before troubleshooting further, rule out the obvious: is this really a NAT/firewall block, or something else (wrong IP, service not running, wrong port)?
- From inside the same network, connect to the device using its local IP (e.g.
ssh pi@192.168.1.50). If this works, the SSH/VNC/RDP service itself is fine — the problem is purely inbound routing from outside. - From outside the network, connecting to the router’s public IP on the same port times out or is refused. This is the expected NAT/firewall behavior — routers do not forward unsolicited inbound traffic to any internal device unless explicitly configured to.
- Check for CGNAT: compare your router’s reported WAN IP (in its admin page) against what an external service reports as your public IP —
curl ifconfig.merun from a device on that network. If they don’t match, your ISP is using Carrier-Grade NAT, and port forwarding is not possible at all, regardless of router configuration, because your router doesn’t hold a real public IP to forward to.
If that matches what you’re seeing, the fix below applies directly.
Can't Reach Your Device Behind a NAT Router or Firewall?
Get remote access to your IoT device in minutes, with no port forwarding needed. Try free for 30 days.
Why This Happens
A NAT router translates your private IP addresses to a single public one, and keeps a table of outbound connections so return traffic can find its way back. It has no entry for a connection nobody inside the network initiated — so an inbound SSH attempt from outside has nowhere to go, and the router’s firewall drops it by default as a security measure.
That’s the short version. For the full mechanics — how the NAT table works, why dynamic IPs and DDNS complicate things further, and why port forwarding, DMZ, and UPnP are all weaker workarounds rather than real solutions — see How NAT Routers and Firewalls Secure Devices Behind Them. If you’re deciding between port forwarding, a VPN, and a tunnel-based solution, see Port Forwarding vs. VPN vs. Secure Tunnel for IoT Remote Access.
The rest of this article covers the fix: reversing the direction of the connection so NAT and the firewall never see it as unsolicited inbound traffic.
Setting Up SocketXP to Get Past NAT and Firewalls
SocketXP’s agent runs on the device and initiates an outbound SSL/TLS connection to the SocketXP Cloud Gateway. Because the device starts the connection, it looks like ordinary outbound traffic to the NAT router and firewall — nothing to configure, nothing to open.
Step 1: Install the Agent
Follow the download instructions for your device’s architecture (ARM64, ARMv7, ARMv6, MIPS, or x86_64).
Step 2: Authenticate the Device
sudo socketxp login
Your auth token is available in the SocketXP portal after creating a free account. This registers the device with the SocketXP Cloud Gateway and generates a unique device credential locally.
Step 3: Create the Tunnel Configuration
Create /etc/socketxp/config.json, pointing at the local SSH daemon:
{
    "tunnels": [
        {
            "destination": "tcp://127.0.0.1:22"
        }
    ]
}
Step 4: Install as a Persistent systemd Service
sudo socketxp service install --config /etc/socketxp/config.json
sudo systemctl daemon-reload
sudo systemctl enable socketxp
sudo systemctl start socketxp
Step 5: Verify the Tunnel Is Up
sudo systemctl status socketxp
Open the SocketXP portal — the device should now appear in the Devices list as online. No router login, no port forwarding rule, no DDNS setup. The agent reconnects automatically if the network drops or the device reboots, so the tunnel survives the same connectivity blips that would otherwise silently break a port-forwarding setup.
Accessing the Device: SSH, VNC, RDP, Web App, or Commands
Once the tunnel is up, every access method runs through the same outbound connection — you’re not opening a separate hole per protocol.
- SSH: Click SSH next to the device in the portal for an instant browser-based terminal, or use a native SSH client via SocketXP’s slave mode. Full walkthrough: Remote SSH Access to IoT Devices.
- VNC: Add an HTTP/TCP tunnel entry for the VNC server port (5901 by default) to reach the device’s GUI desktop. Full walkthrough: Remote VNC Access to IoT Devices.
- RDP (xrdp): Tunnel port 3389 the same way, then connect with any RDP client. Full walkthrough: Remote Desktop Access to IoT via xrdp.
- Web App: Tunnel a local web service (Node-RED, Flask, a dashboard) to get a permanent public HTTPS URL. Full walkthrough: Remote Access to an IoT Web App.
- Remote Commands: Run one-off shell commands or scripts on a device — or a whole fleet — without an interactive SSH session. Full walkthrough: Remote Command Execution on IoT Devices.
For a broader overview of how these five methods compare, see IoT Remote Access Over the Internet.
Conclusion
A NAT router or firewall blocking unsolicited inbound traffic is normal, correct behavior — it’s not misconfigured, and you shouldn’t try to defeat it by opening ports or placing the device in a DMZ. The reliable fix is to flip the connection direction: let the device initiate an outbound tunnel, and reach it through that. That’s what SocketXP does, and it’s the same reason it works whether the device sits behind a home router, an office firewall, or CGNAT with no real public IP at all.
Try SocketXP free for 30 days — no credit card required.
Further reading:
- How NAT Routers and Firewalls Work
- Port Forwarding vs. VPN vs. Secure Tunnel for IoT
- IoT Remote Access Over the Internet — Overview
- IoT Device Management Platform
- Zero-Touch Provisioning
- Reverse SSH Tunnel Explained
Frequently Asked Questions
Do I need to change any router or firewall settings for SocketXP to work behind NAT?
No. The SocketXP agent initiates an outbound SSL/TLS connection (standard HTTPS-style traffic on TCP 443) from the device to the SocketXP Cloud Gateway. Because the connection originates from inside your network — the same way a browser request or app update check does — it passes through NAT and firewall rules with zero configuration. No port forwarding, no inbound firewall rules, and no router admin access are required.
Does SocketXP work behind CGNAT (Carrier-Grade NAT)?
Yes. CGNAT only breaks inbound connections and peer-to-peer NAT traversal techniques like STUN/hole-punching, which can fail behind symmetric or carrier-grade NAT. SocketXP never relies on an inbound or peer-to-peer connection — the device's outbound tunnel to the gateway works the same whether it's behind a home router, an office firewall, or several layers of carrier NAT.
How do I know if my IoT device is behind CGNAT?
Check your router's WAN/internet status page for its public IP address, then compare it to what an external service reports as your public IP (for example, running curl ifconfig.me from a device on the same network). If the two addresses don't match, your ISP is performing CGNAT — your router doesn't hold a true public IP, and port forwarding won't work no matter how it's configured.
Is this different from just putting my IoT device in the router's DMZ?
Yes, significantly. Placing a device in the DMZ exposes every port on that device directly to the internet, bypassing the firewall entirely — a major attack surface. SocketXP's outbound tunnel exposes nothing; the device has no listening inbound port at all. Only the specific service you tunnel (SSH, VNC, RDP, or a web app) is reachable, and only through an authenticated SocketXP session.
Does SocketXP add noticeable latency compared to a direct or local connection?
For most use cases, no — the added latency is typically small (tens of milliseconds) since traffic is relayed through a nearby cloud gateway rather than routed peer-to-peer. For latency-sensitive applications like real-time video or high-frequency control loops, some added delay compared to a purely local connection is expected with any cloud-relayed tunnel, but it's generally not noticeable for remote SSH, dashboards, VNC, or RDP sessions.
Can I use SocketXP if my IoT device has a dynamic (changing) IP address?
Yes. Because SocketXP relies on an outbound connection from the device rather than an inbound connection to a fixed address, it doesn't matter if your device's local or public IP changes. The device reconnects to the SocketXP Cloud Gateway automatically, and you access it through a stable SocketXP-assigned endpoint rather than the device's IP directly.
Is my traffic secure when using SocketXP to access a device remotely?
Yes. All traffic between your device, the SocketXP Cloud Gateway, and your client runs over encrypted SSL/TLS connections, and access requires authentication through your SocketXP account — the tunnel isn't open to the public internet. This is a meaningfully smaller attack surface than exposing a device via port forwarding or a DMZ, where the port itself is reachable by anyone.