Table of Content
Table of Content
In this article, we will discuss how to configure and setup remote access to your IoT Secure Shell(SSH) command line over the internet, without using port forwarding.
We will discuss how to setup a secure SSL/TLS based reverse proxy connection to remotely access any IoT device behind a NAT router or firewall.
The same technique can be used to remote access devices connected to Starlink satellite network, 3G, 4G LTE, 5G cellular networks, or a mobile hotspot. The remote access solution we will discuss is a network agnostic solution.
The Internet of Things (IoT) has revolutionized the way we interact with the world around us.
With the ability to connect and control devices from anywhere in the world, IoT technology has brought convenience and efficiency to our daily lives.
However, with this increased connectivity comes the need for secure remote access to these devices. One way to achieve this is through the use of Secure Shell (SSH).
By the end of this article, you will have a better understanding of how to use SSH to securely access your IoT devices such as Raspberry Pi, Nvidia Jetson Nano, Arduino or any embedded Linux device, behind a NAT router, firewall, satellite router or cellular router from an outside network such as the internet.
Overview
Here is an overview of what we plan to do in this article:
Install, configure and enable SSH server in your Linux based IoT device.
Install and setup a small, light-weight SocketXP agent in your IoT device. SocketXP will create an SSL/TLS based reverse proxy connection to the SSH server running in your IoT device using the SocketXP Remote Access Solution. No port forwarding setup or any configuration changes required in your WiFi router or Firewall settings. You can remotely connect to your devices behind a NAT router, firewall, Starlink satellite router, or a cellular router, over the internet.
Remotely connect to your IoT device’s SSH server from the SocketXP Web Portal or using your favorite third-party SSH client such as PuTTY, SecureCRT or OpenSSH’s SSH command line client.
Remotely upload or download files to or from your IoT device from the SocketXP Web Portal or using your favorite SSH client such as Filezilla, PuTTY PSFTP, SecureCRT or OpenSSH’s SCP/SFTP command line client.
Install and setup SSH server and client
You need to download, install and setup OpenSSH server in your IoT device so that you could connect to it remotely via the internet.
You also need to download and install OpenSSH client on your access device, such as your laptop or PC.
Why is SSH important for remote access?
SSH allows for remote management and monitoring of these devices from anywhere in the world. By using SSH, users can securely access their IoT devices and perform tasks such as updating firmware, changing settings, and troubleshooting issues.
Remotely connect to IoT device via SSH
Let’s say you have an IoT device in your office or in your customer location or far out in the field.
Let’s say the device is connected to the internet through a WiFi network, SIM card or cellular internet or satellite internet.
You want to remotely connect to the IoT device via SSH over the internet, so that you could execute a remote command in the device terminal.
If you want to remotely connect to the SSH server, you need an IoT remote access solution like SocketXP that creates an SSL encrypted reverse proxy tunnel from your laptop to the SSH server in your IoT device.
What is SocketXP
SocketXP is a cloud based IoT remote access and device management solution that provides SSH access to remotely located IoT devices such as a Raspberry Pi, Arduino, Nvidia Jetson, or any embedded Linux devices behind NAT router or firewall over the internet using secure SSL/TLS VPN tunnels.
SocketXP IoT Remote Access Solution does not require any changes to your gateway NAT router configuration. No port forwarding setup or firewall pinholing is required, when you use SocketXP.
SocketXP creates a secure SSL/TLS encrypted tunnel through your firewall, NAT router and over the internet for secure remote SSH access, similar to how a secure VPN solution works. VPN solutions also use the same SSL/TLS encryption technology.
SocketXP uses two-factor authentication to authenticate users before they could SSH login to any remote device.
How SocketXP IoT Remote Access solution works
First, you need to install a SocketXP IoT agent on your IoT device.
The SocketXP agent would connect the device to the SocketXP IoT Cloud Gateway by creating a secure SSL/TLS tunnel.
You could then remote SSH into the IoT device from the SocketXP IoT Cloud Gateway’s portal page (via this secure SSL/TLS tunnel).

Follow the below steps to setup SocketXP IoT agent and remote SSH into your IoT using SocketXP IoT Remote Access solution.
Step 1: Download and Install
Download and install the SocketXP IoT agent on your IoT device from here.
Step 2: Get your Authentication Token
Sign up at SocketXP Web Portal and get your authentication token.
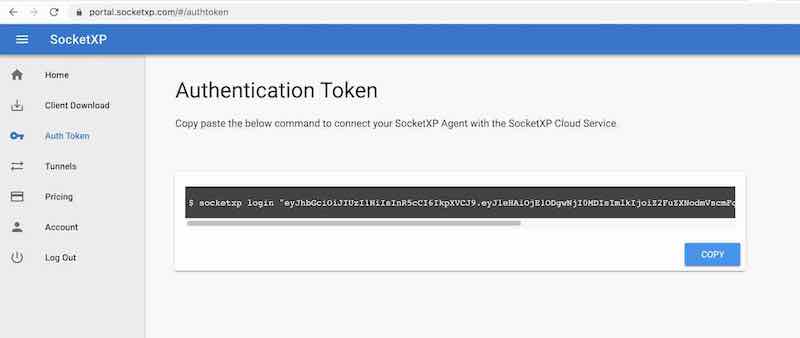
Use the following command to login to the SocketXP IoT Cloud Gateway using the auth token.
$ socketxp login [your-auth-token-goes-here]
Step 3: Create SocketXP SSL Tunnel Endpoint for Remote SSH
Use the following command to create a secure and private SSL tunnel endpoint at the SocketXP IoT Cloud Gateway.
 $ socketxp connect tcp://localhost:22

Connected to SocketXP Cloud Gateway.
Access the TCP service securely using the SocketXP agent in IoT Slave Mode.
Note:
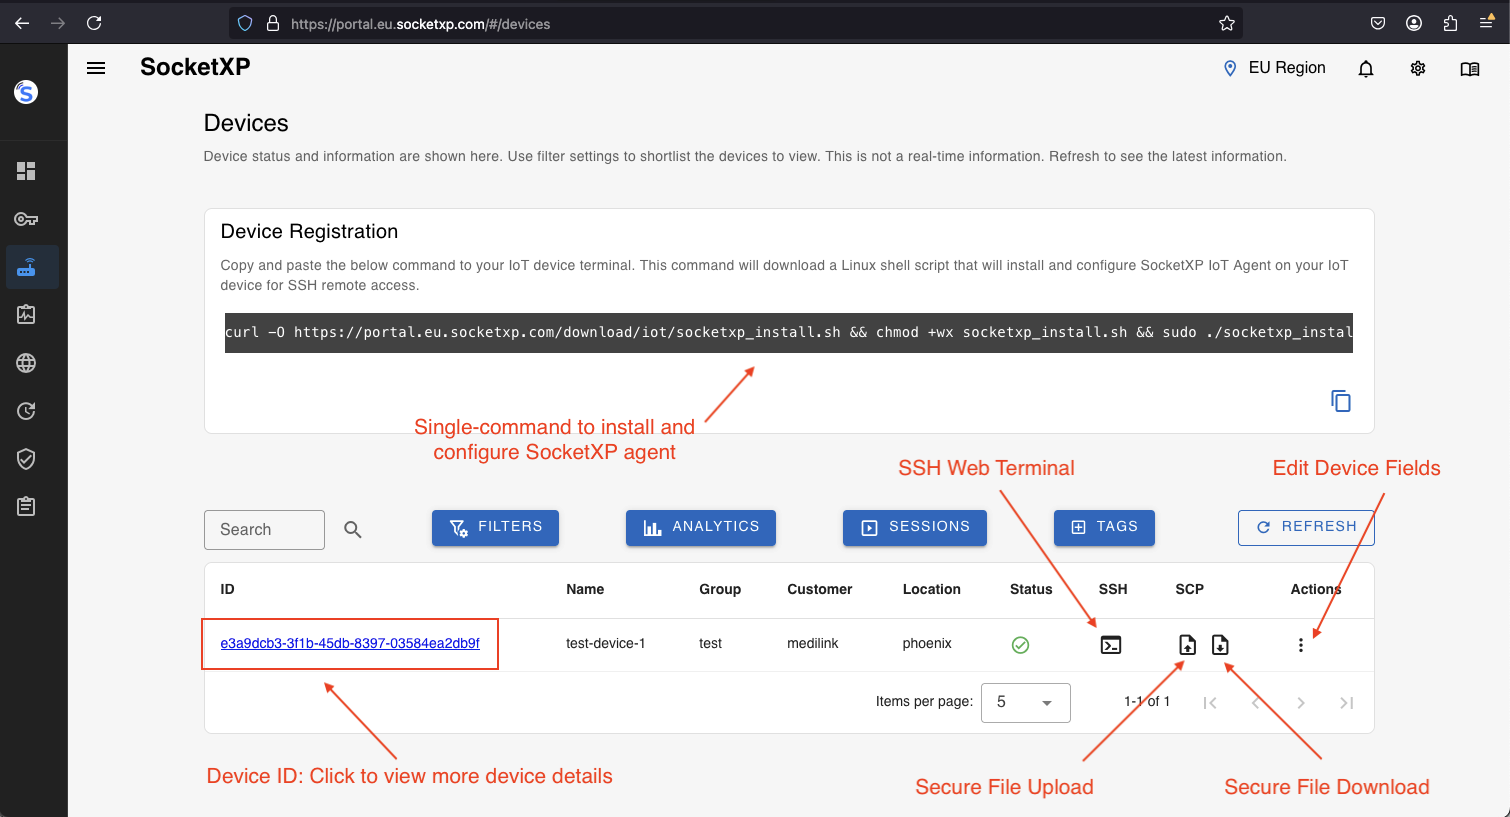
From the SocketXP web portal’s “Devices” page, click the “terminal” icon to SSH into your remote device.
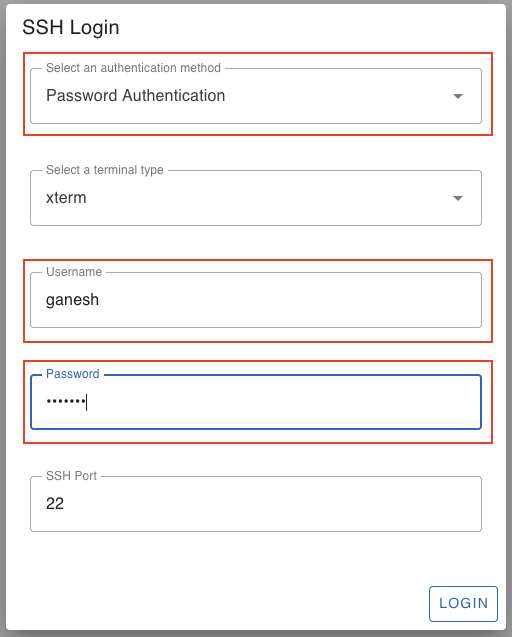
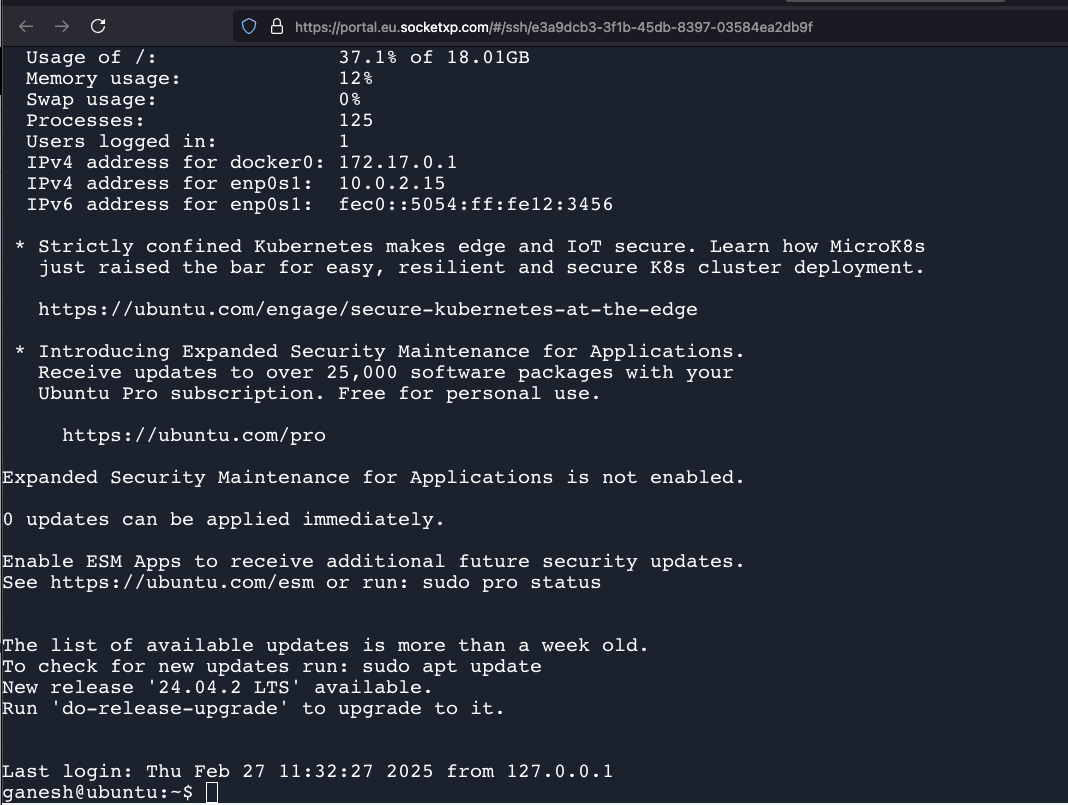
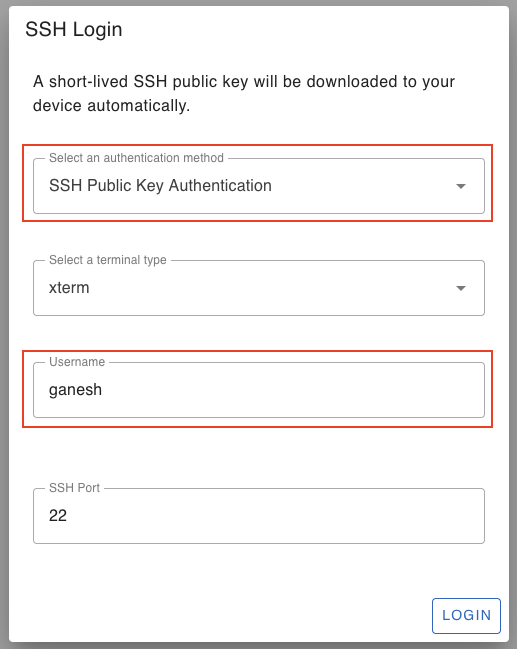
You have the option of using SSH password based authetication or SSH public private key based authentication to login to your remote devices. SocketXP will automatically create and download a public key to your remote device. It does key mamagement behind the screen automatically.
Secure File Transfer (SFTP)
For secure file transfer, click the “File Upload” or “File Download” icon button next to your IoT device. It will open up a SCP dialog window. Follow the instructions to securely transfer a file using SCP from the web client.
File Download Dialog Window:
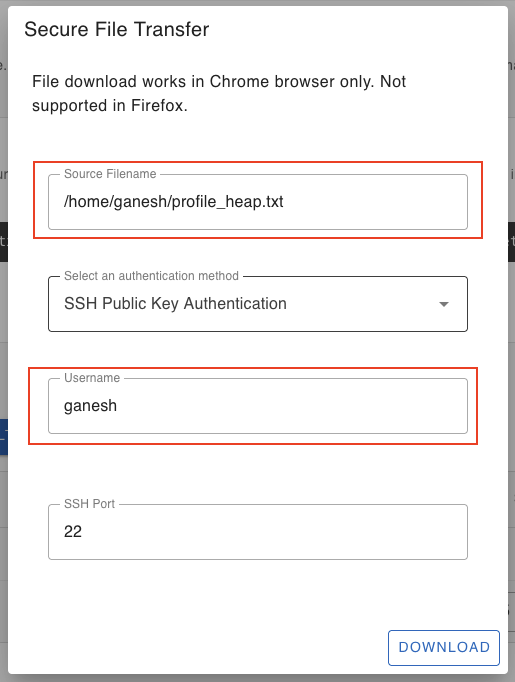
If the file download is successfull, it will open up a file browser window to select a folder location in your local machine where to store the download file. If there was any login error or error finding the source file in the IoT device, the download will abort.
File Upload Dialog Window:
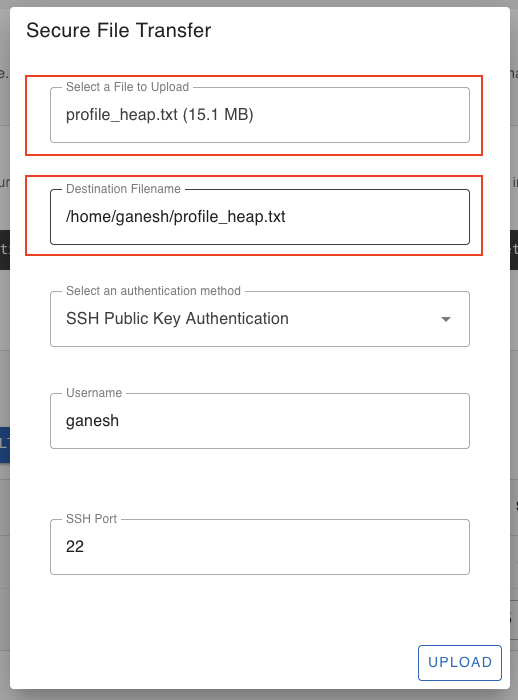
For the security of your device, SocketXP IoT Solution doesn’t create any public TCP tunnel endpoints that can be connected by any SSH client from the internet.
SocketXP private tunnel endpoints are not exposed to the internet and can be accessed only using the SocketXP agent (using the auth token of the user) or through the XTERM terminal in the SocketXP Portal page.
More importantly, this also means port scanners or hackers from the internet cannot access your IoT device SSH server port.
IoT SSH Remote Access using Third-Party Tools - PuTTY, OpenSSH SSH client
This is an alternate method for remotely connecting to your IoT device’s SSH server using the SocketXP solution.
If you don’t want to remotely SSH access your IoT device from the SocketXP web portal and you want to access it using your favorite third-party SSH and SFTP/SCP client software such as OpenSSH SSH/SFTP/SCP client, PuTTY, Filezilla, SecureCRT then follow the instructions below.
First download and install the regular SocketXP agent software on your accessing device (such as a laptop running Windows or Mac OS). This is in-addition to installing the agent in your IoT device, we did in the previous section. Why? Hint: Imagine a VPN client connecting to a VPN server.
Next, configure the agent to run in slave mode using the command option “–iot-slave” as shown in the example below.
$ socketxp connect tcp://localhost:3000 --iot-slave --peer-device-id "2233-4455-abcd-34445" --peer-device-port 22 --authtoken <auth token>

Listening for TCP connections at:
Local URL -> tcp://localhost:3000
You can find the device ID of your IoT device from the devices table in the SocketXP Web Portal’s Devices page.
If your SSH server is configured to run in a non-default SSH port, then you need to specify that in the “—peer-device-port” option in the above command, instead of the default port 22.
Connecting to your IoT SSH through SocketXP Local Proxy Server
Now you can use any third-party SSH client to connect to your IoT device’s SSH server through the SocketXP local proxy server, as shown in the examples below.
The examples use OpenSSH client tools such as scp, sftp, and scp that are command line based tools.
$ ssh -i ~/.ssh/john-private.key john@localhost -p 3000
You shall find the device ID of your IoT device (--peer-device-id) from the SocketXP Web Portal’s Devices Page.
Now you can access your IoT device’s SSH server using the above SocketXP local endpoint, as shown below.
You can use your own SSH client such as PuTTY to connect to your remote Linux device’s SSH shell.
The following example uses a OpenSSH's SSH client, which is a command line tool.
$ ssh -i ~/.ssh/john-private.key john@localhost -p 3000
Securely transfer files from the remote IoT device to your local machine using the OpenSSH SCP command as shown below.
$ scp -i ~/.ssh/john-private.key john@localhost:/path/to/remote/file.txt /path/to/local/directory/ -p 3000

file.txt                                      100%   12KB  12.0KB/s   00:00
Securely transfer files from the local machine to your remote device using the OpenSSH SCP command as shown below.
$ scp -i ~/.ssh/john-private.key /path/to/local/file.txt john@localhost:/path/to/remote/directory/  -p 3000

file.txt                                      100%   12KB  12.0KB/s   00:00
Note:
The above method uses SSH private key based authentication to SSH into your IoT device. You can also login use SSH password based authentication by skipping the “-i” option in the above command.
Secondly, we connect our SSH/SFTP/SCP client tools to our local proxy server listening TCP port 3000 in your local machine.
Thirdly, you can use any third-party SSH/SFTP/SCP client tools such as PuTTY, OpenSSH clients to securely connect using SSH and transfer files to and from your remote IoT devices or embedded Linux devices or any Linux machine/server.
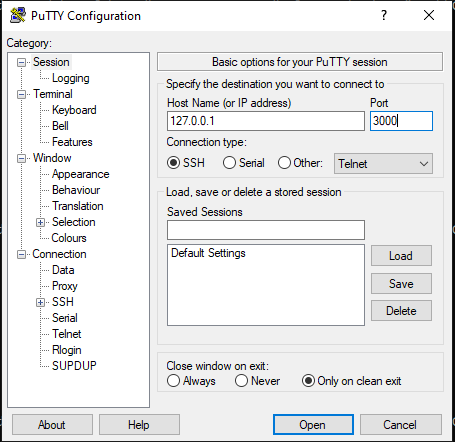
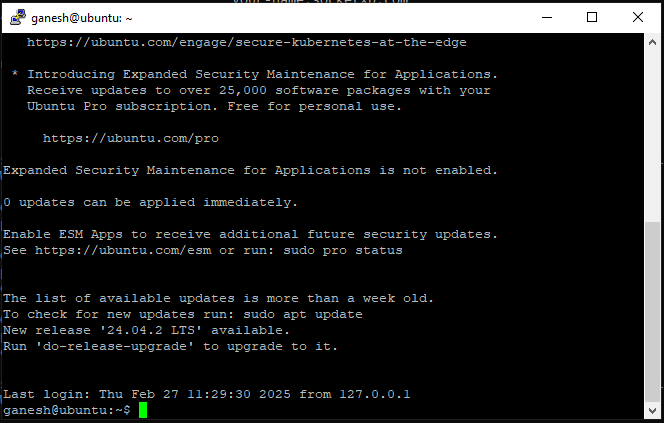
Below we show you the step-by-step instructions on how to securely connect to your IoT device using a free SSH client tool named PuTTY. PuTTY provides a GUI window to login and SSH connect to your remote IoT devices.

Login using your IoT device’s login username and password.
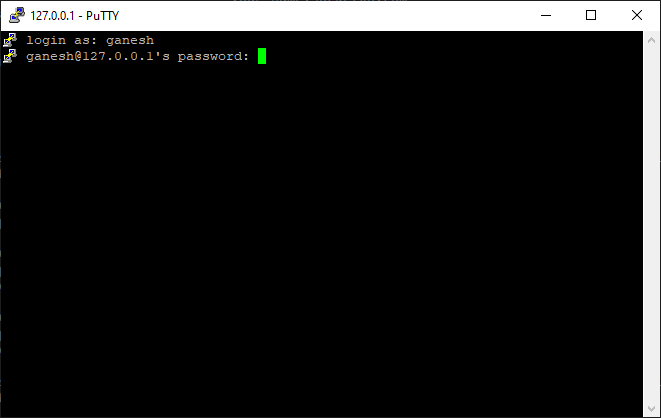
Access the Linux shell prompt.

Note that PuTTY connects to the localhost IP 127.0.0.1 TCP port 3000 where the SocketXP agent running as a local proxy server in the IoT Slave Mode is waiting to create secure reverse proxy tunnels between Filezilla and your remote IoT device.

In the above window, you will notice that we have input the localhost IP address 127.0.0.1 and changed the default SFTP port from 22 to 3000.
This is required because:
- The PuTTY SSH client should connect to the remote IoT device via the SocketXP agent running locally in “IoT Slave” mode or local-proxy mode.
SocketXP Remote Access Solution DOES NOT perform hole-punching or port-forwarding or create any open doors in your NAT router or firewall. SocketXP DOES NOT create any public IP and port as a proxy for your device’s private IP and port. SocketXP solution creates and uses SSL encrypted reverse proxy tunnels to remotely access your IoT devices in the field. Moreover, SocketXP agent requires an authentication token to connect to your remote devices. This is because we care for your device and organization’s security and reputation. Imagine a VPN client-server architecture for better understanding.
The SocketXP agent when configured to run in “IoT Slave” mode will function as a “local-proxy server”. The local-proxy server, listens on local IP 127.0.0.1 and local TCP port 3000.
When the local-proxy server receives any TCP connection on the IP 127.0.0.1:3000, it will proxy the connection to the SocketXP IoT Cloud Gateway, which in-turn will proxy/relay the connection to your remote IoT device, after authenticating the auth token provided by the agent.
The SocketXP agent creates an SSL encrypted secure reverse proxy tunnel between the PuTTY SSH client and your remote IoT device’s SSH server.
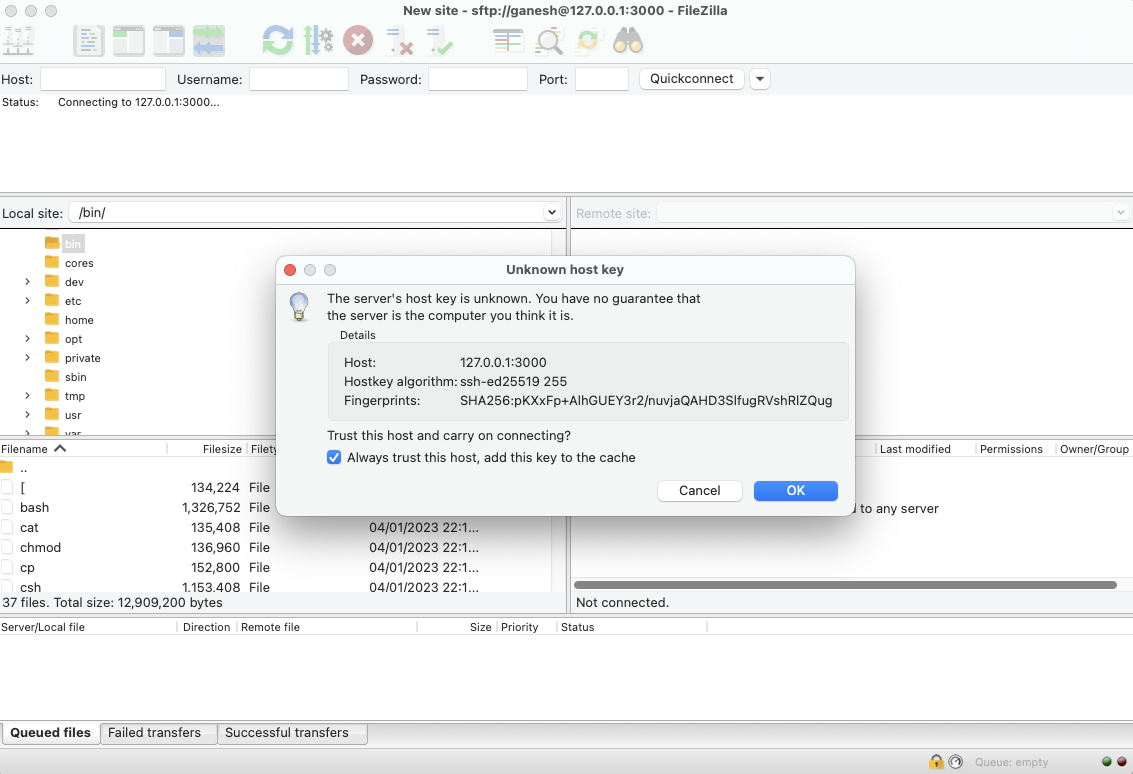
Below examples will show you how to securely transfer files to and from your IoT device using a third-party SFTP/SCP tool named Filezilla. Again, Filezilla SFTP client will connect to the remote IoT device through the SocketXP agent running as a local-proxy server on localhost IP address 127.0.0.1 and TCP port 3000.
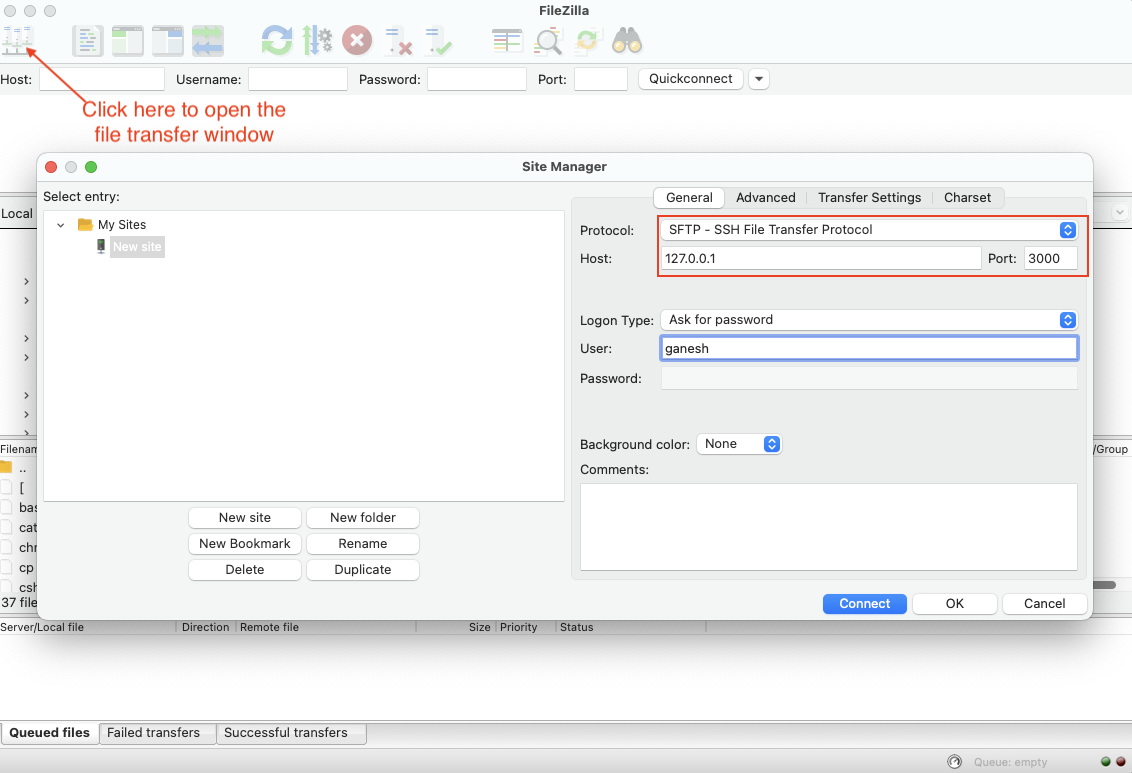
Login using your IoT device’s login username and password.
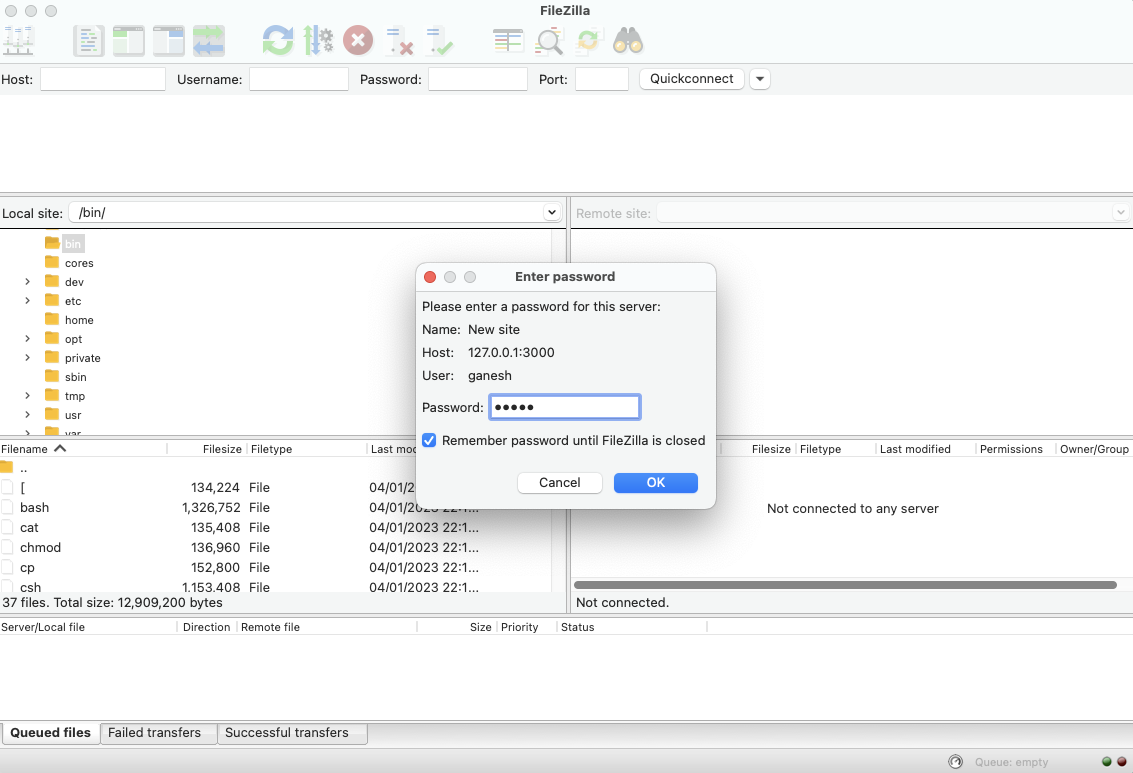
Trust the SSH server’s host (IoT device) key and accept the host key verification request to continue.
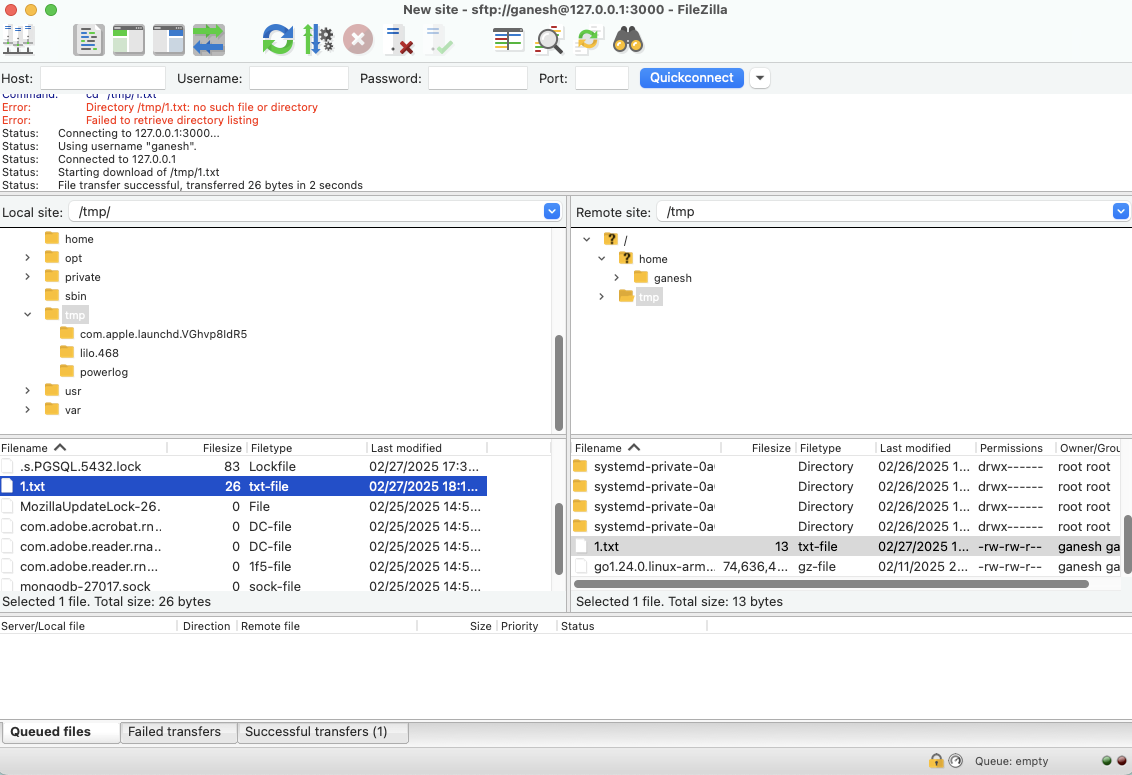
You can drag and drop files from your local machine to the IoT device or vice-versa from the Filezilla GUI window.
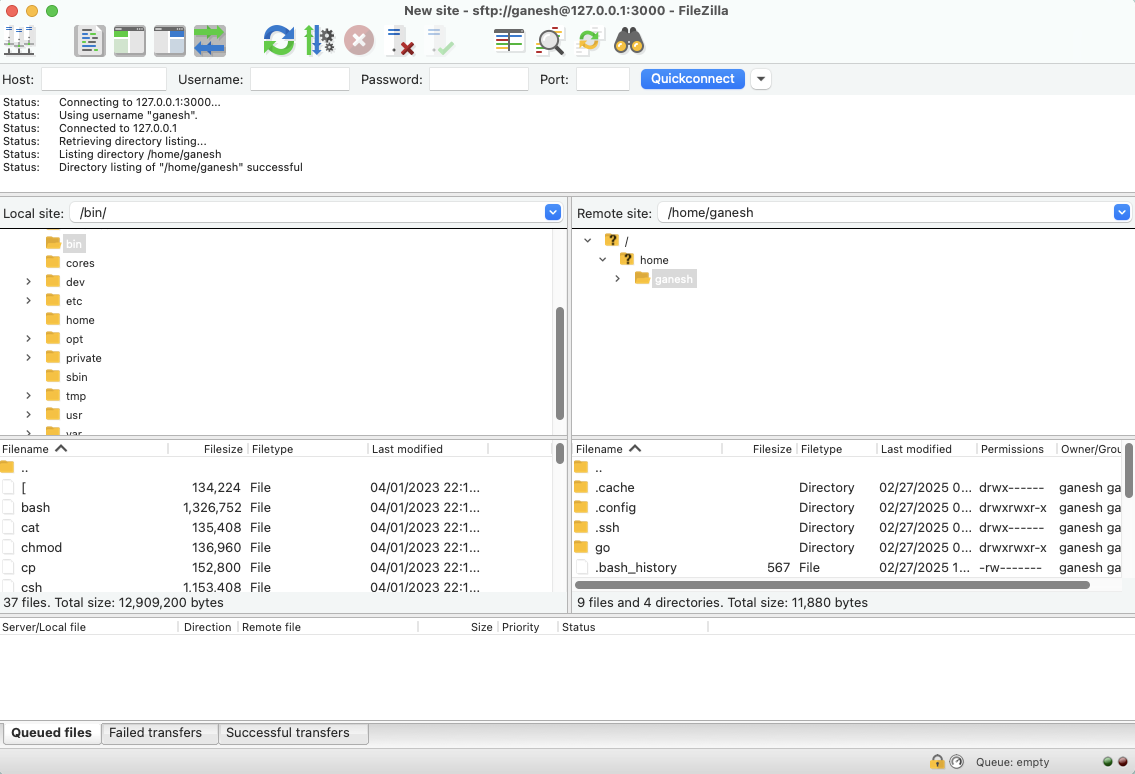
Filezilla securely transfer files (using SFTP) between the local machine and remote device using the SocketXP agent’s local-proxy server (that listens on local IP 127.0.0.1 and local TCP port 3000).
The local-proxy server creates a secure reverse proxy tunnel between the Filezilla client and your remote IoT device’s SSH server.
SocketXP SSH Public Key Management Tool:
SSH password based authentication is vulnerable to attacks and generally not recommended for production usecases. SSH Public Private key based authentication is a secure and recommended method for production usecases.
By default, SocketXP Web Portal will create and sync a very short-lived single-use SSH public key to your Ubuntu Linux machine, so that you can securely remote login to your Ubuntu Linux from anywhere in the world, without having to use password based authentication. The key will be cleaned up or trashed immediately after the user logs in.
You should remember that a user can SSH into your Ubuntu Linux machine from the SocketXP web portal, only after a successful SSO login (and 2FA authentication) provided by your SSO OAuth provider such: Microsoft 365 or Google G-Suite.
SocketXP has a built-in SSH public key management tool, that automates SSH public key management or syncing it between your Ubuntu Linux system and the SSH web client. It even cleans up the key immediately, so that a new public key setup is required for the next login attempt by the same user.
For better security, you can even disable password based authentication completely on your Ubuntu Linux SSH server. But, if you prefer to use password based authentication, then select the “Password authentication” option during the login prompt in the web portal. The default option is “SSH Public Key Authentication.”
Single-Touch Installation and Configuration Command
The 3 step instruction explained earlier to setup SocketXP on your IoT device is a tedious process, if you have thousands of IoT devices to install, configure and register.
With this in mind, SocketXP IoT Remote Access Solution also provides a single-touch installation command for installing and configuring SocketXP IoT Agent on large number IoT devices.
Copy and paste the single-touch installation and configuration command from the SocketXP Web Portal’s devices page to the Linux shell terminal of your IoT device.
The device registration command shown below will download a shell script that will install, configure, setup SocketXP IoT agent on your IoT device.

After the command completes, the IoT device would show up as online in the SocketXP Web Portal’s “Devices” page.
You can connect to it using any SSH client or by clicking the “terminal” icon shown next to it.
SocketXP SSH Public Key Management Tool:
SSH password based authentication is vulnerable to attacks and generally not recommended for production usecases. SSH Public Private key based authentication is a secure and recommended method for production usecases.
By default, SocketXP Web Portal will create and sync a very short-lived single-use SSH public key to your Ubuntu Linux machine, so that you can securely remote login to your Ubuntu Linux from anywhere in the world, without having to use password based authentication. The key will be cleaned up or trashed immediately after the user logs in.
You should remember that a user can SSH into your IoT or embedded Linux device from the SocketXP web portal, only after a successful SSO login (and 2FA authentication) provided by your SSO OAuth provider such: Microsoft 365 or Google G-Suite.
SocketXP has a built-in SSH public key management tool, that automates SSH public key management or syncing it between your Ubuntu Linux system and the SSH web client. It even cleans up the key immediately, so that a new public key setup is required for the next login attempt by the same user.
For better security, you can even disable password based authentication completely on your Ubuntu Linux SSH server. But, if you prefer to use password based authentication, then select the “Password authentication” option during the login prompt in the web portal. The default option is “SSH Public Key Authentication.”
SocketXP Features:
SocketXP IoT Device Management and Remote Access Platform provides the following feature that simplifies remote device management, access, control and monitoring.
- SocketXP IoT Remote Access Solution
- Remote SSH Access from anywhere
- Remote File Transfer - SFTP/SCP
- Remote VNC Desktop Access - RDP/VNC
- Remote IoT Device Monitoring
- Remote Asset Live Tracking
- Remote IoT Software OTA Update
SocketXP Scaling and Performance
SocketXP IoT Cloud Platform can easily support 100K or more devices per customer account. SocketXP IoT Gateway is a cloud native application that has the capability to grow to cloud scale on demand.
If your requirements are unique or have a question regarding customizing our solution to your requirements, please write to us at: [email protected]
Conclusion:
The SocketXP Remote Access Solution discussed in this article is a secure method to transfer files to your IoT devices behind NAT router and Firewall or connected via a cellular network. The file data will be encrypted using SSH when transmitted over the internet using SocketXP.
SSH uses the same cryptography technology used by banks and governments to exchange highly confidential data over the internet.
The data transferred gets encrypted end-to-end between the SSH client and the SSH server.
SocketXP has no way to decrypt or eavesdrop your encrypted data without knowing your SSH private keys. SocketXP merely acts as an online reverse proxy server for your encrypted data traffic transmitted through the SSH connection.
IoT Remote SSH Security - Do’s and Don’ts
What is IoT
IoT means Internet of Things. The term IoT refers to the devices that are connected to the internet.
Today, almost all electrical and electronic gadgets at home such as your air conditioner, refrigerator, washing machine, light bulbs, fans, and security video cameras can be connected to the internet using home automation devices or IoT devices.
Automobiles such as cars, trucks, trains, airplanes and ships are connected to the internet through IoT devices to track the movement and operation of these vehicles.
Even industrial heavy machineries are connected to the internet via the IoT devices. Sensors are added to the machineries or placed at various locations in a plant to monitor the performance and operation of these machineries.
A simple IoT device based IoT device can be used to monitor, control and operate smart electronic gadgets and electrical appliances in your home or factory.
Remote SSH access to IoT devices
The primary reason why you deployed these IoT devices and connected them to the internet was to monitor, track and operate these devices from any remote locations.
Sometimes you need a way to gain access to those IoT devices for troubleshooting, configuration updates, and other operational tasks.
For example, a sensor device deployed at a factory that is hundreds of miles away is having trouble measuring the factory temperature.
You can use secure remote access tunnels to open and quickly start a session to that sensor device.
After you have identified the problem (for example, a misconfiguration or disk full error), you can reset the configuration, delete unwanted files or logs history and restart the sensor device through the same session.
In the traditional methods of troubleshooting you would typically wait until the next day to send a technician to the factory to investigate the sensor device.
But remote access using secure tunneling (using SocketXP) decreases incident response and recovery time and operational costs.
But gaining remote access to IoT devices is no simple task.
So often people take shortcuts and perform quick hacks on routers/firewall settings to permit internet traffic into the corporate network.
In the next section, we’ll discuss about some of these unsafe practices and the security risks associated with such configuration options.
Insecure methods used to remotely access IoT devices
IoT devices in industries, factories, offices and homes are placed behind a firewall and NAT(Wifi Router or Gateway Router).
IoT devices are always assigned a Local IP address using mechanisms such as DHCP. The local IP addresses are usually assigned in the 10.X.X.X or 192.X.X.X range.
IoT devices do not have publicly reachable IP addresses assigned to them.
The IoT devices behind the firewall can talk to servers on the internet (via the gateway router) but not the other way around.
This is because you want to prevent your IoT devices from being accessed from the internet by unwanted people or hackers.
So to gain remote access from the internet to IoT devices in your home or factory is not easy and straightforward.
Many people would practice the unsafe method of opening up ports (SSH port 22 or HTTP/HTTPS ports 80/443) in their firewall settings(ACL rules) or gateway router NAT configuration to allow a particular traffic to sneak into the local network.
Then they would use Dynamic DNS (DDNS) solutions to track the non-static public IP address of the gateway router.
This method is prone for errors and would create a security risk for your IoT installation.
Online hackers could scan such open ports and try sneaking into your local network and servers.
The common myth or the misunderstanding here is that, people falsely believe that as long as they use a secure shell connection (SSH) everything going to that port 22 is safe.
But they fail to understand that they have left a door to their industrial, corporate or home network wide open for any strangers to sneak in without being noticed.
The same door will be shared by hackers and your secure SSH session alike.
The problem is not in the SSH session but in the door you left wide open for anyone to sneak in.
Why SocketXP IoT Remote Access Solution Is More Secure?
SocketXP IoT Remote Access and Device Management Platform provides secure remote access to your remote IoT devices, that doesn’t require setting up port-forwarding on your WiFi router or firewall.
SocketXP solution works without making any changes to your WiFi router or firewall settings.
No hole-punching or port-forwarding setup or back-door opening required.
SocketXP IoT Platform, unlike all other vendor solutions, does not open up your device ports to the internet. Therefore, port scanners and hackers cannot scan your device ports (SSH or HTTP or VNC ports).
SocketXP IoT Platform protects and handles all direct attacks from the internet, eliminating unnecessary traffic from the internet reaching your IoT devices.
SocketXP connects users with remote devices over secure SSL/TLS connections(vpn tunnels).
This is the same technology used by the banks and Governments to exchange confidential data securely over the internet.
Frequently Asked Questions(FAQs):
General FAQs About IoT Remote Access
What is IoT remote access and why is it important?
IoT remote access allows you to securely connect to and manage devices (like Raspberry Pi, ESP32, BeagleBone, or industrial gateways) over the internet. It’s essential for developers and enterprises to update firmware, debug issues, monitor logs, or control devices deployed in remote locations without physically being there.
Why is remote access to microcontroller boards or embedded Linux devices challenging?
Most IoT devices sit behind NAT routers or firewalls, making them unreachable directly over the internet. Setting up port forwarding or static IPs can be complex and insecure. Solutions like SocketXP remove these hurdles by providing secure tunneling without reconfiguring networks.
How does SocketXP make remote IoT access easier compared to VPNs or port forwarding?
Unlike VPNs, SocketXP doesn’t require complex setup, static IPs, or exposing open ports. It creates a secure, lightweight tunnel between your device and your laptop/browser, so you can access it instantly without worrying about firewall restrictions.
Security & Networking FAQs
Is remote access to IoT devices safe?
It can be unsafe if done via insecure methods like port forwarding. SocketXP ensures safety by using TLS-encrypted tunnels, access tokens, and role-based access control, protecting devices against unauthorized access.
What are the risks of using port forwarding for IoT devices?
Port forwarding exposes your device to the public internet, making it vulnerable to brute force attacks, malware, and unauthorized logins. SocketXP eliminates this risk by not exposing any public IP or open port.
How does SocketXP ensure secure remote connections?
SocketXP uses end-to-end encrypted tunnels (TLS 1.2/1.3), token-based authentication, and allows fine-grained access control. It ensures that only authorized users can connect, keeping devices safe from cyberattacks.
How does SocketXP compare to VPNs for IoT remote access security?
VPNs create a broad network tunnel that can expose all connected devices if compromised. SocketXP provides device-specific, application-layer tunnels — limiting exposure and improving security with less complexity.
Device & Platform-Specific FAQs
Can I use SocketXP to access a Raspberry Pi remotely?
Yes. SocketXP supports Raspberry Pi out of the box. You can securely SSH, VNC, or open the Pi’s web applications from anywhere without port forwarding.
Does SocketXP work with ESP32 or Arduino boards?
For microcontrollers like ESP32 or Arduino, SocketXP can act as a cloud tunnel to send telemetry data, enable secure OTA (over-the-air) firmware updates, or provide remote monitoring via APIs.
Is SocketXP compatible with BeagleBone, Jetson Nano, or other SBCs?
Absolutely. Any device running Linux (Debian, Ubuntu, Yocto, OpenWrt, etc.) can install the SocketXP agent to enable secure remote access.
Can I use SocketXP for industrial IoT devices or PLCs?
Yes. SocketXP is lightweight and suitable for edge gateways, PLCs, and industrial controllers that need secure, managed remote connectivity.
Usage & Features FAQs
Do I need static IP or port forwarding to use SocketXP?
No. SocketXP eliminates the need for static IPs, dynamic DNS, or port forwarding. It works even if your device is behind NAT or a firewall.
Can I use SocketXP to SSH into devices behind NAT or firewalls?
Yes. That’s one of SocketXP’s core features. You can instantly open a secure SSH session without touching your router settings.
Does SocketXP support web-based SSH access through a browser?
Yes. SocketXP offers a web console, so you can open a terminal directly in your browser without installing an SSH client.
Can I transfer files remotely using SocketXP?
Yes. SocketXP supports secure file transfer and remote log monitoring, making it easier to update configurations or retrieve logs.
Does SocketXP support remote firmware updates for IoT devices?
Yes. You can securely push OTA firmware updates through the SocketXP tunnel without exposing your devices.
Can I access my IoT device dashboard or web UI using SocketXP?
Absolutely. You can expose web-based dashboards, admin panels, or APIs securely via SocketXP tunnels with HTTPS.
Performance & Scalability FAQs
Does SocketXP introduce latency in IoT device connections?
SocketXP is optimized for low latency. It uses lightweight tunnels, so the performance impact is negligible compared to traditional VPNs.
Can SocketXP handle thousands of IoT devices at scale?
Yes. SocketXP supports multi-device fleet management, making it suitable for both small hobby projects and enterprise deployments.
Is SocketXP suitable for low-power or constrained networks?
Yes. The client agent is lightweight and works efficiently even on devices with limited CPU, RAM, and bandwidth.
Comparison & Alternatives FAQs
What is the difference between SocketXP and VPN solutions?
VPNs require network-wide setup, static IPs, and can expose multiple devices at once. SocketXP is device-centric, faster to deploy, and more secure for IoT use cases.
Why should I choose SocketXP over TeamViewer, ngrok, or OpenVPN?
TeamViewer is GUI-focused, ngrok is session-based, and OpenVPN is complex. SocketXP combines the simplicity of tunnels with enterprise-grade IoT features (SSH, HTTPS, APIs, OTA).
Can I replace my VPN setup with SocketXP for IoT remote access?
Yes. SocketXP is a simpler and more secure alternative to VPNs for managing distributed IoT devices.
Setup & Integration FAQs
How do I install SocketXP on my IoT device?
Installation is simple. Download the SocketXP agent binary, register it with your account, and start the service. Within minutes, you’ll have a secure remote tunnel.
What operating systems does SocketXP support?
SocketXP works with most Linux distributions (Debian, Ubuntu, Raspbian, OpenWrt, Yocto) and embedded Linux environments.
Can I run SocketXP on Docker or Kubernetes?
Yes. SocketXP can be deployed as a Docker container or sidecar within Kubernetes clusters for secure application tunneling.
Does SocketXP provide SDKs or APIs for developers?
Yes. Developers can integrate SocketXP tunnels into their applications using APIs, making it possible to build remote monitoring dashboards or CI/CD pipelines.
Pricing & Business FAQs
Is SocketXP free to use?
SocketXP offers a free tier for developers and hobbyists with limited devices. Paid plans unlock more devices, features, and enterprise support.
Does SocketXP offer a free trial for IoT developers?
Yes. You can try SocketXP for free and later upgrade to paid plans as your deployment grows.
Can I use SocketXP for commercial IoT products?
Yes. SocketXP supports enterprise deployments, OEM integrations, and white-label options for commercial products.