Table of Content
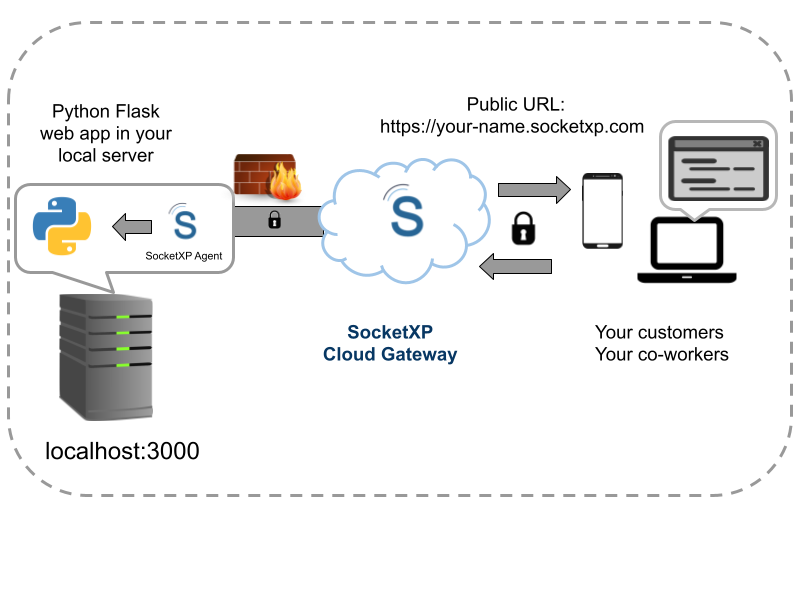
Table of Content
Jupyter Notebook and JupyterLab are the standard tools for data science, machine learning experimentation, and AI research. However, running heavy workloads—training neural networks, processing large datasets, or running GPU-accelerated code—requires a powerful machine, often a desktop workstation with a GPU or a dedicated home lab server.
The problem: that powerful machine sits in your home or office behind a NAT router, with no public IP address. You cannot reach it from your laptop at a coffee shop, from a client’s office, or while traveling.
This guide explains how to remotely access Jupyter Notebook running on any Linux machine from anywhere in the world using SocketXP Remote Access Solution—without port forwarding, without a VPN, and without a public IP.
The Problem: Jupyter Behind NAT and Firewall
When you run jupyter notebook on your home server or GPU workstation, it listens on localhost:8888. This means:
- You can access it from within your home network at
http://192.168.x.x:8888 - No one outside your network can reach it
Traditional workarounds—port forwarding on your router, VPNs, or SSH tunnels—all require configuration, a static IP, or network access that may not be available on corporate or cellular networks.
SocketXP solves this by installing a lightweight agent on your server that creates a secure outbound connection to the SocketXP Cloud Gateway. SocketXP then gives you a permanent public HTTPS URL that proxies securely to your Jupyter instance—no router changes required.
How SocketXP Jupyter Notebook Remote Access Works
SocketXP works in 3 simple steps:
- The SocketXP agent runs on the machine where Jupyter is hosted.
- The agent creates a secure SSL/TLS tunnel to the SocketXP Cloud Gateway.
- SocketXP provides a permanent public HTTPS URL that you open in any browser to reach your Jupyter Notebook.
Step-by-Step: Access Jupyter Notebook Remotely
Step 1: Start Jupyter Notebook on Your Remote Machine
On the machine where your notebooks live (GPU workstation, home server, Raspberry Pi, etc.), start Jupyter with the --no-browser flag to prevent it from trying to open a browser on the server itself:
$ jupyter notebook --no-browser --port=8888
[I 10:23:11.456 NotebookApp] Serving notebooks from local directory: /home/user/notebooks
[I 10:23:11.456 NotebookApp] Jupyter Notebook is running at:
[I 10:23:11.456 NotebookApp] http://localhost:8888/?token=abc123def456...
Note down the token in the startup output. You will need it to log into Jupyter from your browser.
If you prefer JupyterLab, the command is identical:
$ jupyter lab --no-browser --port=8888
Step 2: Install the SocketXP Agent
Download and install the SocketXP agent on the same machine running Jupyter.
Step 3: Get Your Authentication Token
Sign up at the SocketXP Web Portal and copy your authentication token.
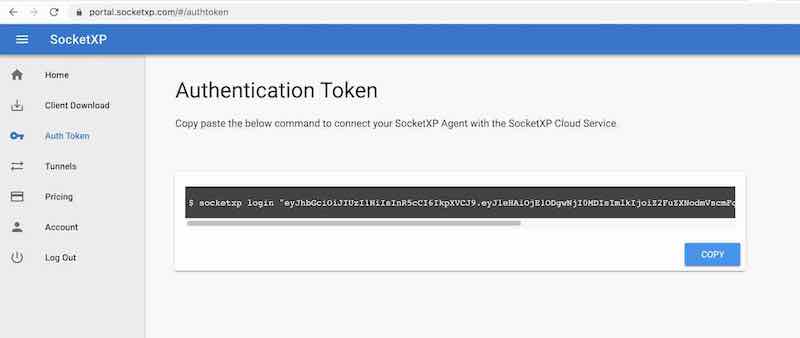
Authenticate the agent:
$ socketxp login "eyJhbGciOiJIUzI1NiIsInR5cCI6IkpXVCJ9..."
Step 4: Create the HTTPS Tunnel to Jupyter
Run the following command to create a secure HTTPS tunnel between Jupyter and the SocketXP Cloud Gateway:
$ socketxp connect http://localhost:8888

Public URL -> https://your-user-id-abc123.socketxp.com
SocketXP outputs a permanent public HTTPS URL. This URL is your remote access address for Jupyter Notebook.
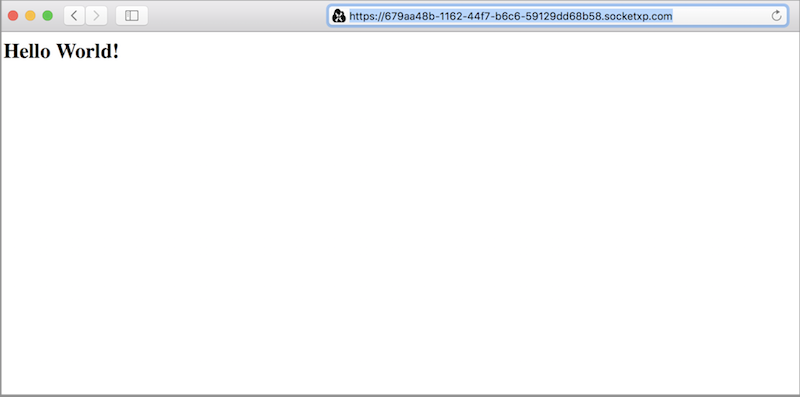
Step 5: Access Jupyter from Any Browser
Open the SocketXP public URL in any browser from anywhere:
https://your-user-id-abc123.socketxp.com
Jupyter will show its standard login page, prompting you for the token from Step 1 (or your Jupyter password if you set one with jupyter notebook password).
You now have full access to your notebooks, running code, viewing outputs, and using the terminal—exactly as if you were sitting at the machine.
Running SocketXP as a Background Service
To keep the Jupyter tunnel running persistently (even after you close the terminal), you can configure the SocketXP agent as a systemd service. Refer to the SocketXP Getting Started guide for service configuration instructions.
Once configured as a service, the tunnel automatically comes back up after a server reboot—your Jupyter URL stays the same and is always reachable.
Single-Touch Installation for Multiple Machines
If you run Jupyter on multiple machines (e.g., several GPU workstations in a lab), SocketXP’s single-touch installation script lets you install and configure the agent on all of them quickly. Copy the install command from the SocketXP portal and paste it once into each machine’s terminal.

Security: Protecting Your Remote Jupyter Instance
Because SocketXP creates a public HTTPS URL, anyone who knows the URL can reach your Jupyter login page. Jupyter’s own authentication is your first line of defense:
- Use the token: Jupyter generates a long random token at startup. Only share it with trusted users.
- Set a password: Run
jupyter notebook passwordon the server to set a static password instead of a per-session token. - Disable token and require password: For long-running servers, setting a password is more practical than copying a new token every time.
SocketXP itself encrypts all traffic with SSL/TLS—the same encryption used by banks—so the data flowing between your browser and Jupyter is protected in transit.
Why SocketXP vs. SSH Tunnels or ngrok for Jupyter?
| Method | Requires router config | Permanent URL | Works on cellular | Setup time |
|---|---|---|---|---|
| Port forwarding | Yes | No | No | 15+ min |
| SSH local tunnel | No | No (per session) | Sometimes | 5 min |
| ngrok free tier | No | No (changes each session) | Yes | 2 min |
| SocketXP | No | Yes (permanent) | Yes | 5 min |
SSH tunnels work but require you to run a tunnel command every time from a machine that can already reach the server—defeating the purpose when you’re on an unfamiliar network. ngrok’s free tier generates a new URL every session, which means you cannot bookmark it or share a permanent link with collaborators. SocketXP gives you a permanent URL that works on any internet connection.
Use Cases
- AI/ML researchers: Access GPU-accelerated Jupyter notebooks on your workstation from a laptop without a GPU.
- Data scientists: Run long data-processing jobs on a powerful home server and check results remotely.
- Students and educators: Share a single notebook server with a class, each student accessing via the same permanent URL.
- Raspberry Pi and Jetson projects: Run a lightweight notebook server on an edge device and access it from a desktop.
- Remote teams: Let collaborators access a shared notebook environment without setting up a VPN.
Conclusion
SocketXP makes remote Jupyter Notebook access as simple as running one command. Install the agent, run socketxp connect http://localhost:8888, and you get a permanent public HTTPS URL that works from any browser, anywhere in the world—behind any NAT router, firewall, cellular network, or satellite connection.
Your notebook stays on your own machine, your data never leaves your server, and you keep full control. No cloud subscription for compute, no complex VPN setup, no router configuration required.
For more details on SocketXP’s remote access capabilities, visit the SocketXP IoT Remote Access page or read the Getting Started guide.
Frequently Asked Questions
1. Can I access Jupyter Notebook remotely without a public IP or port forwarding?
Yes. SocketXP installs a lightweight agent on the machine running Jupyter. The agent creates an outbound SSL/TLS tunnel to the SocketXP Cloud Gateway, which gives you a permanent public HTTPS URL. No inbound ports need to be opened on your router or firewall.
2. Does remote Jupyter Notebook access work on a home lab machine behind a router?
Yes. SocketXP works through any NAT router or firewall without any router configuration. It also works over 4G/5G cellular networks and Starlink satellite connections.
3. How do I authenticate when accessing Jupyter remotely via the SocketXP public URL?
Jupyter Notebook uses token-based or password authentication by default. When you open the SocketXP public URL in your browser, Jupyter will prompt you for the token shown in the server startup output, or for the password you set with jupyter notebook password. Your Jupyter credentials are separate from SocketXP and remain intact.
4. Can I access JupyterLab remotely using the same method?
Yes. JupyterLab runs on the same port as Jupyter Notebook (8888 by default). Start it with jupyter lab --no-browser --port=8888 and create the SocketXP tunnel the same way: socketxp connect http://localhost:8888. The public URL will serve the JupyterLab interface.
5. Is the SocketXP public URL permanent or does it change every session?
The public HTTPS URL assigned to your tunnel is permanent and does not change as long as you keep the tunnel active or until you manually delete it from the SocketXP portal. You can bookmark it and share it with collaborators.
6. Can I access a Jupyter Notebook running on a Raspberry Pi or NVIDIA Jetson remotely?
Yes. SocketXP works on any Linux device including Raspberry Pi (all models), NVIDIA Jetson Nano, Jetson Orin, and any ARM or x86 Linux server. Install the SocketXP agent, start the tunnel, and access Jupyter from your browser.
7. Can multiple team members access the same remote Jupyter Notebook?
Yes. The SocketXP public URL can be shared with collaborators. Each person opens the URL in their browser and authenticates using the Jupyter token or password. For team isolation, consider running separate Jupyter instances on different ports, each with its own SocketXP tunnel.
8. How do I keep Jupyter Notebook running after I close my terminal or SSH session?
Start Jupyter inside a tmux or screen session on the remote machine before creating the SocketXP tunnel. This keeps the Jupyter process alive even after your terminal closes. Alternatively, configure the SocketXP agent as a systemd service so the tunnel restarts automatically on reboot, and run Jupyter as a separate systemd service as well.
9. Can I connect VS Code to a remote Jupyter Notebook served via SocketXP?
Yes. In VS Code, open the Command Palette and select “Jupyter: Specify Jupyter Server for Connections”. Enter the SocketXP public URL as the server URI along with the Jupyter token. VS Code will connect to your remote Jupyter kernel and you can run notebooks locally while the compute runs on the remote machine.
10. Can I access Jupyter Notebook from my phone or tablet?
Yes. The SocketXP public HTTPS URL opens in any mobile browser—Chrome, Safari, or Firefox on iOS or Android. JupyterLab’s interface adapts reasonably well on larger tablets. A physical keyboard is recommended for coding, but you can view outputs and run cells from a phone.
11. How does SocketXP compare to ngrok for Jupyter Notebook remote access?
ngrok’s free tier generates a new random URL every time the tunnel restarts, which means your bookmark breaks and you cannot share a stable link with collaborators. SocketXP provides a permanent URL that stays the same indefinitely. SocketXP also does not enforce session time limits, making it more practical for long-running Jupyter servers.
12. Does remote Jupyter Notebook access work when I am behind a corporate VPN?
Yes. The SocketXP agent on your remote machine creates an outbound connection to the SocketXP Cloud Gateway. You access the Jupyter URL from your browser over the internet—your corporate VPN connection on your laptop does not interfere with this, as long as the VPN allows general HTTPS browsing.