
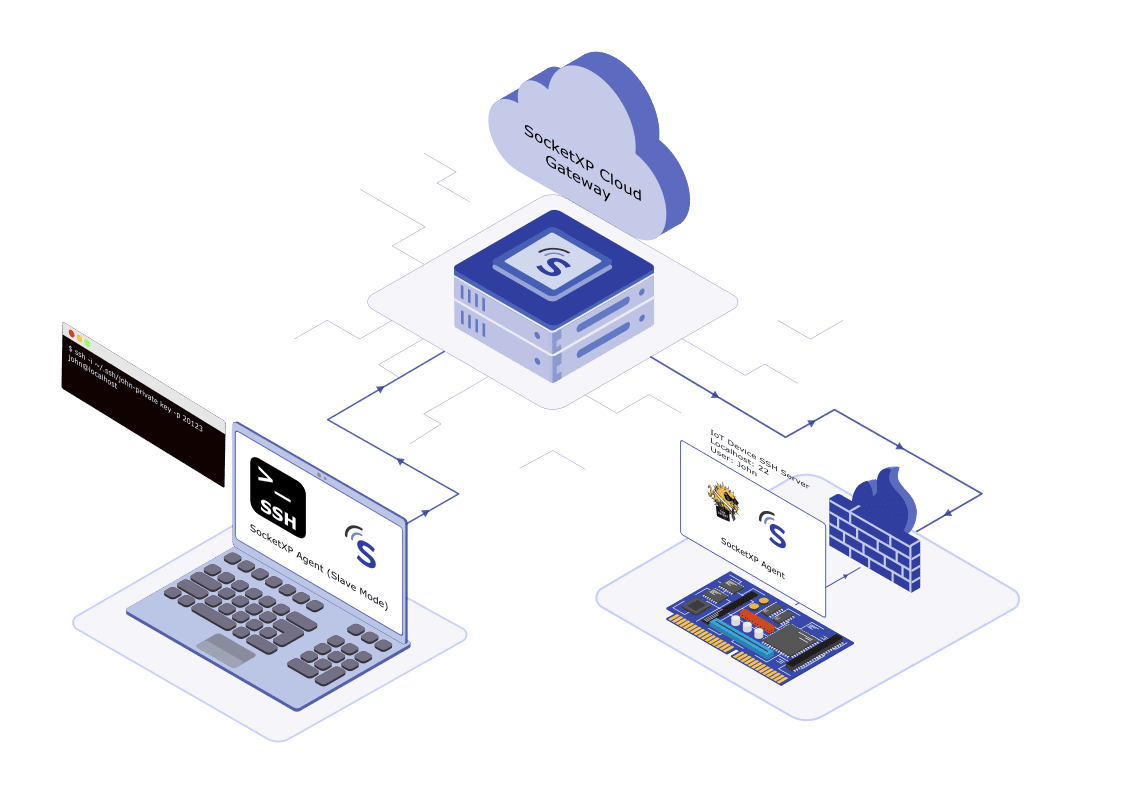
Raspberry Pi and Windows are the two most common computing environments in hobbyist, embedded systems, and production IoT workflows — and SSH from a Windows machine into a remote Raspberry Pi is one of the most frequent operations engineers need to perform. The obstacle is always the same: the Pi is behind a NAT router or CGNAT, making direct SSH connection from Windows impossible without port forwarding or a public static IP.
SSH from Windows to Raspberry Pi in 3 steps:
- On the Pi: install SocketXP agent and run
socketxp connect tcp://localhost:22 - On Windows: either open the SocketXP web portal in any browser for an instant SSH terminal, or install SocketXP for Windows and run it in slave mode to create a local proxy
- Connect: use PuTTY (
localhost:3000), Windows OpenSSH (ssh pi@localhost -p 3000), or the SocketXP browser terminal
No port forwarding, no static IP, no VPN configuration required.
The Core Challenge: Reaching a Pi from Windows over the Internet
Windows SSH clients — PuTTY, the built-in OpenSSH client, SecureCRT, Termius — all require a reachable hostname or IP address and an open TCP port 22. From outside the Pi’s local network:
- The Pi’s private IP (e.g.,
192.168.1.42) is not routable from the internet - The router’s public IP may change (no static IP) or may not exist (CGNAT)
- Port forwarding exposes SSH port 22 to the public internet, inviting brute-force attacks
- Corporate or campus Windows machines may have outbound port restrictions that block non-standard tunnels
SocketXP resolves this by having the Pi initiate an outbound connection to the SocketXP cloud gateway. Your Windows machine then connects through that existing tunnel — either via the SocketXP web portal in a browser, or via the SocketXP agent for Windows running in slave mode.
Step 1: Enable SSH on Your Raspberry Pi
On your Raspberry Pi, enable the SSH server if not already running:
sudo raspi-config
# Navigate to: Interface Options > SSH > Enable
Or directly via systemd:
sudo systemctl enable ssh
sudo systemctl start ssh
sudo systemctl status ssh
Step 2: Install the SocketXP Agent on Your Raspberry Pi
Step 2.1: Download and Install
Follow the download and install instructions to install the SocketXP agent on your Raspberry Pi.
Step 2.2: Get Your Authentication Token
Sign up at the SocketXP Web Portal and retrieve your authentication token.
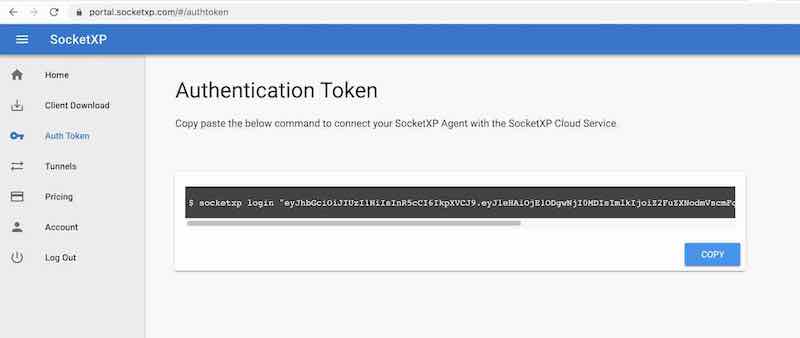
Authenticate the SocketXP agent:
$ socketxp login [your-auth-token-goes-here]
Step 2.3: Create the SSH Tunnel
$ socketxp connect tcp://localhost:22

Connected to SocketXP Cloud Gateway.
Access the device securely using the SocketXP agent in IoT Slave Mode.
Your Raspberry Pi is now online in the SocketXP web portal.
Step 3: Connect from Windows
There are two methods to SSH into your Raspberry Pi from Windows using SocketXP:
Method A: SocketXP Web Terminal (Browser-Based — Easiest)
No Windows software installation needed. Open any browser on your Windows machine and log into the SocketXP Web Portal.
Navigate to Devices, find your Raspberry Pi, and click the terminal icon.
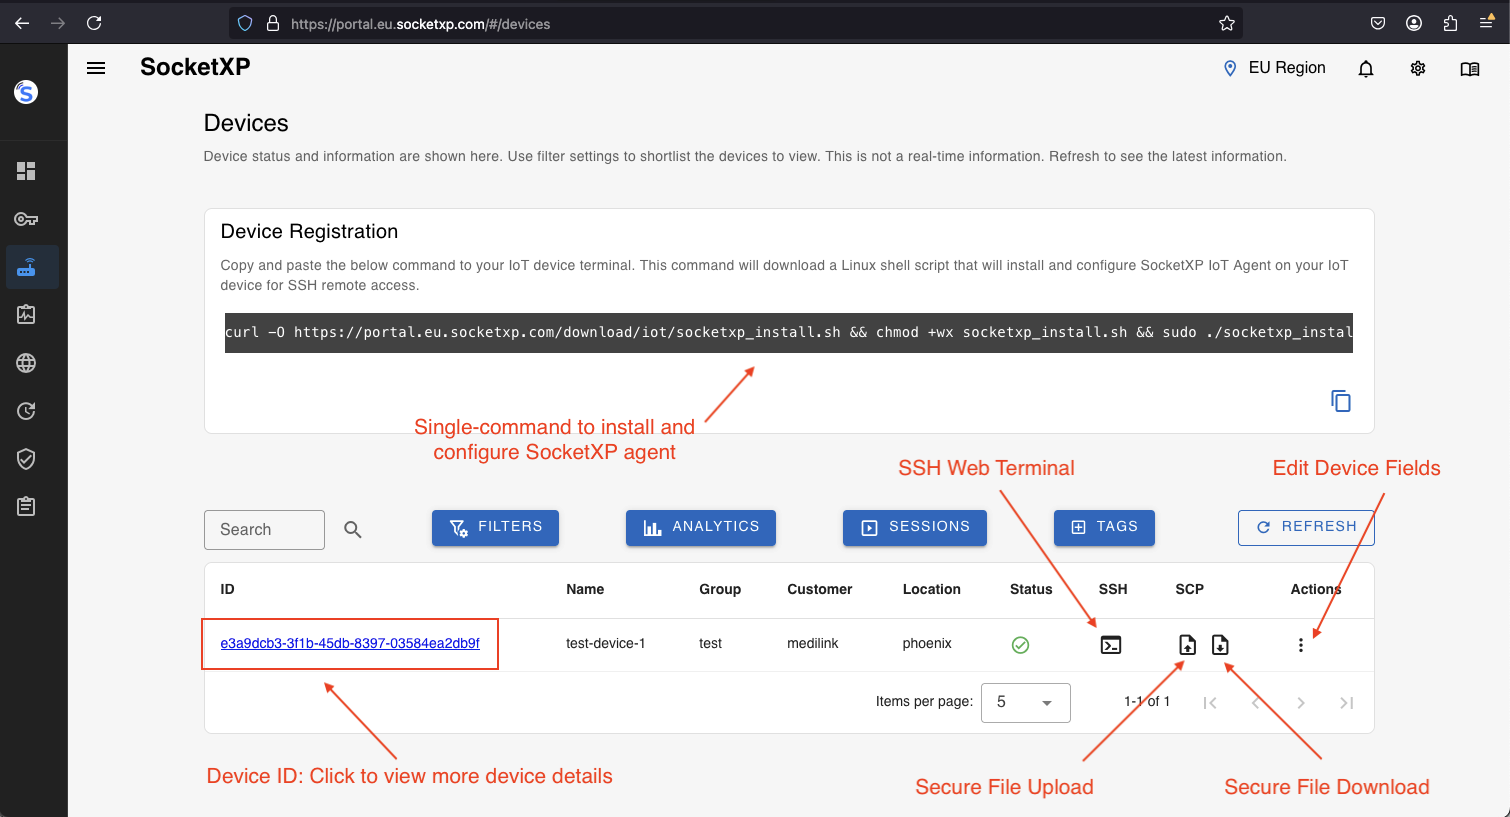
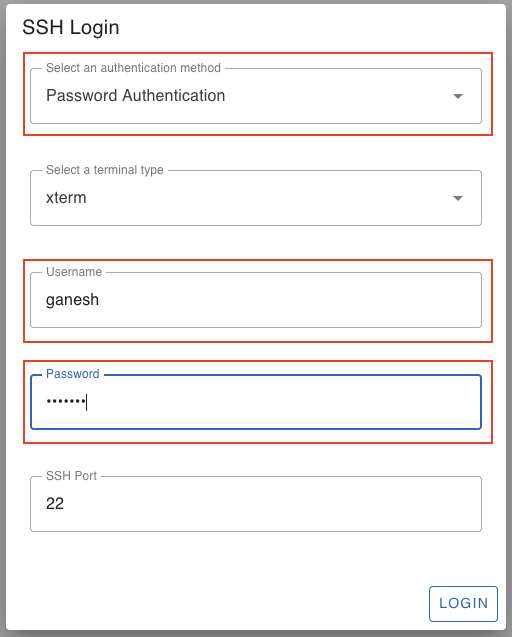
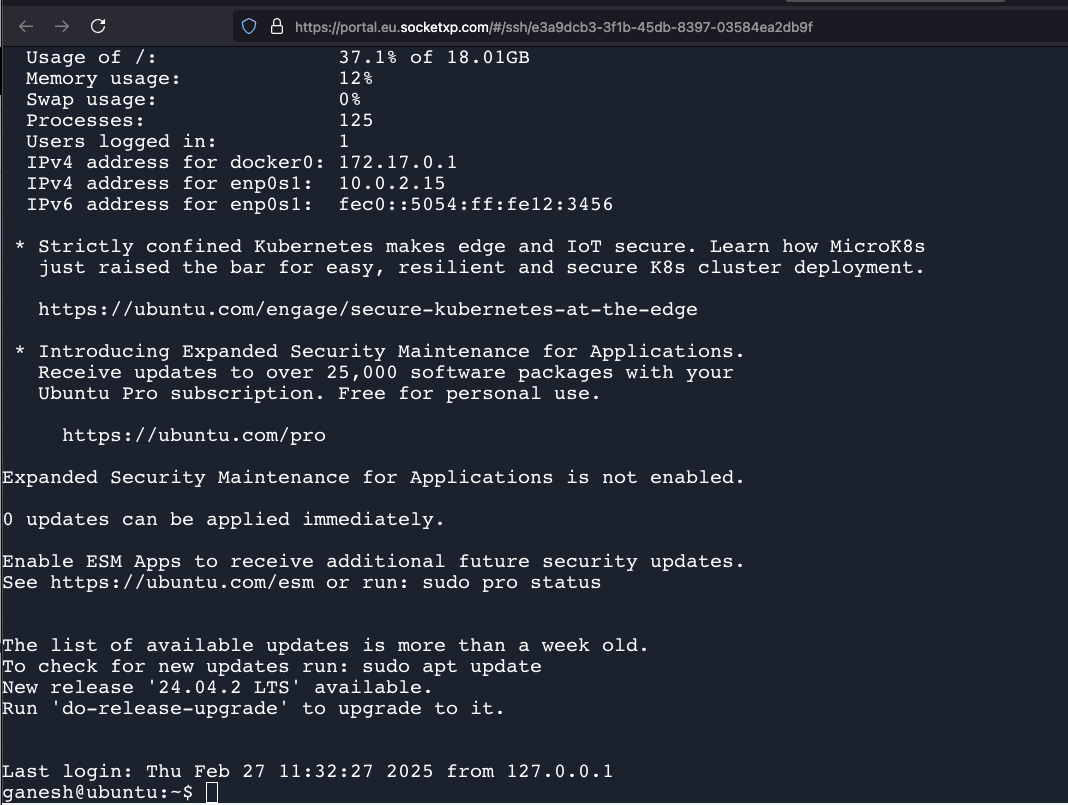
Enter your Raspberry Pi’s username and password. You are now in an SSH shell on your Pi, running inside your Windows browser.
This method works in Chrome, Edge, Firefox, and any modern browser on Windows 10 and Windows 11.
Method B: PuTTY via SocketXP Slave Mode
If you prefer PuTTY or the Windows OpenSSH client for SSH sessions, install SocketXP for Windows and run it in slave mode to create a local TCP proxy.
Step B.1: Download SocketXP for Windows
Download the SocketXP agent for Windows from socketxp.com/download. The .exe binary runs on both Windows 10 and Windows 11 (x64).
Step B.2: Run SocketXP in Slave Mode
Open PowerShell or Command Prompt as a regular user and run:
.\socketxp.exe connect tcp://localhost:3000 `
    --iot-slave `
    --peer-device-id "your-raspberry-pi-device-id" `
    --peer-device-port 22 `
    --authtoken your-auth-token

Listening for TCP connections at:
Local URL -> tcp://localhost:3000
Find your Raspberry Pi’s device ID in the SocketXP Portal under Devices.
SocketXP is now listening on localhost:3000 on your Windows machine. Any connection to this port is securely tunneled to port 22 (SSH) on your Raspberry Pi.
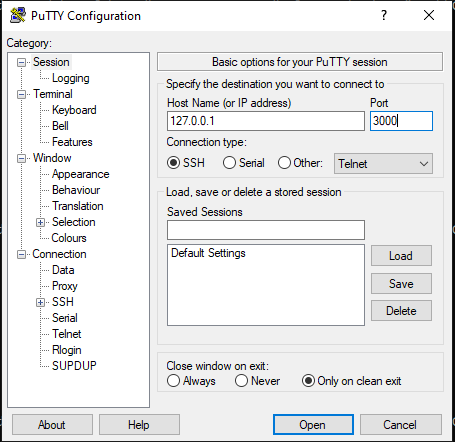
Step B.3: Connect with PuTTY
Download and open PuTTY.
Configure the connection:
- Host Name:
localhost - Port:
3000 - Connection type: SSH
Click Open. When prompted, enter your Raspberry Pi username and password.
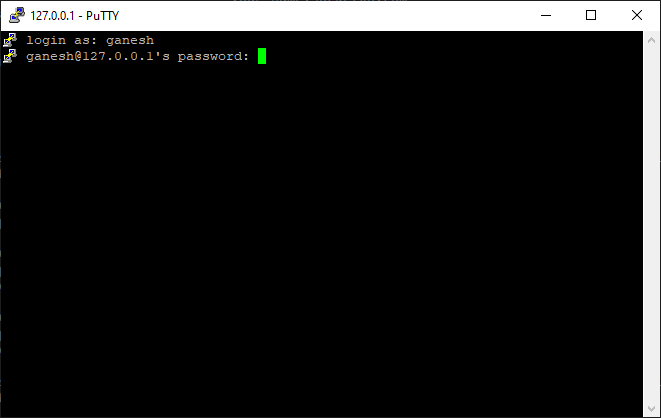
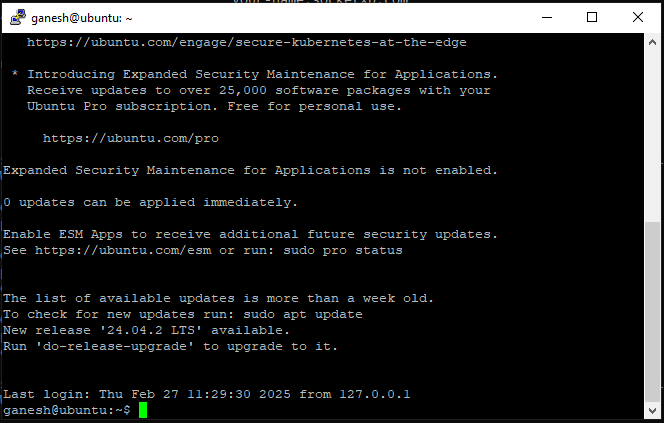
You are now in an SSH shell on your Raspberry Pi from Windows.
Step B.4 (Optional): Using Windows OpenSSH Client Instead of PuTTY
Windows 10 (1809+) and Windows 11 include the OpenSSH client. Use it directly without installing PuTTY:
ssh pi@localhost -p 3000
pi@raspberrypi:~ $
For SSH key authentication (recommended over passwords):
ssh -i C:\Users\YourName\.ssh\id_rsa pi@localhost -p 3000
File Transfer from Windows to Raspberry Pi
Using WinSCP (SFTP over SocketXP)
With the SocketXP slave mode proxy running on localhost:3000, open WinSCP and configure:
- File Protocol: SFTP
- Host name:
localhost - Port number:
3000 - User name:
pi(or your configured username) - Password: your Pi password
Click Login. WinSCP connects via SocketXP’s tunnel and provides a drag-and-drop file manager for transferring files between your Windows machine and the Raspberry Pi.
Using SCP from Windows Command Line
With the SocketXP slave mode proxy running:
# Copy a file from Windows to Raspberry Pi
scp -P 3000 C:\path\to\localfile.txt pi@localhost:/home/pi/

# Copy a file from Raspberry Pi to Windows
scp -P 3000 pi@localhost:/home/pi/logs/app.log C:\Users\YourName\Downloads\
SocketXP vs Tailscale vs ngrok for Windows to Raspberry Pi Remote Access
Windows users evaluating remote access tools for Raspberry Pi often compare SocketXP with Tailscale and ngrok. Here is how they differ for IoT use cases:
| Criterion | ngrok | Tailscale | SocketXP |
|---|---|---|---|
| Access from Windows browser | No | No | Yes — web terminal, no install |
| Windows VPN client required | No | Yes | No |
| IoT fleet management | No | No | Yes — centralized device portal |
| Remote OTA updates to Pi | No | No | Yes |
| Device health monitoring | No | No | Yes |
| Works behind CGNAT | Yes | Yes (DERP relay) | Yes |
| Scales to 10,000+ devices | Not designed for IoT | Mesh complexity at scale | Native IoT architecture |
| Session limits (free tier) | Yes | No | No |
| WinSCP / SCP file transfer | No direct support | Not built-in | Yes — via slave mode SFTP proxy |
| Agent resource footprint | Low | Moderate (kernel VPN) | Minimal userspace binary |
ngrok creates short-lived developer tunnels useful for testing and demos. On the free tier, sessions expire and public URLs change on restart — making it unreliable for persistent Raspberry Pi access from Windows. It has no device management portal, no OTA update support, and no monitoring. It is not designed for IoT.
Tailscale requires the Tailscale client installed on every Windows machine that needs Pi access — including Windows machines that are shared or managed by IT. Corporate Windows environments often have restrictions on VPN client installations (MDM policies, firewall rules). Tailscale also provides no IoT-specific management features beyond network connectivity.
SocketXP gives Windows users two paths with no VPN client required: the SocketXP web portal runs in any Windows browser (Chrome, Edge, Firefox) and provides instant SSH terminal access; the SocketXP Windows agent (a single .exe) in slave mode creates a local TCP proxy compatible with PuTTY, the Windows OpenSSH client, WinSCP, and any other SSH/SFTP tool. At scale, SocketXP manages tens of thousands of Raspberry Pi and embedded Linux devices from a single portal — with OTA updates, device monitoring, and RBAC built in.
SSH Public Key Setup for Windows to Raspberry Pi
Password-based authentication is vulnerable to brute-force attacks. Set up SSH key authentication for secure, password-free access:
Generate an SSH key pair on Windows:
ssh-keygen -t ed25519 -C "your-email@example.com"
# Keys saved to C:\Users\YourName\.ssh\id_ed25519 (private) and id_ed25519.pub (public)
Copy the public key to your Raspberry Pi (with the SocketXP proxy running on port 3000):
type C:\Users\YourName\.ssh\id_ed25519.pub | ssh -p 3000 pi@localhost "mkdir -p ~/.ssh && cat >> ~/.ssh/authorized_keys"
Disable password authentication on the Pi (after confirming key login works):
# On the Raspberry Pi:
$ sudo nano /etc/ssh/sshd_config
# Set: PasswordAuthentication no
$ sudo systemctl restart ssh
Security Best Practices
- Use SSH key authentication from Windows instead of passwords; generate an Ed25519 key pair (
ssh-keygen -t ed25519) for stronger security than RSA-2048 - Never enable password authentication on your Raspberry Pi’s SSH server once keys are configured
- Use SocketXP RBAC to control which Windows users can access which Raspberry Pi devices
- Protect your SocketXP auth token — treat it like a password; rotate it periodically and revoke it for decommissioned devices
- Run SocketXP as a service on the Pi so the tunnel re-establishes automatically after reboots and network disruptions
Conclusion
Accessing a Raspberry Pi from Windows no longer requires opening firewall ports, configuring static IPs, or running a VPN server. SocketXP’s outbound tunnel makes your Pi reachable from any Windows machine in two ways: the SocketXP web portal for instant browser-based SSH, or the SocketXP Windows agent in slave mode for PuTTY and the native Windows SSH client.
Both approaches use the same encrypted TLS tunnel and SocketXP’s cloud gateway — working transparently behind NAT, CGNAT, and corporate firewalls.
For all Raspberry Pi remote access options — SSH, VNC, web apps, headless setup, Mac, and mobile — see the complete SocketXP solution page.
Frequently Asked Questions
How do I SSH into a Raspberry Pi from Windows without port forwarding?
Install the SocketXP agent on your Raspberry Pi (run 'socketxp connect tcp://localhost:22'), then either use the SocketXP web terminal in your browser—no Windows software needed—or install SocketXP for Windows in slave mode and connect via PuTTY to localhost on the proxy port.
Can I use PuTTY to SSH into a Raspberry Pi from Windows using SocketXP?
Yes. Install SocketXP for Windows and run it in slave mode to create a local proxy on a chosen port (e.g., 3000). Open PuTTY, enter 'localhost' as the host and '3000' as the port, and connect. You'll be prompted for your Pi's username and password.
Does Windows 11 have a built-in SSH client I can use with SocketXP?
Yes. Windows 10 (version 1809+) and Windows 11 include the OpenSSH client. Open PowerShell or Command Prompt and run 'ssh pi@localhost -p 3000' after setting up the SocketXP slave mode proxy on port 3000.
Can I use WinSCP to transfer files to my Raspberry Pi from Windows?
Yes. WinSCP supports SFTP over the SocketXP local proxy. Set the host to 'localhost', the port to the slave mode proxy port (e.g., 3000), and the protocol to SFTP. Use your Pi's username and password or private key for authentication.