Table of Content
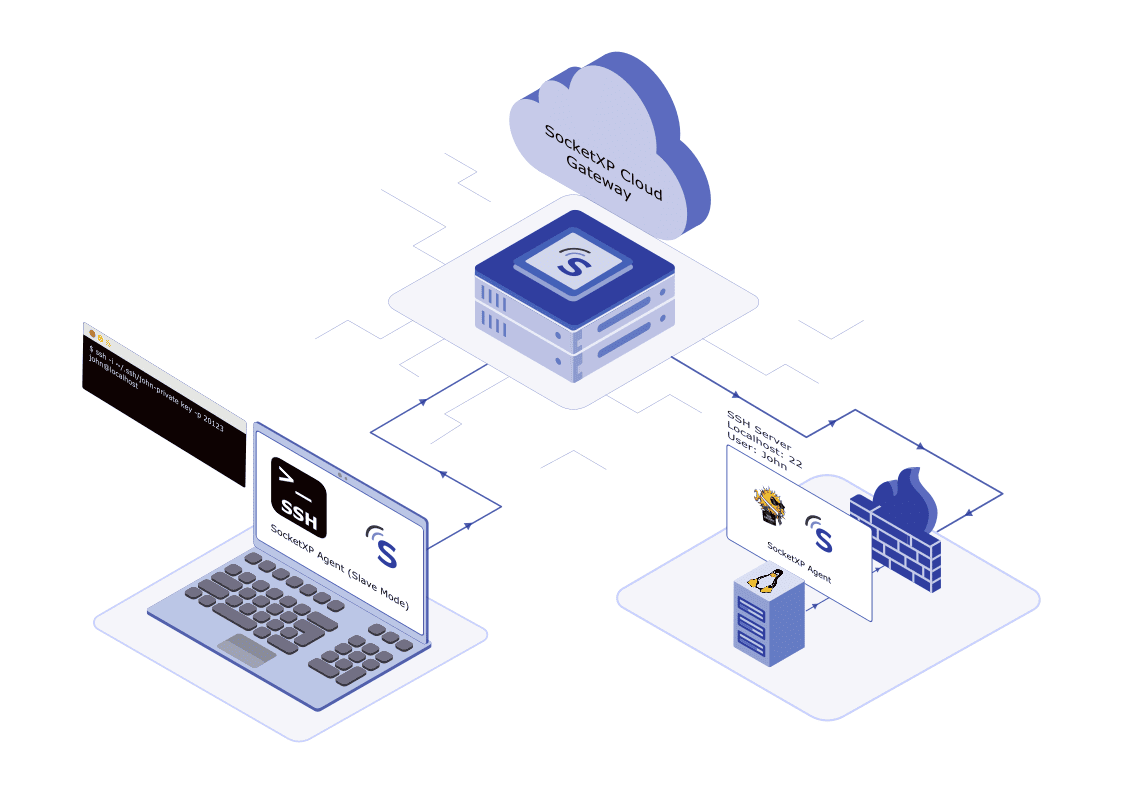
Table of Content
In this article, we will discuss how to securely remote access your Linux (SSH) server or embedded Linux device from anywhere in the world, making it easier than ever to remotely manage your Linux server.
One of the key features of the Linux server is its ability to be accessed remotely, which allows you to control and manage your Linux server from another machine over the internet.
One common method to remotely access a Linux server is using Secure Shell (SSH), a network protocol that provides a secure way to communicate with a remote device.
Let’s dive in and unlock the full potential of your Linux device with remote access from anywhere via SSH!
Step 1: Set Up Your Linux server for remote SSH access
Before you can remotely access your Linux server, you need to make sure that it is set up correctly.
This includes installing an operating system (such as Ubuntu), connecting it to the internet using an ethernet cable or through Wi-Fi and verify if you can ping ‘www.google.com’ from the Linux server.
Once your Linux server is up and running, you are ready to proceed with remote access.
Step 2: Enable SSH on Your Linux server
By default, SSH is disabled on a Linux server for security reasons. However, you can easily enable it using the following steps:
- Open a terminal window on your Linux server.
- Run
systemctl status sshdand check if the OpenSSH server is already running. - If not, run
systemctl start sshd - Recheck the status of the sshd server by running
systemctl status sshdagain.
If SSH server(sshd) is not installed in your Linux machine, install the OpenSSH server and client on your Linux server first.
Step 3: Set up Linux server Remote Access software
Remote access to the SSH server running in your Linux server requires installing and running a secure remote access software (a VPN like software) on the Linux server.
Once the remote access software is installed on the Linux server, the Linux server device can be securely accessed from anywhere in the world without setting up port forwarding on your router.
SocketXP, a popular Linux server remote access and IoT Device Management platform, enables you to easily manage, control, monitor and remote access a fleet of Linux server from a web portal.
How SocketXP Linux server Remote Access solution works
First, you need to install the SocketXP agent on your Linux server.
The agent will securely connect (using an SSL/TLS tunnel) to the SocketXP IoT Cloud Gateway using an authentication token.
You can then SSH connect to your Linux server from the SocketXP Web Portal or using your own SSH client such as PuTTY.

Follow the steps below to install and setup SocketXP agent on your Linux server.
Step 3.1: Download and Install
Follow the download and install instructions to install the SocketXP agent on your Linux server device.
Step 3.2: Get your Authentication Token
Sign up at SocketXP Web Portal and get your authentication token.
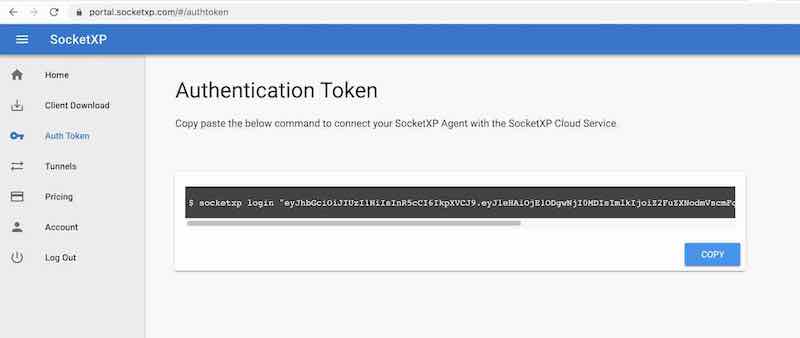
Use the following command to login to the SocketXP IoT Cloud Gateway using the auth token.
$ socketxp login [your-auth-token-goes-here]
Step 3.3: Connect the device to the SocketXP Cloud Gateway
Use the following command to connect the Linux server to the cloud gateway using a secure SSL/TLS connection.
 $ socketxp connect tcp://localhost:22

Connected to SocketXP Cloud Gateway.
Access the device securely using the SocketXP agent in IoT Slave Mode.
For the security of your device, SocketXP IoT Solution doesn’t create any public TCP endpoints that can be connected by any SSH client from the internet.
SocketXP private tunnel endpoints are not exposed to the internet and can be accessed only using the SocketXP agent (in IoT slave mode using the auth token of the user) or through the web terminal in the SocketXP web portal as shown below.
Single-Touch Installation Command
The 3 step instruction explained above to setup SocketXP on your Linux server is a tedious process, if you have thousands of Linux server devices to install, configure and manage.
With this in mind, SocketXP IoT Remote Access Solution also provides a single-touch installation command for installing and configuring SocketXP IoT Agent on large number Linux server devices.
Copy and paste the below single-touch installation command from the SocketXP Portal page on to the terminal of your Linux server. The command shown below will download a shell script that will install, configure, setup SocketXP IoT agent on your Linux server. After the command completes, the Linux server device would show up as online in the SocketXP Portal page.

Step 4: Remotely Accessing the Linux server SSH from anywhere
Your Linux server is now ready to be accessed remotely from anywhere in the world using SSH by simply logging in to the SocketXP Web Portal.
Head to the “Devices” section, find your Linux server device listed in the table. Click the terminal icon next to your device. It will take you to a SSH login screen.
Provide the login and password setup for your device. Once the login is successful, it will put you in a shell prompt.


The above screen capture shows the “htop” command output from an SSH session created using the SSH web terminal window in the SocketXP web portal.
SocketXP SSH Public Key Management Tool:
SSH password based authentication is vulnerable to attacks and generally not recommended for production usecases. SSH Public Private key based authentication is a secure and recommended method for production usecases.
By default, SocketXP Web Portal will create and sync a very short-lived single-use SSH public key to your Ubuntu Linux machine, so that you can securely remote login to your Ubuntu Linux from anywhere in the world, without having to use password based authentication. The key will be cleaned up or trashed immediately after the user logs in.
You should remember that a user can SSH into your Ubuntu Linux machine from the SocketXP web portal, only after a successful SSO login (and 2FA authentication) provided by your SSO OAuth provider such: Microsoft 365 or Google G-Suite.
SocketXP has a built-in SSH public key management tool, that automates SSH public key management or syncing it between your Ubuntu Linux system and the SSH web client. It even cleans up the key immediately, so that a new public key setup is required for the next login attempt by the same user.
For better security, you can even disable password based authentication completely on your Ubuntu Linux SSH server. But, if you prefer to use password based authentication, then select the “Password authentication” option during the login prompt in the web portal. The default option is “SSH Public Key Authentication.”
Step 4.1: Configuring SocketXP agent to run in slave mode
This is an alternate method for connecting to your Linux SSH server from anywhere using the SocketXP solution.
If you don’t want to access your Linux server SSH from the browser and you want to access it using your own SSH client such as PuTTY then follow the instructions below.
This method is also extremely useful if you want to setup and use SSH public private keys to remote access your Linux server.
First download and install the SocketXP agent software on your accessing device (such as a laptop running Windows or Mac OS).
Next, configure the agent to run in slave mode (or local proxy mode) using the command option “–iot-slave” as shown in the example below.
$ socketxp connect tcp://localhost:3000 --iot-slave --peer-device-id "2233-4455-abcd-34445" --peer-device-port 22 --authtoken <auth token>

Listening for TCP connections at:
Local URL -> tcp://localhost:3000
You shall find the device ID of your Linux server from the SocketXP Portal page in the IoT Devices section.
Now you can access your Linux server’s SSH server using the above SocketXP local endpoint, as shown below.
You can use your own SSH client such as PuTTY to connect to your remote Linux server SSH shell. The following example uses a command line based SSH client tool.
$ ssh -i ~/.ssh/john-private.key john@localhost -p 3000
How to install OpenSSH server on your Linux server device
All Linux server devices come with SSH Server installed. If your device is not Linux server based and you want to know how to install and configure SSH server, SSH clients, SSH public/private keys for remote SSH access, continue reading the below sections.
OpenSSH is a free open source software that uses SSH protocol to create secure and encrypted communication channels over computer networks.
Open SSH is developed by the Open BST Community and it is released under a Simplified BSD License
OpenSSH comes with additional features such as SFTP and SCP to perform secure file transfer and secure copy over a computer network.
To install and run SSH server on your Linux server device, execute the following commands:
Debian/Ubuntu Linux:
First update your linux and then install the openssh server
$ sudo apt-get update
$ sudo apt-get install openssh-server
The following commands will enable and run SSH server as a daemon in the background.
$ sudo systemctl enable ssh
$ sudo systemctl start ssh
RHEL/CentOS Linux:
$ sudo yum update
$ sudo yum -y install openssh-server
Then enable SSH server and start it.
$ sudo chkconfig sshd on
$ sudo service sshd start
SSH uses port 22 for communication. If it is not enabled already, execute the following command to open up the SSH port on your linux system.
$ sudo /sbin/iptable -A INPUT -m state --state NEW -m tcp -p tcp --dport 22 -j ACCEPT
$ sudo service iptables save
How to install SSH client on your client machines
Use the following command to install SSH client on your laptops or any device from where you would remote SSH into your Linux server.
Debian/Ubuntu
$ sudo apt-get update
$ sudo apt-get install openssh-client
RHEL/CentOS
$ sudo yum update
$ sudo yum -y install openssh-client
How to create and setup SSH public private keys
SSH uses a public/private key based encryption algorithm for encrypting the communication channel. Use the ssh-keygen command to generate SSH keys for those clients that need to SSH into your Linux server devices.
Go to your client machine (Laptop, for eg.) and open up a terminal and execute the following command. Follow the instructions on the screen to create a public/private key pair.
$ ssh-keygen -b 4096
Generating public/private rsa key pair.
Enter file in which to save the key (/home/your_home/.ssh/id_rsa):
The keys will be saved usually in your home directory under the “.ssh” folder.
Leave the private key in your client machine. Copy just the contents of /home/your_)home/.ssh/id_rsa.pub file and paste it (actually append it) to the “~/.ssh/authorized_keys” file in your Linux server device where the SSH server runs.
From now on, you can login to your Linux server remotely using the SSH private key in your client machine using the following command
$ ssh -i ~/.ssh/id_rsa.key [email protected] -p 23224
Disable Password Authentication on your SSH Server
After configuring your SSH server and client to use private/public key for authentication, it is wise and safe to turn off password based authentication, because passwords are relatively easy to crack.
Before you perform this step, make sure you have setup your public/private key pairs correctly and you are able to login using them. Otherwise, once you disable password authentication, you’ll be locked out of your Linux server.
To disable password authentication, open the SSH server’s configuration file as a sudo user.
sudo nano /etc/ssh/sshd_configInside the file, search for a directive called PasswordAuthentication. This may be commented out. Uncomment the line and set the value to “no”. This will disable your ability to log in to the SSH server using account passwords:
PasswordAuthentication noSave and close the file when you are finished.
To actually implement the changes we just made, you must restart the service.
On Ubuntu or Debian machines, you can issue this command:
sudo service ssh restartOn CentOS/Fedora machines, issue the following command:
sudo service sshd restartAfter completing this step, you’ve successfully transitioned your SSH daemon to only respond to SSH keys.
Security Best Practices:
As with any remote access solution, enabling SSH on a Linux server comes with security implications.
You need to follow SSH remote access security best practices to keep your Linux server secure from any potential threats.
It is essential that you periodically review these security best practices and ensure that your Linux server is adhering strictly to the security guidelines.
Advantages of using SocketXP for Linux server remote SSH access from anywhere:
SocketXP uses secure reverse proxy SSL/TLS tunnels to connect to your Linux server over the internet, so that your device is not directly exposed to the internet. Also, the data transmitted is encrypted using SSL/TLS.
SSH uses the same cryptography technology used by banks and governments to exchange highly confidential data over the internet.
The data transferred gets encrypted end-to-end between the SSH client and the SSH server.
SocketXP has no way to decrypt or eavesdrop your encrypted data without knowing your SSH private keys. SocketXP merely acts as an SSL/TLS reverse proxy server for your encrypted data traffic transmitted through the SSH connection.
Conclusion
Remotely connecting to your Linux server via SSH provides a convenient and powerful way to control your Linux server from anywhere in the world.
By following the steps outlined in this article, you can easily enable SSH, install SocketXP Linux server Remote Access agent on it, and connect to it remotely using SSH from anywhere.
Once connected, you can perform various tasks to manage your Linux server remotely, including updating packages, installing/removing software, configuring settings, transferring files, managing processes, and performing system maintenance.
With remote access, you can unlock the full potential of your Linux server and use it for a wide range of applications with ease and convenience.
Frequently Asked Questions(FAQs):
General FAQs About IoT Remote Access
What is IoT remote access and why is it important?
IoT remote access allows you to securely connect to and manage devices (like Raspberry Pi, ESP32, BeagleBone, or industrial gateways) over the internet. It’s essential for developers and enterprises to update firmware, debug issues, monitor logs, or control devices deployed in remote locations without physically being there.
Why is remote access to microcontroller boards or embedded Linux devices challenging?
Most IoT devices sit behind NAT routers or firewalls, making them unreachable directly over the internet. Setting up port forwarding or static IPs can be complex and insecure. Solutions like SocketXP remove these hurdles by providing secure tunneling without reconfiguring networks.
How does SocketXP make remote IoT access easier compared to VPNs or port forwarding?
Unlike VPNs, SocketXP doesn’t require complex setup, static IPs, or exposing open ports. It creates a secure, lightweight tunnel between your device and your laptop/browser, so you can access it instantly without worrying about firewall restrictions.
Security & Networking FAQs
Is remote access to IoT devices safe?
It can be unsafe if done via insecure methods like port forwarding. SocketXP ensures safety by using TLS-encrypted tunnels, access tokens, and role-based access control, protecting devices against unauthorized access.
What are the risks of using port forwarding for IoT devices?
Port forwarding exposes your device to the public internet, making it vulnerable to brute force attacks, malware, and unauthorized logins. SocketXP eliminates this risk by not exposing any public IP or open port.
How does SocketXP ensure secure remote connections?
SocketXP uses end-to-end encrypted tunnels (TLS 1.2/1.3), token-based authentication, and allows fine-grained access control. It ensures that only authorized users can connect, keeping devices safe from cyberattacks.
How does SocketXP compare to VPNs for IoT remote access security?
VPNs create a broad network tunnel that can expose all connected devices if compromised. SocketXP provides device-specific, application-layer tunnels — limiting exposure and improving security with less complexity.
Device & Platform-Specific FAQs
Can I use SocketXP to access a Raspberry Pi remotely?
Yes. SocketXP supports Raspberry Pi out of the box. You can securely SSH, VNC, or open the Pi’s web applications from anywhere without port forwarding.
Does SocketXP work with ESP32 or Arduino boards?
For microcontrollers like ESP32 or Arduino, SocketXP can act as a cloud tunnel to send telemetry data, enable secure OTA (over-the-air) firmware updates, or provide remote monitoring via APIs.
Is SocketXP compatible with BeagleBone, Jetson Nano, or other SBCs?
Absolutely. Any device running Linux (Debian, Ubuntu, Yocto, OpenWrt, etc.) can install the SocketXP agent to enable secure remote access.
Can I use SocketXP for industrial IoT devices or PLCs?
Yes. SocketXP is lightweight and suitable for edge gateways, PLCs, and industrial controllers that need secure, managed remote connectivity.
Usage & Features FAQs
Do I need static IP or port forwarding to use SocketXP?
No. SocketXP eliminates the need for static IPs, dynamic DNS, or port forwarding. It works even if your device is behind NAT or a firewall.
Can I use SocketXP to SSH into devices behind NAT or firewalls?
Yes. That’s one of SocketXP’s core features. You can instantly open a secure SSH session without touching your router settings.
Does SocketXP support web-based SSH access through a browser?
Yes. SocketXP offers a web console, so you can open a terminal directly in your browser without installing an SSH client.
Can I transfer files remotely using SocketXP?
Yes. SocketXP supports secure file transfer and remote log monitoring, making it easier to update configurations or retrieve logs.
Does SocketXP support remote firmware updates for IoT devices?
Yes. You can securely push OTA firmware updates through the SocketXP tunnel without exposing your devices.
Can I access my IoT device dashboard or web UI using SocketXP?
Absolutely. You can expose web-based dashboards, admin panels, or APIs securely via SocketXP tunnels with HTTPS.
Performance & Scalability FAQs
Does SocketXP introduce latency in IoT device connections?
SocketXP is optimized for low latency. It uses lightweight tunnels, so the performance impact is negligible compared to traditional VPNs.
Can SocketXP handle thousands of IoT devices at scale?
Yes. SocketXP supports multi-device fleet management, making it suitable for both small hobby projects and enterprise deployments.
Is SocketXP suitable for low-power or constrained networks?
Yes. The client agent is lightweight and works efficiently even on devices with limited CPU, RAM, and bandwidth.
Comparison & Alternatives FAQs
What is the difference between SocketXP and VPN solutions?
VPNs require network-wide setup, static IPs, and can expose multiple devices at once. SocketXP is device-centric, faster to deploy, and more secure for IoT use cases.
Why should I choose SocketXP over TeamViewer, ngrok, or OpenVPN?
TeamViewer is GUI-focused, ngrok is session-based, and OpenVPN is complex. SocketXP combines the simplicity of tunnels with enterprise-grade IoT features (SSH, HTTPS, APIs, OTA).
Can I replace my VPN setup with SocketXP for IoT remote access?
Yes. SocketXP is a simpler and more secure alternative to VPNs for managing distributed IoT devices.
Setup & Integration FAQs
How do I install SocketXP on my IoT device?
Installation is simple. Download the SocketXP agent binary, register it with your account, and start the service. Within minutes, you’ll have a secure remote tunnel.
What operating systems does SocketXP support?
SocketXP works with most Linux distributions (Debian, Ubuntu, Raspbian, OpenWrt, Yocto) and embedded Linux environments.
Can I run SocketXP on Docker or Kubernetes?
Yes. SocketXP can be deployed as a Docker container or sidecar within Kubernetes clusters for secure application tunneling.
Does SocketXP provide SDKs or APIs for developers?
Yes. Developers can integrate SocketXP tunnels into their applications using APIs, making it possible to build remote monitoring dashboards or CI/CD pipelines.
Pricing & Business FAQs
Is SocketXP free to use?
SocketXP offers a free tier for developers and hobbyists with limited devices. Paid plans unlock more devices, features, and enterprise support.
Does SocketXP offer a free trial for IoT developers?
Yes. You can try SocketXP for free and later upgrade to paid plans as your deployment grows.
Can I use SocketXP for commercial IoT products?
Yes. SocketXP supports enterprise deployments, OEM integrations, and white-label options for commercial products.