Table of Content
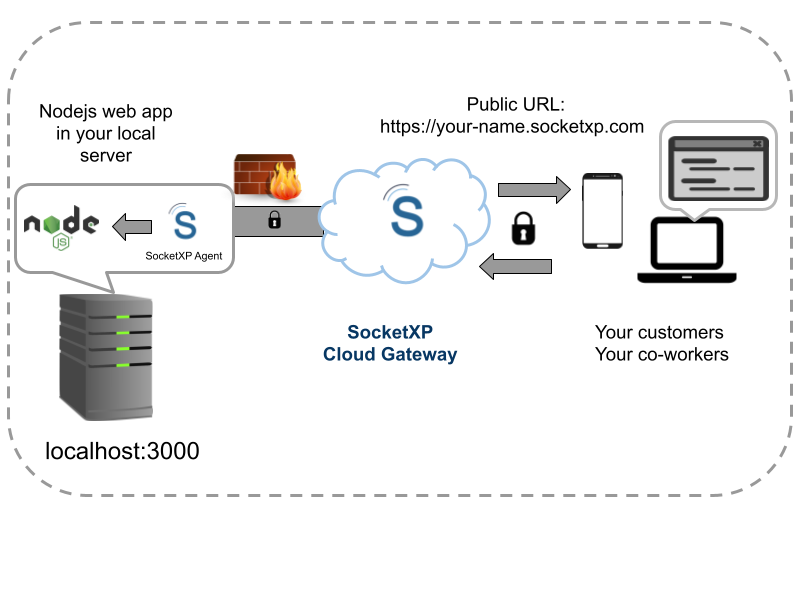
Table of Content
In this tutorial, we will discuss how to setup remote access to a websocket server in your local machine so that you can connect to the websocket securely over the internet.
Whether you are a coding enthusiast, a DIY enthusiast, or just curious about writing web applications for IoT and remotely accessing it, this article will provide you with a step-by-step instructions on how to remotely connect to a websocket app running in your IoT over the internet.
So, let’s dive in.
NodeJS Websocket server example
We’ll use the following simple NodeJS based Websocket server to illustrate our solution.
$
// ws-server.js
const express = require('express');
const http = require('http');
const WebSocket = require('ws');

const app = express();

//initialize a simple http server
const server = http.createServer(app);

//initialize the WebSocket server instance
const wss = new WebSocket.Server({ server });

wss.on('connection', (ws) => {
    //websocket client connection is up.

    //Listen for messages from the client and print
    ws.on('message', (message) => {
        console.log('Msg received: %s', message);
    });

    //send a message to the incoming client connection
    ws.send('Hi there, I am a WebSocket server');
});

//start the HTTP WS server
server.listen(3000, () => {
    console.log(`HTTP server started on port ${server.address().port}`);
});
Now run the Websocket server using the following command:
$ node ws-server.js
HTTP server started on port 3000
NodeJS Websocket client example
We’ll use the following simple NodeJS websocket client for our illustration:
//ws-client.js
const WebSocket = require('ws');

const ws = new WebSocket('ws://localhost:3000')
ws.onopen = () => {
  console.log('Websocket opened on browser')
  ws.send('Hello, I am a Websocket client')
}

ws.onmessage = (message) => {
  console.log(`Msg received: `, message.data)
}
Now, let’s run the Websocket client locally on the same machine as the server and test if the client is able to connect to the Websocket server.
$ node ws-client.js
Websocket opened on browser
Msg received:  Hi there, I am a WebSocket server
Now if you watch the Websocket server’s terminal window, you’ll see the following message:
$ node ws_server.js
HTTP server started on port 3000
Msg received: Hello, I am a Websocket client
Right now the Websocket server application can be accessed only from a local network because it runs on your server, Raspberry Pi or IoT behind a NAT router or Firewall.
Now, to remote access your Websocket server application from the internet, we’ll use a simple and easy to use SocketXP IoT Remote Access Solution to setup remote access to your websocket server.
You can use SocketXP to remote access any web application over the internet.
Remote Access Websocket Server From Internet
Follow the instructions below to create a SocketXP HTTPS tunnel and a Public Web URL for your Websocket Server application, so that it can be remotely accessed from anywhere using a Websocket client.
Step 1: Download and Install
Download and install SocketXP IoT agent on your server, IoT or Raspberry Pi device where the Websocket server runs.
Step 2: Get your Authentication Token
Sign up at https://portal.socketxp.com and get your authentication token.
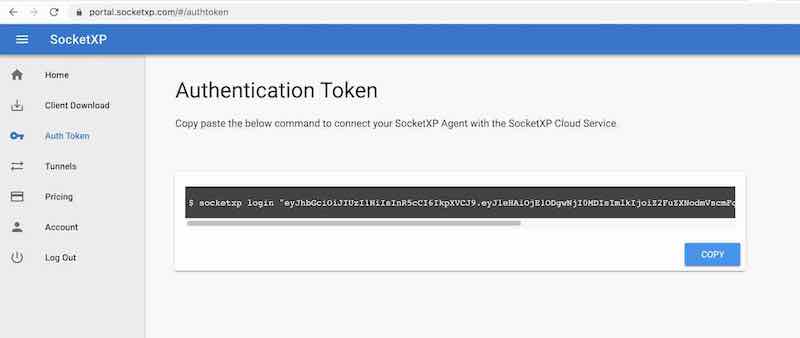
Click the copy button to copy the command string and paste in the terminal window in your laptop or server.
$ socketxp login "eyJhbGciOiJIUzI1NiIsInR5cCI..."
After registering the SocketXP Client with the SocketXP Cloud Service, use the following command to create a secure HTTP proxy tunnel between the nodejs websocket server and the SocketXP Cloud Gateway.
$socketxp connect http://localhost:3000
Public URL -> https://test-user-59129dd68b58.socketxp.com
Let’s access the nodejs websocket server application from the internet using the SocketXP Public URL provided in the above output.
The above SocketXP public URL is a permanent link just assigned to your Websocket server app and it doesn’t change until you manually delete it from the SocketXP web portal.
We have modified the Websocket client to use the above SocketXP Public Web URL to connect to the Websocket server over the internet or from any outside network.
//ws-client.js
const WebSocket = require('ws');
const ws = new WebSocket('ws://test-user-59129dd68b58.socketxp.com')
ws.onopen = () => {
  console.log('Websocket opened on browser')
  ws.send('Hello, I am a Websocket client')
}
ws.onmessage = (message) => {
  console.log(`Msg received: `, message.data)
}
Now let’s try connecting the Websocket client to the Websocket server over the internet.
Note: Usually the Websocket client runs in a browser. But to keep our discussion simple we use NodeJS to execute the Websocket client app.
$ node ws-client.js
Websocket opened on browser
Msg received:  Hi there, I am a WebSocket server
Congratulations!! You have successfully setup remote access to your Websocket server and accessed it remotely using a Websocket client.
Conclusion:
Developing websocket applications for IoT is made easy by using Javascript or Python.
With SocketXP IoT Remote Access Solution – part of IoT Device Management and Remote Access Platform, it is easy to securely access any websocket application running in your IoT from any browser on any OS, be it Windows or Mac or Linux.
By following the steps outlined in this article, you can quickly set up remote access to websocket app running in your IoT and access it from anywhere, anytime.
Whether you’re managing a IoT project remotely or accessing your IoT for troubleshooting or maintenance purposes, web application remote access is a powerful tool that enables you to stay connected to your IoT with ease.