Table of Content
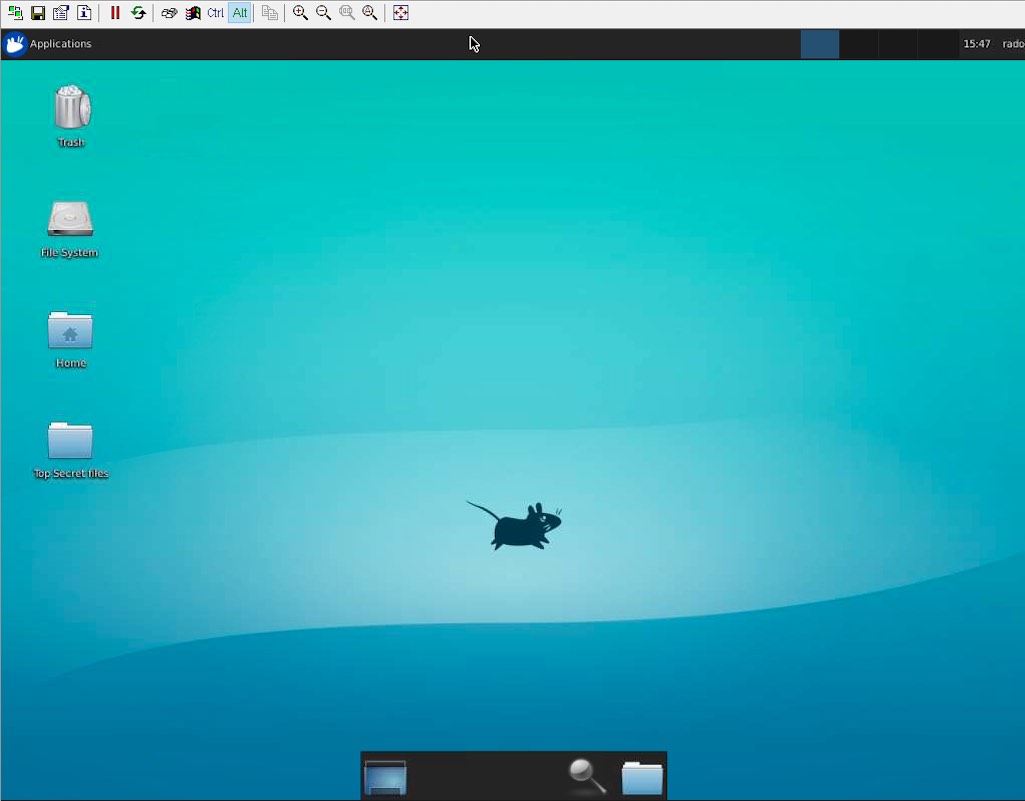
Table of Content
In this article, we’ll discuss how to remotely access your Linux or Ubuntu desktop GUI from Windows using RDP, making it easier than ever to manage your Linux server from anywhere in the world.
One of the most powerful features of the Linux is its ability to be accessed remotely, allowing you to control and interact with your Linux server or Ubuntu over the internet from outside network.
And when it comes to remote desktop access on a Linux server, xrdp (X Remote Desktop Protocol) is the go-to solution.
With xrdp, you can unlock a world of possibilities, from setting up a headless Linux server to accessing your Linux server’s graphical desktop from any machine, be it a Windows, macOS, or Linux machine.
What is RDP
Remote Desktop Protocol (RDP) is a network protocol developed by Microsoft and is widely used by users to remotely access and interact with the graphical user interface of a remote machine such as Windows Server, Mac, or Linux machine including Linux server.
RDP follows the client-server model, where an RDP client is installed on a local machine, and an RDP server is installed on the remote server or Linux server.
What is xrdp
xrdp is an open-source software package that allows for remote desktop access to Linux-based operating systems, including Linux server.
xrdp stands for “X Remote Desktop Protocol” and is a protocol that enables users to connect to a Linux-based desktop environment from a remote device, such as a Windows, macOS, or another Linux machine.
xrdp uses the Remote Desktop Protocol (RDP) developed by Microsoft.
xrdp is often used as an alternative to other remote desktop solutions, such as Virtual Network Computing (VNC), as it provides a more seamless and integrated experience for connecting to Linux-based systems.
It allows users to access their Linux desktop environment remotely, run applications, edit files, and perform other tasks using a graphical interface, making it convenient for remote administration, support, and other use cases.
Linux server Remote Desktop Access using xrdp
In this blog article, we will delve into the fascinating concept of Linux server remote desktop access using xrdp.
We will guide you through the step-by-step process of setting up xrdp on your Linux server, exploring its features and configuration options, and providing tips and tricks to optimize your remote desktop experience.
So, grab your Linux server, and let’s embark on an exciting journey of unlocking the true potential of remote desktop access with xrdp!
Recommended for you: How to securely remote access Linux Servers using SSH from Windows.
Step 1: Setting up a Desktop environment on Linux server
Before you can remotely connect to your Linux server via xrdp, you need to make sure your Linux server is set up and running.
This includes installing an operating system (such as Ubuntu) and connecting your Linux server to a display, keyboard, and mouse.
Additionally, make sure your Linux server is connected to the internet via an Ethernet cable or Wi-Fi.
For this tutorial we will assume that your Linux server doesn’t have a GUI desktop environment installed. We will install XFCE desktop environment, to have the actual desktop accessible on the Linux server.
Note: If your Linux server already has a desktop environment set up, say Ubuntu Desktop, then you can skip this step and jump to the next step.
sudo apt install -y xfce4 xfce4-goodies
Next, we will install xrdp to access this GUI desktop environment from a different machine.
Step 2: Install and setup xrdp on Linux server
Following the below instructions to install xrdp on your Linux server:
Open a terminal window.
Update the package list on your system by running the following command:
sudo apt update
Install xrdp by running the following command:
sudo apt install xrdp
Once the installation is complete, start the xrdp service by running the following command:
sudo systemctl start xrdp
Optionally, you can enable the xrdp service to start automatically at boot by running the following command:
sudo systemctl enable xrdp
It’s important to configure your firewall settings in your Linux server to allow incoming RDP traffic to your Linux server on TCP port 3389 using the following command:
sudo ufw allow 3389/tcp
Now you can access your Linux server desktop via xrdp from your Windows or Mac PC in a local network. You can jump to Step #4 if you want to access Linux server remote desktop using an RDP client from a local network.
But our goal is to connect to Linux server desktop remotely over the internet.
For this, we’ll use the SocketXP Linux Server Remote Access solution as shown in the next step.
Step 3: Install SocketXP Linux Server Remote Access Agent
We need to install SocketXP Linux Server Remote Access Agent to run in two different places:
- Linux server - in IoT Master Mode (Default Mode)
- Laptop or PC - in IoT Slave Mode
Follow the SocketXP download and install instructions to install the SocketXP Remote Access agent on the Linux server and the access devices.
To make SocketXP agent to run in IoT Master Mode (which is the default mode of SocketXP agent) use the below command.
$ socketxp  connect tcp://localhost:3389

Connected to SocketXP Cloud Gateway.
Access the TCP service securely using the SocketXP agent in IoT Slave Mode.
where localhost port 3389 is the RDP server port, on which xrdp is listening for connections from a RDP client such as RDC.
Next, to access the Linux server device from your Windows laptop or PC, install SocketXP Agent for Windows and run the below command:
$ ./socketxp.exe connect tcp://localhost:3000 --iot-slave --peer-device-id "2233-abcdefgh-2342abc" --peer-device-port 3389 --authtoken <auth token>
Listening for TCP connections at:
Local URL -> tcp://localhost:3000
where 3000 is a local port on your PC at which you want to access the Linux server. You can choose to use any free local port instead of port 3000.
You shall find the device ID of your Linux server device from the SocketXP Portal page in the IoT Devices section. For our illustration, we assume 2233-abcdefgh-2342abc is the device ID of your IoT device.
Step 4: Connect to Linux server remote desktop using RDP Client
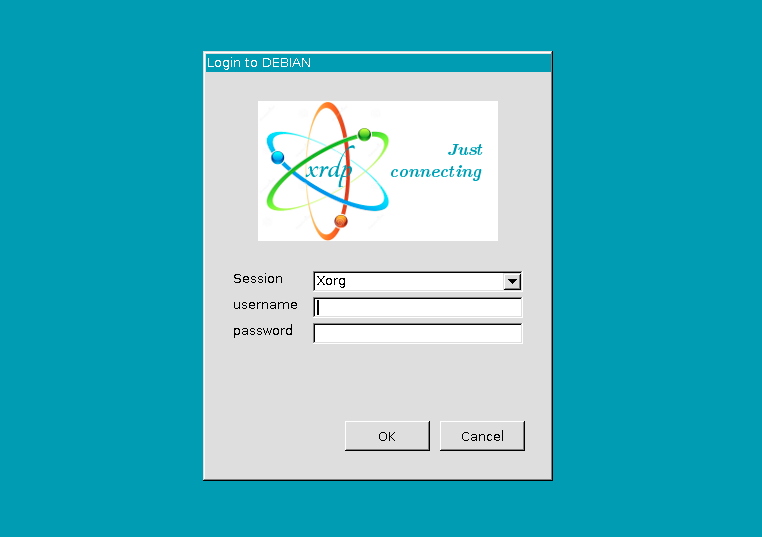
With xrdp up and running on your Linux server, you can now connect to it using an RDP client such as Remote Dekstop Connection (RDC) in Windows or Remmina in Linux.
If you are using Linux, use the following command to install Remmina on your Ubuntu Linux based access device such as your laptop:
sudo apt update
sudo apt install remmina
Connecting from Local Network
To access the remote desktop GUI of your Linux server connected to your local network, simply open the Windows Remote Desktop Client(RDC), enter the IP address or hostname of your Linux server, and click “Connect”. Enter your Linux server’s username and password when prompted.
If you are using Linux, you can use the Remmina Remote Desktop Client, which is a popular RDP client for Linux. Open Remmina, click on “New” to create a new connection, select “RDP” as the protocol, and enter your Linux server’s IP address or hostname, username, and password. Click “Connect” to establish the remote desktop connection.
Connecting from Outside Network Over the Internet
If you want to remotely access Linux server desktop from Windows over the internet using SocketXP Linux Server Remote Access solution, then enter localhost or 127.0.0.1 as the IP address and port 3000 on the RDC client.
This is the IP address and port on which SocketXP agent configured to run in iot-slave mode, in Step#3 above, is listening for local proxy connections.
Once connected, you will be able to see and interact with your Linux server’s desktop environment, just as if you were physically sitting in front of it. You can run applications, edit files, and perform other tasks remotely.
Conclusion:
With xrdp, remote access to your Linux server desktop GUI has never been easier.
SocketXP Linux Server Remote Access Solution is a highly scalable solution that uses secure SSL/TLS tunnel to remotely connect and access Linux server VNC server from a Windows Laptop or a Mac Book.
By following the steps outlined in this article, you can quickly set up xrdp on your Linux server and establish a secure and convenient remote desktop connection from anywhere, anytime.
Whether you’re managing a Linux server remotely or accessing your Linux server for troubleshooting or maintenance purposes, xrdp is a powerful tool that enables you to stay connected to your Linux server with ease.
Happy remote controlling your Linux server!
Recommended Suggestions
Based on your interest, you may also be interested in:
- How to securely remote access Linux Server using SSH from Windows.
Frequently Asked Questions(FAQs):
General FAQs About IoT Remote Access
What is IoT remote access and why is it important?
IoT remote access allows you to securely connect to and manage devices (like Raspberry Pi, ESP32, BeagleBone, or industrial gateways) over the internet. It’s essential for developers and enterprises to update firmware, debug issues, monitor logs, or control devices deployed in remote locations without physically being there.
Why is remote access to microcontroller boards or embedded Linux devices challenging?
Most IoT devices sit behind NAT routers or firewalls, making them unreachable directly over the internet. Setting up port forwarding or static IPs can be complex and insecure. Solutions like SocketXP remove these hurdles by providing secure tunneling without reconfiguring networks.
How does SocketXP make remote IoT access easier compared to VPNs or port forwarding?
Unlike VPNs, SocketXP doesn’t require complex setup, static IPs, or exposing open ports. It creates a secure, lightweight tunnel between your device and your laptop/browser, so you can access it instantly without worrying about firewall restrictions.
Security & Networking FAQs
Is remote access to IoT devices safe?
It can be unsafe if done via insecure methods like port forwarding. SocketXP ensures safety by using TLS-encrypted tunnels, access tokens, and role-based access control, protecting devices against unauthorized access.
What are the risks of using port forwarding for IoT devices?
Port forwarding exposes your device to the public internet, making it vulnerable to brute force attacks, malware, and unauthorized logins. SocketXP eliminates this risk by not exposing any public IP or open port.
How does SocketXP ensure secure remote connections?
SocketXP uses end-to-end encrypted tunnels (TLS 1.2/1.3), token-based authentication, and allows fine-grained access control. It ensures that only authorized users can connect, keeping devices safe from cyberattacks.
How does SocketXP compare to VPNs for IoT remote access security?
VPNs create a broad network tunnel that can expose all connected devices if compromised. SocketXP provides device-specific, application-layer tunnels — limiting exposure and improving security with less complexity.
Device & Platform-Specific FAQs
Can I use SocketXP to access a Raspberry Pi remotely?
Yes. SocketXP supports Raspberry Pi out of the box. You can securely SSH, VNC, or open the Pi’s web applications from anywhere without port forwarding.
Does SocketXP work with ESP32 or Arduino boards?
For microcontrollers like ESP32 or Arduino, SocketXP can act as a cloud tunnel to send telemetry data, enable secure OTA (over-the-air) firmware updates, or provide remote monitoring via APIs.
Is SocketXP compatible with BeagleBone, Jetson Nano, or other SBCs?
Absolutely. Any device running Linux (Debian, Ubuntu, Yocto, OpenWrt, etc.) can install the SocketXP agent to enable secure remote access.
Can I use SocketXP for industrial IoT devices or PLCs?
Yes. SocketXP is lightweight and suitable for edge gateways, PLCs, and industrial controllers that need secure, managed remote connectivity.
Usage & Features FAQs
Do I need static IP or port forwarding to use SocketXP?
No. SocketXP eliminates the need for static IPs, dynamic DNS, or port forwarding. It works even if your device is behind NAT or a firewall.
Can I use SocketXP to SSH into devices behind NAT or firewalls?
Yes. That’s one of SocketXP’s core features. You can instantly open a secure SSH session without touching your router settings.
Does SocketXP support web-based SSH access through a browser?
Yes. SocketXP offers a web console, so you can open a terminal directly in your browser without installing an SSH client.
Can I transfer files remotely using SocketXP?
Yes. SocketXP supports secure file transfer and remote log monitoring, making it easier to update configurations or retrieve logs.
Does SocketXP support remote firmware updates for IoT devices?
Yes. You can securely push OTA firmware updates through the SocketXP tunnel without exposing your devices.
Can I access my IoT device dashboard or web UI using SocketXP?
Absolutely. You can expose web-based dashboards, admin panels, or APIs securely via SocketXP tunnels with HTTPS.
Performance & Scalability FAQs
Does SocketXP introduce latency in IoT device connections?
SocketXP is optimized for low latency. It uses lightweight tunnels, so the performance impact is negligible compared to traditional VPNs.
Can SocketXP handle thousands of IoT devices at scale?
Yes. SocketXP supports multi-device fleet management, making it suitable for both small hobby projects and enterprise deployments.
Is SocketXP suitable for low-power or constrained networks?
Yes. The client agent is lightweight and works efficiently even on devices with limited CPU, RAM, and bandwidth.
Comparison & Alternatives FAQs
What is the difference between SocketXP and VPN solutions?
VPNs require network-wide setup, static IPs, and can expose multiple devices at once. SocketXP is device-centric, faster to deploy, and more secure for IoT use cases.
Why should I choose SocketXP over TeamViewer, ngrok, or OpenVPN?
TeamViewer is GUI-focused, ngrok is session-based, and OpenVPN is complex. SocketXP combines the simplicity of tunnels with enterprise-grade IoT features (SSH, HTTPS, APIs, OTA).
Can I replace my VPN setup with SocketXP for IoT remote access?
Yes. SocketXP is a simpler and more secure alternative to VPNs for managing distributed IoT devices.
Setup & Integration FAQs
How do I install SocketXP on my IoT device?
Installation is simple. Download the SocketXP agent binary, register it with your account, and start the service. Within minutes, you’ll have a secure remote tunnel.
What operating systems does SocketXP support?
SocketXP works with most Linux distributions (Debian, Ubuntu, Raspbian, OpenWrt, Yocto) and embedded Linux environments.
Can I run SocketXP on Docker or Kubernetes?
Yes. SocketXP can be deployed as a Docker container or sidecar within Kubernetes clusters for secure application tunneling.
Does SocketXP provide SDKs or APIs for developers?
Yes. Developers can integrate SocketXP tunnels into their applications using APIs, making it possible to build remote monitoring dashboards or CI/CD pipelines.
Pricing & Business FAQs
Is SocketXP free to use?
SocketXP offers a free tier for developers and hobbyists with limited devices. Paid plans unlock more devices, features, and enterprise support.
Does SocketXP offer a free trial for IoT developers?
Yes. You can try SocketXP for free and later upgrade to paid plans as your deployment grows.
Can I use SocketXP for commercial IoT products?
Yes. SocketXP supports enterprise deployments, OEM integrations, and white-label options for commercial products.