
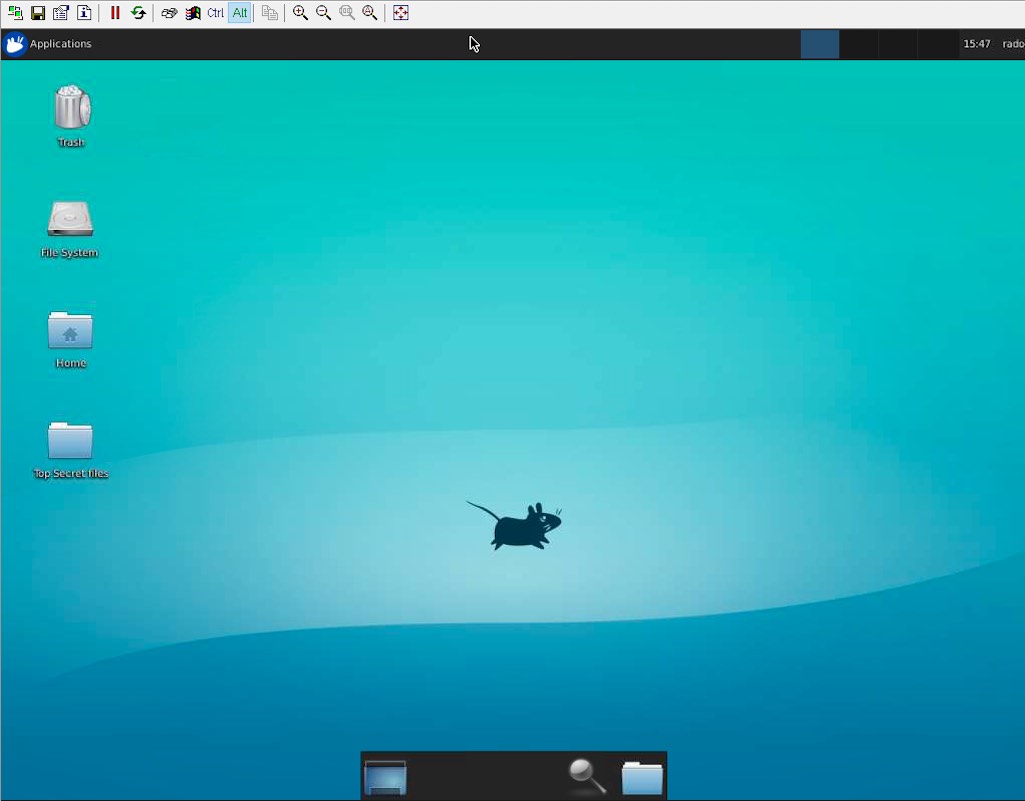
You can remote access an IoT device’s desktop via VNC from anywhere in 2026 without port forwarding. Run a modern VNC server on the device (wayvnc, TigerVNC or x11vnc) bound to 127.0.0.1. Then tunnel it with the SocketXP agent, which makes an outbound TLS connection. Open the desktop directly in your web browser with one click in the SocketXP Portal, or connect a native viewer such as macOS Screen Sharing, TigerVNC Viewer, RealVNC Viewer or Remmina. This works behind NAT routers, corporate firewalls, CGNAT, 4G/5G modems and Starlink, because the device never has to accept an inbound connection.
This guide is written for IoT and embedded Linux devices such as Raspberry Pi, NVIDIA Jetson, industrial gateways, kiosks and HMI panels. It covers which VNC server to pick for each device, how to make it start on boot and how to lock it down. For a Raspberry Pi-only walkthrough, see Remote Access Raspberry Pi Desktop via VNC.
- Pick the VNC server by display stack: wayvnc for Wayland (Raspberry Pi OS Bookworm/Trixie), x11vnc to mirror an existing X11 screen (Jetson, Ubuntu on Xorg), TigerVNC for a virtual desktop on a headless device.
- Never expose ports 5900/5901 to the internet. Bind VNC to
127.0.0.1and let an encrypted tunnel carry the traffic. - SocketXP needs no inbound port:
sudo socketxp login <token>plus a one-line tunnel config on the device. - Zero-install browser access: click the VNC button next to your device in the SocketXP Portal to open the desktop in a browser tab.
- Or use any native viewer through IoT slave mode: macOS Screen Sharing (
vnc://localhost:10111), TigerVNC Viewer, RealVNC Viewer, Remmina or TightVNC Viewer. - Run both VNC and the SocketXP agent as systemd services so the device can still be reached after a reboot or power cut.
How VNC Remote Access Works for IoT Devices
VNC (Virtual Network Computing) sends a device’s screen to a remote viewer using the RFB protocol, and sends your keyboard and mouse input back. A VNC server listens on TCP port 5900 + display number.
The hard part with IoT devices isn’t VNC itself. It’s reaching the device at all. Devices usually sit behind a NAT router or firewall, often on cellular or satellite links that use carrier-grade NAT (CGNAT). With CGNAT, the device has no public IP address to forward a port to.
SocketXP reverses the direction of the connection:
- The VNC server on the device listens on
127.0.0.1:5900(or5901) and can’t be reached from the network. - The SocketXP agent on the device dials out to the SocketXP Cloud Gateway over TLS on port 443, which is almost never blocked.
- You reach the desktop in one of two ways:
- In a web browser: click VNC next to the device in the SocketXP Portal and the session streams to your browser over HTTPS.
- With a native VNC client: the SocketXP agent on your computer runs in IoT slave mode and opens a private local port, for example
localhost:10111. Your viewer connects there, and the traffic goes through the encrypted tunnel to the device’s local VNC port.
No inbound firewall rule, no public IP, no dynamic DNS and no VPN server to maintain. For a wider comparison of the options, see IoT remote access without VPN or port forwarding.
Which VNC Server Should You Use in 2026?
Choose based on two questions: is the desktop Wayland or X11, and do you need the physical screen or a separate virtual desktop?
| VNC server | Best for | Display stack | Shows physical screen? | Default port |
|---|---|---|---|---|
| wayvnc | Raspberry Pi OS Bookworm/Trixie, wlroots desktops (labwc, Wayfire, Sway) | Wayland | Yes | 5900 |
| x11vnc | NVIDIA Jetson (JetPack), Ubuntu/Debian on Xorg, kiosks and HMI panels | X11 | Yes | 5900 |
TigerVNC (tigervnc-standalone-server) | Headless devices with no monitor, multiple users, server-style use | X11 (virtual) | No, it creates a new desktop | 5901 (display :1) |
| TightVNC Server | Legacy only | X11 (virtual) | No | 5901 |
| RealVNC Server | Commercial fleets with RealVNC licences, legacy Pi OS (Bullseye and earlier) | X11 | Yes | 5900 |
What changed recently:
- Raspberry Pi OS moved to Wayland, so wayvnc replaced RealVNC Server as the built-in VNC server. x11vnc can’t capture a Wayland session.
- TightVNC Server (
tightvncserver1.3.x) is effectively unmaintained. Older tutorials still recommend it. Use TigerVNC, which is actively developed and ships a proper systemd unit. - GNOME Remote Desktop on recent Ubuntu releases focuses on RDP. On Ubuntu-based devices you can also use RDP via xrdp.
Prerequisites
- An IoT device running Linux, for example Raspberry Pi OS, Ubuntu 22.04/24.04, JetPack on NVIDIA Jetson, or Debian on an industrial gateway, with outbound internet access.
- SSH or console access to the device for the initial setup. You don’t need a monitor or keyboard; you can SSH into the device remotely with SocketXP as well.
- A SocketXP account (30-day free trial) and your authentication token.
- A Mac, Windows or Linux computer to connect from.
Update the package index first:
sudo apt update
Step 1: Install and Configure the VNC Server on the IoT Device
Follow one of the three options below, depending on your device.
Option A: wayvnc (Raspberry Pi OS Bookworm and later, Wayland)
On Raspberry Pi OS with the desktop, wayvnc is pre-installed. Enable it:
sudo raspi-config nonint do_vnc 0
Or use the menu: sudo raspi-config → Interface Options → VNC → Yes.
wayvnc authenticates with your Linux username and password. If the Pi runs without a monitor, set a resolution for the headless virtual display under Display Options → VNC Resolution in raspi-config.
To keep wayvnc off the local network, make it listen on loopback only. Edit /etc/wayvnc/config and set:
address=127.0.0.1
Then restart the service and confirm it’s listening:
sudo systemctl restart wayvnc
ss -tlnp | grep 5900
The output should show 127.0.0.1:5900. Your tunnel target is port 5900.
Option B: x11vnc (mirror the physical X11 screen, e.g. NVIDIA Jetson)
Use x11vnc when you need to see exactly what’s on the device’s attached screen, such as a kiosk app, a robot UI or a machine HMI. The device must be running an X11 session (JetPack uses Xorg by default).
Install x11vnc and store a VNC password:
sudo apt install -y x11vnc
sudo x11vnc -storepasswd /etc/x11vnc.pass
Create a systemd unit so x11vnc starts on boot and listens on localhost only:
sudo tee /etc/systemd/system/x11vnc.service > /dev/null <<'EOF'
[Unit]
Description=x11vnc VNC server for the physical display
After=display-manager.service
Requires=display-manager.service

[Service]
ExecStart=/usr/bin/x11vnc -display :0 -auth guess -forever -shared -localhost -rfbport 5900 -rfbauth /etc/x11vnc.pass
Restart=on-failure
RestartSec=3

[Install]
WantedBy=graphical.target
EOF

sudo systemctl daemon-reload
sudo systemctl enable --now x11vnc
Headless Jetson tip: if no monitor is attached, many boards don’t start an X display, or start one at a very low resolution, so x11vnc has nothing to mirror. Fit an HDMI/DisplayPort dummy plug, or use Option C instead. Your tunnel target is port 5900.
Option C: TigerVNC (virtual desktop on a headless device)
TigerVNC runs its own virtual X desktop, so it works on devices with no monitor at all. That covers most field-deployed gateways and edge AI boxes. It uses a lightweight XFCE desktop here to save RAM on small boards.
Install TigerVNC and XFCE (dbus-x11 is needed for the session to start properly):
sudo apt install -y tigervnc-standalone-server xfce4 xfce4-terminal dbus-x11
As the user who will own the desktop (not root), set the VNC password:
vncpasswd
Create the TigerVNC config file. On TigerVNC 1.14 and later it lives at ~/.config/tigervnc/config; on older versions (Ubuntu 22.04/24.04) it’s ~/.vnc/config:
session=xfce
geometry=1600x900
localhost
alwaysshared
The localhost line makes TigerVNC accept connections only from 127.0.0.1. That’s all SocketXP needs, and it means the session never travels unencrypted across your LAN.
Map display :1 to your user, then enable the systemd service so the desktop starts on boot:
echo ":1=$USER" | sudo tee -a /etc/tigervnc/vncserver.users
sudo systemctl enable --now tigervncserver@:1.service
Verify it’s listening:
ss -tlnp | grep 5901
Display :1 listens on port 5901. That’s your tunnel target.
Step 2: Install the SocketXP Agent on the IoT Device
Follow the download and install instructions to install the SocketXP agent. Binaries are available for arm, arm64 and amd64, which covers every Raspberry Pi, every Jetson module and x86 gateways.
Log in with the authentication token from the SocketXP Portal. This registers the device and gives it a Device ID:
sudo socketxp login <your-auth-token>
Create /etc/socketxp/config.json pointing at the local VNC port. Use 5900 for wayvnc or x11vnc, 5901 for TigerVNC. This example also tunnels SSH, so you keep a fallback way in if the desktop ever fails:
{
    "tunnels": [
        {
            "destination": "tcp://127.0.0.1:5901"
        },
        {
            "destination": "tcp://127.0.0.1:22"
        }
    ]
}
Install and start the agent as a systemd service so the tunnel comes back on its own after a reboot or a dropped network connection:
sudo socketxp service install --config /etc/socketxp/config.json
sudo systemctl daemon-reload
sudo systemctl enable socketxp
sudo systemctl start socketxp
The device now shows as online in the Devices section of the SocketXP Portal. Copy its Device ID for the next step.
Step 3: Connect to the Remote VNC Desktop
SocketXP gives you two ways to open the device’s desktop. Both go through the same outbound-only tunnel, so neither one opens a port to the public internet:
| Method 1: Web browser (SocketXP Portal) | Method 2: Native VNC client (IoT slave mode) | |
|---|---|---|
| Software on your computer | None, just a browser | SocketXP agent + a VNC viewer |
| Works from | Any OS, including Chromebooks, tablets and locked-down corporate laptops | macOS, Windows, Linux |
| Best for | Quick access, support teams, devices you visit occasionally | Daily use, best image quality, clipboard and scaling options in your favourite viewer |
Method 1: Open the VNC Desktop in Your Web Browser
This is the fastest route and needs no client software at all.
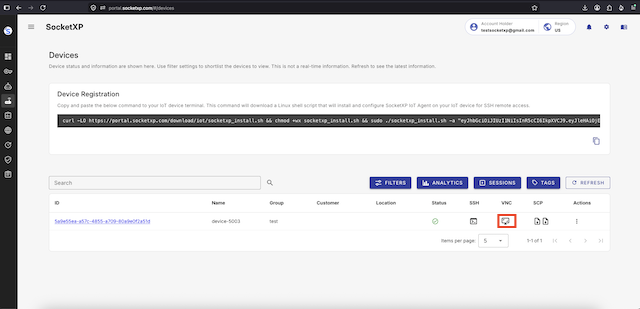
- Log in to the SocketXP Portal and open the Devices page.
- Find your device (it should show as online).
- Click the VNC button next to the device.
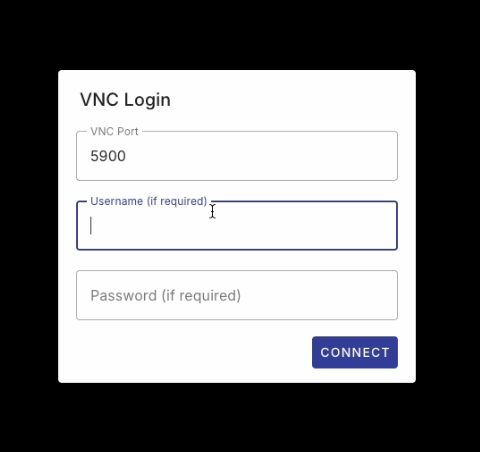
- A VNC Login dialog opens in the browser. Enter the VNC port on the device (5900 for wayvnc or x11vnc, 5901 for TigerVNC display
:1), then your credentials: just the VNC password for TigerVNC or x11vnc, or your Linux username and password for wayvnc on Raspberry Pi. Click Connect.
The remote desktop opens in a new browser tab, the same way the SocketXP web SSH terminal works. You don’t need an inbound port, VPN client or VNC viewer installed, and the session runs over HTTPS. That makes it ideal for field technicians, customer support staff, or anyone who can’t install software on their work laptop.
Method 2: Use a Native VNC Client via IoT Slave Mode
If you prefer a desktop VNC viewer such as macOS Screen Sharing, TigerVNC or RealVNC, run the SocketXP agent in IoT slave mode on your computer. It creates a private local port that forwards to the device’s VNC server through the tunnel. Nothing is exposed publicly; only your own computer can reach that local port.
Install the SocketXP agent on the computer you’ll connect from (macOS, Windows or Linux), then create a local endpoint for the device’s VNC port. See the IoT slave mode documentation for details.
macOS or Linux:
socketxp connect tcp://localhost:10111 --iot-slave --peer-device-id "<device-id>" --peer-device-port 5901 --authtoken <your-auth-token>
Windows (PowerShell):
.\socketxp.exe connect tcp://localhost:10111 --iot-slave --peer-device-id "<device-id>" --peer-device-port 5901 --authtoken <your-auth-token>
You should see:
Listening for TCP connections at:
Local URL -> tcp://localhost:10111
10111is any free port on your computer. Avoid5900on a Mac, because macOS uses it for its own Screen Sharing service.--peer-device-portis the VNC port on the device:5900for wayvnc/x11vnc,5901for TigerVNC.
Now point any VNC viewer at localhost port 10111:
macOS: built-in Screen Sharing
- In Finder, choose Go → Connect to Server (⌘K).
- Enter
vnc://localhost:10111and click Connect. - Enter the VNC password (or your Pi username and password for wayvnc).
You can also open the Screen Sharing app from Spotlight and type localhost:10111. Screen Sharing has an adaptive-quality mode that helps on slow links.
Windows
Install TigerVNC Viewer, RealVNC Viewer or TightVNC Viewer, then connect to:
localhost::10111
The double colon matters in TigerVNC and TightVNC. host::port means a TCP port, while host:N means display number N (port 5900+N). RealVNC Viewer also accepts localhost:10111.
Linux
Use Remmina (choose the VNC protocol, server localhost:10111) or TigerVNC’s vncviewer:
vncviewer localhost::10111
Performance Tuning for Low-Bandwidth IoT Links
IoT devices are often on cellular, Starlink or a congested site network. A few settings make a big difference:
- Lower the resolution: on TigerVNC set
geometry=1280x720; on Raspberry Pi, set the VNC resolution inraspi-config. - Lower the colour depth: add
depth=16to the TigerVNC config to roughly halve the pixel data. - Use the viewer’s adaptive encoding: leave TigerVNC Viewer on Auto select (Tight/JPEG encoding), or turn on adaptive quality in macOS Screen Sharing.
- Use a light desktop: XFCE or LXQt instead of GNOME, and turn off compositing and animations.
- Consider RDP for remote-only sessions: if you don’t need the physical screen, xrdp usually feels faster over high-latency links.
Security Checklist for VNC on IoT Devices
| Risk | Mitigation |
|---|---|
| VNC passwords are only 8 characters long (classic VNC authentication) | Never expose VNC directly. Treat the tunnel’s authentication as the main security layer. |
| VNC traffic is unencrypted on the LAN | Bind the server to 127.0.0.1 (address=127.0.0.1, -localhost or localhost). |
| Internet-wide port scanners hitting 5900/5901 | No port forwarding. SocketXP’s tunnel is outbound-only. |
| Shared credentials across a fleet | Use a unique VNC password per device and SocketXP’s per-user access control. |
| Desktop left open after a session | Set a screen lock or idle logout in the desktop environment. |
For the full zero-trust design, including time-limited access and RBAC, see Secure Tunneling: The Zero-Trust VPN Alternative for IoT.
Troubleshooting
| Symptom | Likely cause | Fix |
|---|---|---|
| Browser VNC session won’t open | VNC server not running, or the agent isn’t tunneling the VNC port | Check ss -tlnp on the device and the destination port in /etc/socketxp/config.json. |
| Connection refused in the viewer | Slave-mode agent not running, or wrong --peer-device-port | Restart the slave-mode command. Check the device’s VNC port with ss -tlnp. |
| Grey or black screen (TigerVNC) | Desktop session failed to start | Install dbus-x11 and check session=xfce matches a file in /usr/share/xsessions/. Read the log in ~/.vnc/ or ~/.config/tigervnc/. |
| Black screen (x11vnc on Jetson) | No X display because no monitor is attached | Fit a dummy HDMI plug or switch to TigerVNC. |
| Viewer connects to the wrong port | Single colon used in TigerVNC/TightVNC | Use localhost::10111. |
| “Unsupported security type” in macOS Screen Sharing | Authentication method not supported by Screen Sharing | Use RealVNC Viewer or TigerVNC Viewer. |
| Display :1 already in use | A stale VNC session or lock file | sudo systemctl restart tigervncserver@:1, or remove /tmp/.X1-lock. |
| Device shows offline in portal | Agent not running or no outbound internet | sudo systemctl status socketxp. Check that outbound TCP 443 is allowed. |
| Access lost after reboot | VNC or agent not enabled at boot | systemctl is-enabled for both services. Re-run systemctl enable. |
VNC vs RDP vs SSH for IoT Devices
| VNC | RDP (xrdp) | SSH | |
|---|---|---|---|
| Shows the physical screen | Yes (wayvnc, x11vnc) | No (separate session) | No |
| Works with Wayland desktops | Yes (wayvnc) | Limited | Not applicable |
| Bandwidth efficiency | Moderate | Good | Excellent |
| Browser access via SocketXP | Yes (VNC button) | No (use a native RDP client) | Yes (web terminal) |
| Native client on macOS | Yes (Screen Sharing) | Windows App (free download) | Yes (Terminal) |
| Best for | Kiosks, HMIs, robot UIs, GUI debugging | Remote GUI work sessions | Administration, scripting, file transfer |
| Guide | This article | IoT remote desktop via xrdp | IoT remote access via SSH |
Scaling VNC Access Across an IoT Fleet
The same setup scales from one device to thousands. Bake the VNC config, /etc/socketxp/config.json and the systemd services into your device image, and use a per-device login during provisioning. Every device then comes up reachable with no site-by-site firewall changes. Operators pick a device in the SocketXP Portal and click VNC to open its desktop in the browser, and access is controlled per user rather than through shared VPN credentials. See IoT remote access at 10,000-device scale for fleet patterns, and the SocketXP IoT Remote Access platform overview.
Device-specific guides:
- Remote access Raspberry Pi desktop via VNC
- Remote access a Linux desktop via VNC from Windows or Mac
- Remote access NVIDIA Jetson Nano over the internet
- SSH into NVIDIA Jetson behind CGNAT
Reach Any IoT Desktop, Anywhere
Secure VNC, SSH and RDP access to devices behind NAT, CGNAT and firewalls, with no port forwarding. Start your 30-day free trial, no credit card required.
Frequently Asked Questions
Can I access an IoT device's VNC desktop from a web browser?
Yes. In the SocketXP Portal, click the VNC button next to your device and the remote desktop opens directly in a browser tab, just like the SocketXP web SSH terminal. You don't need to install a VNC viewer, VPN client or any agent on your computer, and no port is opened on the device or router.
Can I access an IoT device via VNC without port forwarding?
Yes. The SocketXP agent on the IoT device opens an outbound TLS connection to the SocketXP Cloud Gateway on port 443. Your VNC session travels back through that tunnel, so you never open an inbound port on the router, need a public IP or configure dynamic DNS.
Does VNC remote access work behind CGNAT, 4G/5G or Starlink?
Yes. Carrier-grade NAT blocks inbound connections, but it does not block outbound ones. Because the device starts the tunnel, VNC over SocketXP works on cellular modems, Starlink and any ISP that does not give you a public IP address.
Is VNC secure over the internet?
Not on its own. Classic VNC password authentication uses only the first 8 characters of the password, and many VNC servers do not encrypt the session by default. Never expose port 5900 or 5901 to the internet. Bind the VNC server to 127.0.0.1 and carry the session inside an authenticated, encrypted tunnel such as SocketXP's TLS tunnel.
Which VNC server should I use on Raspberry Pi OS Bookworm or Trixie?
wayvnc. Raspberry Pi OS switched from X11 to a Wayland desktop, and wayvnc replaced RealVNC Server as the built-in VNC server. Enable it with 'sudo raspi-config nonint do_vnc 0'. x11vnc and the old RealVNC Server do not work with a Wayland session.
Can I use the built-in macOS Screen Sharing app as a VNC client?
Yes. macOS Screen Sharing is a standard VNC client. Open Finder, choose Go > Connect to Server, and enter vnc://localhost:10111 (the local port of the SocketXP slave-mode agent). It works with TigerVNC and x11vnc password authentication. If it refuses to connect to wayvnc, use RealVNC Viewer or TigerVNC Viewer for Mac instead.
Why do I see a grey or black screen after connecting via VNC?
With TigerVNC this usually means the desktop session failed to start, often because dbus-x11 is missing or the session name in the TigerVNC config is wrong. With x11vnc on a headless device it means no X display is running because no monitor is attached; use a dummy HDMI plug or switch to TigerVNC. Check the log in ~/.vnc or ~/.config/tigervnc for the exact error.
Should I use VNC or RDP (xrdp) for remote desktop on IoT devices?
Use VNC when you need to see the device's real physical screen, such as a kiosk, HMI panel or robot display, or when the device runs a Wayland desktop. Use RDP through xrdp when you want a separate, faster virtual session per user over slow links. Both tunnel through SocketXP the same way.
Which port does VNC use?
VNC uses TCP port 5900 plus the display number. Display :0 (the physical screen, used by wayvnc and x11vnc) listens on 5900, display :1 (a TigerVNC virtual desktop) on 5901, display :2 on 5902, and so on.