Table of Content
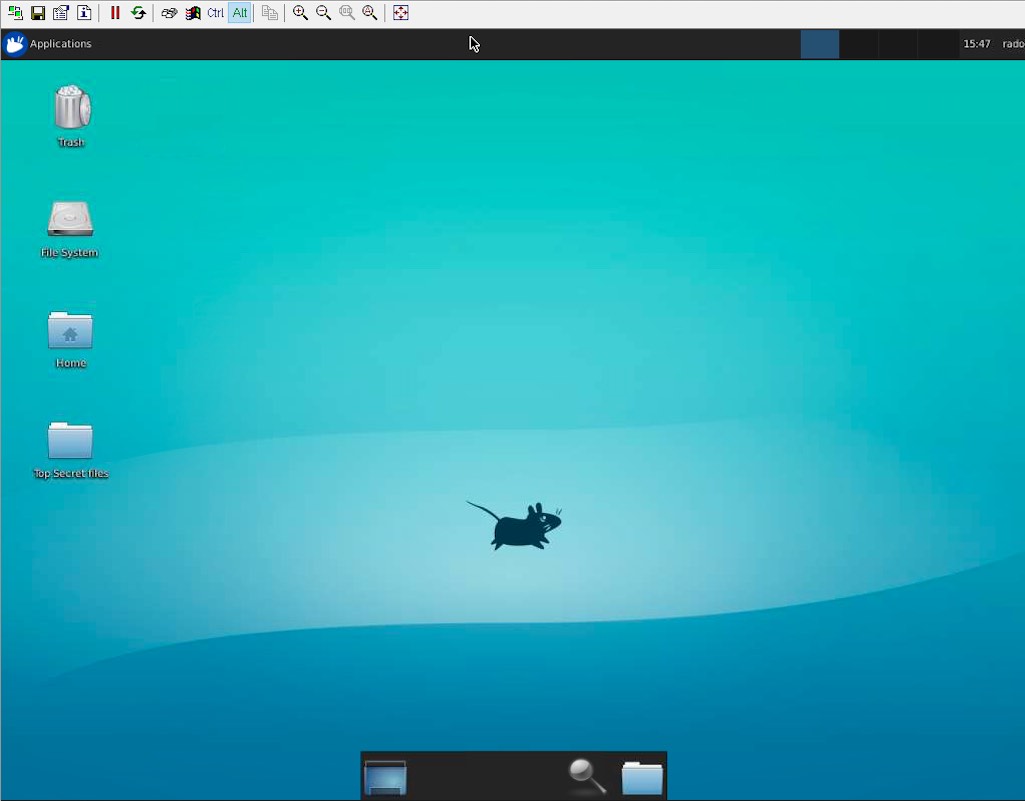
Table of Content
In this article, we’ll discuss how to remotely access your Linux or Ubuntu desktop GUI from Windows using VNC, making it easier than ever to manage your Linux server from anywhere in the world.
One of the key features of the Linux server is its ability to be accessed remotely, allowing you to control it from another device. One of the most common methods to achieve this is by using Virtual Network Computing (VNC).
In this article, we will guide you step-by-step through the process of remotely connecting to a Linux desktop GUI via VNC.
Remotely connecting and accessing a Linux server Remote Desktop involves the following steps:
- Setting up a desktop environment (XFCE) for your Linux server
- Installing TightVNC Server on the Linux server, as well as install the TightVNC client for Windows or Mac.
- Installing SocketXP Linux Server Remote Access[/remote-access-linux-server] agent on the Linux server.
- Connecting to Linux server remotely via the TightVNC client from a Windows or Mac laptop over the internet.
Step 1: Setting up XFCE desktop environment on Linux server
Before you can remotely connect to your Linux server via VNC, you need to make sure your Linux server is set up and running.
This includes installing an operating system (such as Ubuntu) and connecting your Linux server to a display, keyboard, and mouse.
Additionally, make sure your Linux server is connected to the internet via an Ethernet cable or Wi-Fi.
For this tutorial we will assume that your Linux server doesn’t have a GUI desktop environment installed. We will install XFCE desktop environment, to have the actual desktop accessible on the Linux server.
Note: If your Linux server already has a desktop environment set up, say Ubuntu Desktop, then you can skip this step and jump to the next step.
sudo apt install -y xfce4 xfce4-goodies
Next, we will install tightvncserver to be able to access that GUI desktop.
Step 2: Installing TightVNC server on Linux server
Use the following command to install TightVNC server on Linux server.
sudo apt install -y tightvncserver
The next thing we’ll have to do is to set up an access password for VNC clients. This is done on the first run of your VNC server. Simply run the command below:
vncserver
You will be asked to provide two passwords.
One is an access password and the other is a view-only password.
The access password lets you connect to the desktop and interact with it using keyboard and mouse whereas the view-only password will only let a user observe your desktop.
The view only password is optional so you can skip setting it up when asked by pressing the enter key on your keyboard.
Now that the password is set up we will configure a startup file for VNC.
Firstly, we’ll have to shut down our currently running VNC server.
vncserver -kill :1
Then we’ll create a backup of current startup file, in case we’d like to revert back to it.
mv ~/.vnc/xstartup ~/.vnc/xstartup.bak
Finally, we’ll create a new startup file.
printf '#!/bin/bash\nxrdb $HOME/.Xresources\nstartxfce4 &\n' > ~/.vnc/xstartup
sudo chmod +x ~/.vnc/xstartup
This will create the following file:
#!/bin/bash
xrdb $HOME/.Xresources
startxfce4 &
The first line xrdb $HOME/.Xresources tells the VNC’s GUI framework to read the server user’s Xresource file.
The second line starts the Xfce in background.
Now, re-start the VNC server using the command below.
$ vncserver
Now we’re ready to access our Linux server desktop via VNC from our Windows or Mac PC on a local network.
But our goal is to connect to Linux server remotely via VNC over the internet.
For this, we’ll use the SocketXP Linux server Remote Access solution as shown in the next step.
Step 3: Installing SocketXP Linux server Remote Access Agent
We need to install SocketXP Linux server Remote Access Agent to run in two different places:
- Linux server - in IoT Master Mode (Default Mode)
- Windows Laptop or PC - in IoT Slave Mode
Follow the SocketXP download and install instructions to install the SocketXP Remote Access agent on the Linux server and the access devices.
To make SocketXP agent to run in IoT Master Mode (which is the default mode of SocketXP agent) use the below command.
$ socketxp  connect tcp://localhost:5901

Connected to SocketXP Cloud Gateway.
Access the TCP service securely using the SocketXP agent in IoT Slave Mode.
where localhost port 5901 is the VNC server port, on which tightvncserver is listening for connections from a VNC viewer .
Next, to access the Linux server device from your Windows laptop or PC, install SocketXP Agent for Windows and run the below command:
$ ./socketxp.exe connect tcp://localhost:10111 --iot-slave --peer-device-id "2233-abcdefgh-2342abc" --peer-device-port 5901 --authtoken <auth token>
Listening for TCP connections at:
Local URL -> tcp://localhost:10111
where 10111 is a local port on your PC at which you want to access the Linux server. You can choose to use any free local port instead of port 10111. You shall find the device ID of your Linux server device from the SocketXP Portal page in the IoT Devices section.
Step 4: Connecting remotely to Linux server via VNC viewer from Windows:
Install TightVNC Viewer from the TightVNC website.
Launch TightVNC Viewer and it will bring you straight to the login window. Fill it out with the following details:
- Remote Host: localhost:10111.
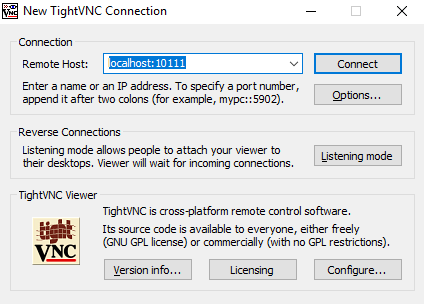
When done click on “Connect”. This will bring you to the authentication window.
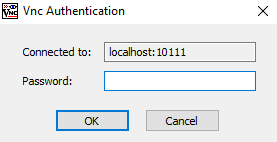
This is where you provide your access password that you’ve set up in the first section of this article. When you click OK, you will see the desktop of your Linux server.
Please keep in mind that there’s a lot of data being transferred in between your Linux server and your Windows PC in order to provide live desktop experience, so the quality and response time might not be exactly as on a local desktop.
Conclusion:
Remote access to your Linux server via VNC can be a powerful tool that allows you to control your Linux server from any device with a VNC viewer installed.
SocketXP Linux Server Remote Access Solution is a highly scalable solution that uses secure SSL/TLS tunnel to remotely connect and access Linux server VNC server from a Windows Laptop or a Mac Book.
With the simple steps outlined in this article, you can easily set up and connect to your Linux server remotely via VNC.
This can be particularly useful in scenarios where you want to access your Linux server headless (without a display, keyboard, and mouse), or when you need to manage your Linux server from a different location.
So go ahead and try remote access via VNC for your Linux server and enjoy the flexibility and convenience it offers!
Frequently Asked Questions(FAQs):
General FAQs About IoT Remote Access
What is IoT remote access and why is it important?
IoT remote access allows you to securely connect to and manage devices (like Raspberry Pi, ESP32, BeagleBone, or industrial gateways) over the internet. It’s essential for developers and enterprises to update firmware, debug issues, monitor logs, or control devices deployed in remote locations without physically being there.
Why is remote access to microcontroller boards or embedded Linux devices challenging?
Most IoT devices sit behind NAT routers or firewalls, making them unreachable directly over the internet. Setting up port forwarding or static IPs can be complex and insecure. Solutions like SocketXP remove these hurdles by providing secure tunneling without reconfiguring networks.
How does SocketXP make remote IoT access easier compared to VPNs or port forwarding?
Unlike VPNs, SocketXP doesn’t require complex setup, static IPs, or exposing open ports. It creates a secure, lightweight tunnel between your device and your laptop/browser, so you can access it instantly without worrying about firewall restrictions.
Security & Networking FAQs
Is remote access to IoT devices safe?
It can be unsafe if done via insecure methods like port forwarding. SocketXP ensures safety by using TLS-encrypted tunnels, access tokens, and role-based access control, protecting devices against unauthorized access.
What are the risks of using port forwarding for IoT devices?
Port forwarding exposes your device to the public internet, making it vulnerable to brute force attacks, malware, and unauthorized logins. SocketXP eliminates this risk by not exposing any public IP or open port.
How does SocketXP ensure secure remote connections?
SocketXP uses end-to-end encrypted tunnels (TLS 1.2/1.3), token-based authentication, and allows fine-grained access control. It ensures that only authorized users can connect, keeping devices safe from cyberattacks.
How does SocketXP compare to VPNs for IoT remote access security?
VPNs create a broad network tunnel that can expose all connected devices if compromised. SocketXP provides device-specific, application-layer tunnels — limiting exposure and improving security with less complexity.
Device & Platform-Specific FAQs
Can I use SocketXP to access a Raspberry Pi remotely?
Yes. SocketXP supports Raspberry Pi out of the box. You can securely SSH, VNC, or open the Pi’s web applications from anywhere without port forwarding.
Does SocketXP work with ESP32 or Arduino boards?
For microcontrollers like ESP32 or Arduino, SocketXP can act as a cloud tunnel to send telemetry data, enable secure OTA (over-the-air) firmware updates, or provide remote monitoring via APIs.
Is SocketXP compatible with BeagleBone, Jetson Nano, or other SBCs?
Absolutely. Any device running Linux (Debian, Ubuntu, Yocto, OpenWrt, etc.) can install the SocketXP agent to enable secure remote access.
Can I use SocketXP for industrial IoT devices or PLCs?
Yes. SocketXP is lightweight and suitable for edge gateways, PLCs, and industrial controllers that need secure, managed remote connectivity.
Usage & Features FAQs
Do I need static IP or port forwarding to use SocketXP?
No. SocketXP eliminates the need for static IPs, dynamic DNS, or port forwarding. It works even if your device is behind NAT or a firewall.
Can I use SocketXP to SSH into devices behind NAT or firewalls?
Yes. That’s one of SocketXP’s core features. You can instantly open a secure SSH session without touching your router settings.
Does SocketXP support web-based SSH access through a browser?
Yes. SocketXP offers a web console, so you can open a terminal directly in your browser without installing an SSH client.
Can I transfer files remotely using SocketXP?
Yes. SocketXP supports secure file transfer and remote log monitoring, making it easier to update configurations or retrieve logs.
Does SocketXP support remote firmware updates for IoT devices?
Yes. You can securely push OTA firmware updates through the SocketXP tunnel without exposing your devices.
Can I access my IoT device dashboard or web UI using SocketXP?
Absolutely. You can expose web-based dashboards, admin panels, or APIs securely via SocketXP tunnels with HTTPS.
Performance & Scalability FAQs
Does SocketXP introduce latency in IoT device connections?
SocketXP is optimized for low latency. It uses lightweight tunnels, so the performance impact is negligible compared to traditional VPNs.
Can SocketXP handle thousands of IoT devices at scale?
Yes. SocketXP supports multi-device fleet management, making it suitable for both small hobby projects and enterprise deployments.
Is SocketXP suitable for low-power or constrained networks?
Yes. The client agent is lightweight and works efficiently even on devices with limited CPU, RAM, and bandwidth.
Comparison & Alternatives FAQs
What is the difference between SocketXP and VPN solutions?
VPNs require network-wide setup, static IPs, and can expose multiple devices at once. SocketXP is device-centric, faster to deploy, and more secure for IoT use cases.
Why should I choose SocketXP over TeamViewer, ngrok, or OpenVPN?
TeamViewer is GUI-focused, ngrok is session-based, and OpenVPN is complex. SocketXP combines the simplicity of tunnels with enterprise-grade IoT features (SSH, HTTPS, APIs, OTA).
Can I replace my VPN setup with SocketXP for IoT remote access?
Yes. SocketXP is a simpler and more secure alternative to VPNs for managing distributed IoT devices.
Setup & Integration FAQs
How do I install SocketXP on my IoT device?
Installation is simple. Download the SocketXP agent binary, register it with your account, and start the service. Within minutes, you’ll have a secure remote tunnel.
What operating systems does SocketXP support?
SocketXP works with most Linux distributions (Debian, Ubuntu, Raspbian, OpenWrt, Yocto) and embedded Linux environments.
Can I run SocketXP on Docker or Kubernetes?
Yes. SocketXP can be deployed as a Docker container or sidecar within Kubernetes clusters for secure application tunneling.
Does SocketXP provide SDKs or APIs for developers?
Yes. Developers can integrate SocketXP tunnels into their applications using APIs, making it possible to build remote monitoring dashboards or CI/CD pipelines.
Pricing & Business FAQs
Is SocketXP free to use?
SocketXP offers a free tier for developers and hobbyists with limited devices. Paid plans unlock more devices, features, and enterprise support.
Does SocketXP offer a free trial for IoT developers?
Yes. You can try SocketXP for free and later upgrade to paid plans as your deployment grows.
Can I use SocketXP for commercial IoT products?
Yes. SocketXP supports enterprise deployments, OEM integrations, and white-label options for commercial products.