
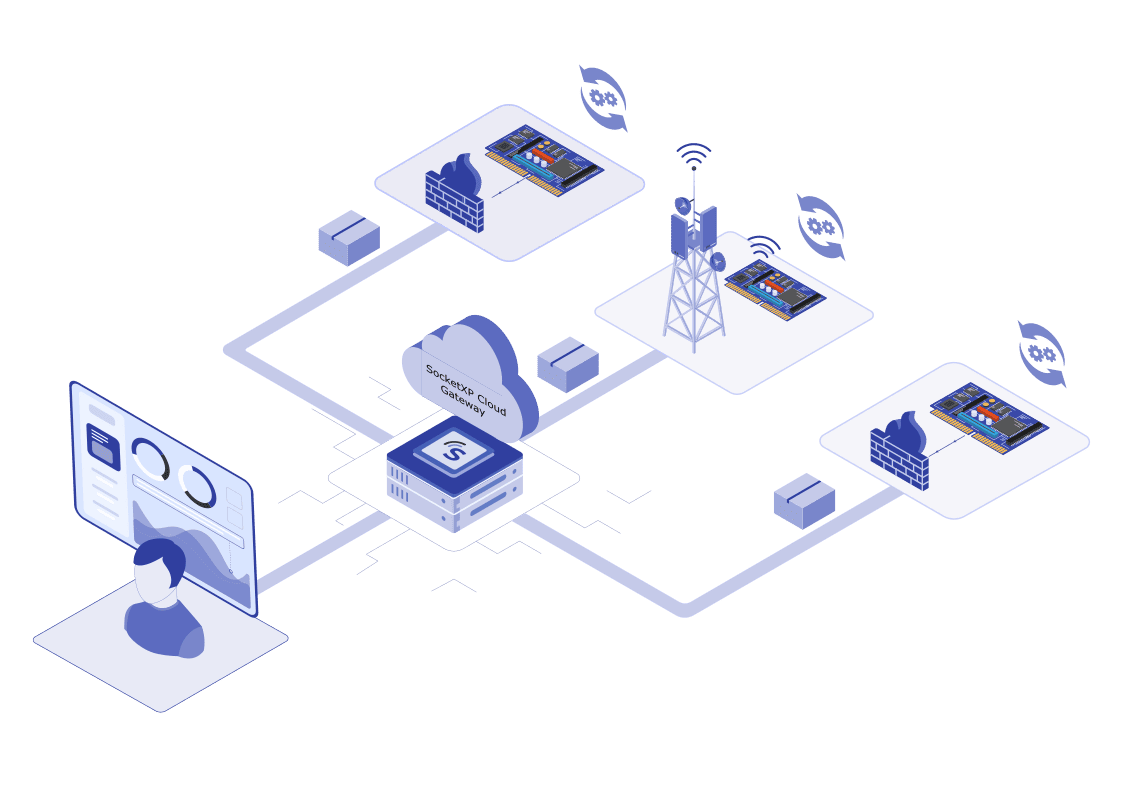
In this article, we will show you how to securely update an IoT software binary remotely on a fleet of IoT devices using SocketXP’s Over-the-Air(OTA) update feature.
New to OTA updates? Start with our complete guide to OTA updates for IoT for an overview of the concepts, benefits, and best practices before diving into the steps below.
SocketXP is an IoT device management, remote access and OTA update platform that can be used to remotely manage, monitor, access, update and control IoT, Raspberry Pi or any embedded Linux devices at massive scale.
SocketXP creates a secure SSL/TLS encrypted tunnel through your firewall, NAT router and over the internet for secure remote access, similar to how a secure VPN solution works. VPN solutions also use the same SSL/TLS encryption technology for secure remote communication over the internet.
SocketXP’s OTA update feature is extremely useful when you have to deploy software update on a fleet of remote IoT devices in your customer’s network, cellular network, or out in the field, behind a NAT router or Firewall.
SocketXP sends OTA software updates to IoT fleet over an SSL/TLS encrypted channel.
The OTA update feature can be used to update the following types of artifacts:
- Application binaries
- Firmware
- Software Packages
- Docker Container
- Program files
- Config File
- Script File
- Execute a script or command
on multiple remote devices.
How SocketXP Secures OTA Updates in Transit
Every OTA update artifact — firmware, application binary, Debian package, or Docker image — travels from the SocketXP Artifact Registry to your IoT devices over the same SSL/TLS encrypted agent tunnel used for remote SSH access. There is no separate, unencrypted channel for OTA delivery.
SocketXP secures the OTA update pipeline in three ways:
- Encrypted transport: The update package and installation script are downloaded by the SocketXP agent over an SSL/TLS encrypted connection, the same tunnel technology used by VPN solutions for secure communication over the internet.
- Device authentication: Only devices registered and authenticated to your SocketXP account can connect to the tunnel and receive a deployment. A device outside your account has no way to request or intercept an update meant for your fleet.
- Artifact integrity verification: You can bundle a checksum file with your update artifact (see Software Binary Checksum below) so the device can verify the downloaded package hasn’t been corrupted or tampered with before installing it. For an additional layer of protection, you can sign your update packages and verify the signature inside your installation script before it runs (see Signing and Verifying Update Artifacts below).
Together, encrypted transport and device authentication mean an attacker on the same network as your IoT device — or anywhere between the device and the SocketXP cloud gateway — cannot read or modify the update in transit.
Still Pushing Updates to Your IoT Fleet One Device at a Time?
Deploy OTA updates securely to your whole fleet at once, with automatic rollback if anything fails.
Download and Install SocketXP Agent
Before you can deploy software updates on remote IoT fleet, you need to download and install SocketXP agent on the IoT devices.
Follow our instructions to download and install SocketXP agent on the IoT devices.
You can also follow the instructions in our Getting Started guide to setup the SocketXP agent in your IoT fleet.
Now that your IoT fleet is registered and connected to the SocketXP Cloud Gateway, let’s move on to deploy software updates on the IoT fleet using SocketXP OTA update feature.
Creating and Deploying IoT Software OTA Updates
Creating and deploying OTA IoT software updates using the tool is a two step process:
- Create and upload an artifact to the SocketXP Artifact Registry
- Deploy the artifact on a group of devices over an SSL/TLS connection
The basic concept behind this two-step approach is to reuse the uploaded artifact to deploy OTA updates on different group of devices. It means, we create one or more deployments using the same artifact.
Simple IoT App Example:
We will be using a simple C program to demonstrate SocketXP’s OTA update capabilities.
Note: We are using a C program for our example but the IoT app can be created using any programming language or script. Eg: Java, C++, Golang, Python, Javascript, C# etc.
The app will print “Hello, OTA update!” every 10 minutes.
We also assume that the app is running as a Linux systemd service in the IoT devices.
/*
 * To build: gcc myapp.c -o myapp
 * To run: ./myapp
 * Output: "Hello, OTA update!"
 */

#include <stdio.h>
#include <unistd.h>

int main() {
    while (1) {
        printf("Hello, OTA update!\n");
        fflush(stdout); // Ensure immediate output
        sleep(600); // in seconds
    }
    return 0;
}
The above C program and the build script we will use for this demo can be downloaded from our official git repository here:
Build the App Binary
Let’s first clone the git repository using the link provided above:
$ git clone https://github.com/ampaslabs/ota-update-build-artifacts
For this exercise, we will use the example in the app folder. So let’s get into the app folder.
~/ota-update-build-artifacts$ cd app
~/ota-update-build-artifacts/app$ ls
make_artifact.sh	myapp/	update.sh
The app folder contains the following three items:
- A
myappdirectory containing ourappcode written in the the C language and aMakefileto compile and build the app binary. - An
update.shshell script – the workflow script that runs in the target devices and updates the app binary. - A
make_artifact.shshell script – a packaging script that creates a tar.gz zipped archive file containing the above two items: the myapp binary file and the update.sh script file.
Create a New Version of the App:
Let’s get into the myapp/ directory and start building our app.
Before we do that, we will edit the myapp.c file and make it to print "Hello, OTA update! Version 1.0.0". Let’s call it as the version 1.0.0 of the app.
/*
 * To build: gcc myapp.c -o myapp
 * To run: ./myapp
 * Output: "Hello, OTA update!"
 */

#include <stdio.h>
#include <unistd.h>

int main() {
    while (1) {
        printf("Hello, OTA update! Version 1.0.0\n");
        fflush(stdout); // Ensure immediate output
        sleep(600); // in seconds
    }
    return 0;
}
Next compile and build the app binary.
~/ota-update-build-artifacts/app$ cd myapp
$ make myapp
gcc myapp.c -o myapp
$ ls
makefile	myapp		myapp.c
Now that we have built our app binary, we are ready to create a tar.gz style artifact using it.
Software Binary Checksum
You can also create a file containing the checksum of the app binary you have just built. This checksum file can be bundled along with the app binary in the artifact tar.gz file. This checksum will be used by the IoT device to verify the integrity of the app binary when the OTA update is deployed on the device. This will ensure that the software binary is legitimate and prevents tampering by any intermediaries.
Signing and Verifying Update Artifacts
For an added layer of protection beyond the checksum, you can also sign the app binary with a private key at build time and bundle the signature file along with the binary in the artifact tar.gz file. The IoT device holds the matching public key — provisioned onto the device ahead of time — and uses it to verify the signature before installing the update. This confirms the artifact was genuinely published by you and hasn’t been tampered with, and if verification fails, the update is aborted before it touches the running service.
Why should we create a tar.gz archive file: SocketXP OTA update expects the artifact to be uploaded as a
tar.gzarchive file containing theapp binaryand the workflow scriptupdate.shin it. When the artifact is downloaded on the target device, the SocketXP agent running in the device will unzip and extract thetar.gzfile contents into the/tmpdirectory and start executing theupdate.shworkflow script contained in themyapp_1.0.0folder.
Let’s go back to the app’s parent directory and execute the make_artifact.sh script.
~/ota-update-build-artifacts/app/myapp$ cd ..
~/ota-update-build-artifacts/app$ sh make_artifact.sh
  myapp_1.0.0
  myapp_1.0.0/myapp
  myapp_1.0.0/update.sh
~/ota-update-build-artifacts/app$ ls
make_artifact.sh	myapp/			myapp_1.0.0.tar.gz	update.sh
Verify the contents of the tar.gz file built.
~/ota-update-build-artifacts/app$ tar -tf myapp_1.0.0.tar.gz
myapp_1.0.0/
myapp_1.0.0/myapp
myapp_1.0.0/update.sh
Workflow Script - update.sh
The OTA update workflow script contains all the instructions required to update the myapp running in the IoT devices.
Let’s quickly look at the contents of the update.sh script
#!/bin/bash

#================================================
# MyApp Update Workflow Script - Example #1
#================================================

# stop the app running as systemd service
systemctl stop myapp

# backup the existing app
mv /usr/bin/myapp /usr/bin/myapp.bkup

# update the new binary
mv myapp /usr/bin/myapp

systemctl start myapp

# verify the app is working fine
service_name="myapp"
if systemctl --quiet is-active "$service_name"; then
  echo "$service_name is running."
  # update success
  # clean up the backup and exit
  rm -f /usr/bin/myapp.bkup
else
  echo "$service_name is not running."
  # update failed
  # restore from the backup
  mv /usr/bin/myapp.bkup /usr/bin/myapp
  # start the previous working version
  systemctl start myapp
fi
Explanation:
What the script does is:
- Stops the
myapp servicerunning in the background (assumption) - Creates a backup of the
myappalready running in the device - Copies over the new version of
myappto the/usr/bindirectory - Starts the
myapp servicewhich will kickstart the new version of the app binary - Verifies if the service is running fine. If the app fails to run properly after the update, the script will restore the previous working version of the app that it backed up initially. And, will start the app service.
- If the app starts running fine after the update, it will delete the backup files and exit.
Rollback and Health Checks
You can implement the rollback and health-check logic directly into your update script (refer to the sample update.sh script shown above). SocketXP reliably and securely delivers the artifact, executes your script on every target device, and reports the per-device result (success or failure) back to the dashboard in real time.
The pattern used in the above update.sh is a simple and reusable health check: after installing the new version, verify the service actually came up (systemctl --quiet is-active), and if it didn’t, restore the backup and restart the previous version. You can extend this same pattern with a more thorough health check — for example, curling a local HTTP health endpoint, running a self-test command, or checking a log file for an expected startup message — before deciding whether to keep the new version or roll back.
Because this logic runs inside your own script, you have full control over what “healthy” means for your application, and the rollback happens immediately on each device without waiting for a check-in from the cloud. SocketXP simply reports whether your script’s rollback logic activated, so you can see exactly which devices rolled back and why.
Upload the artifact
Now that we have built the artifact, let’s upload it to the SocketXP Artifact Registry.
Login to your SocketXP account using the web potal and go to the OTA update page. In the Artifacts table, click the “Upload new artifact” button.
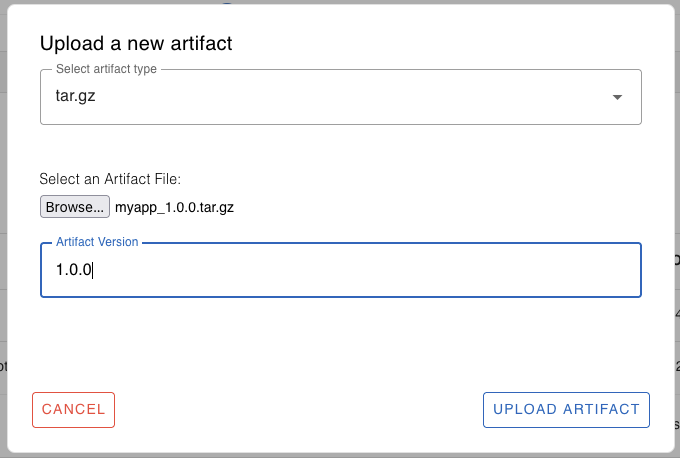
Browse and select the myapp_1.0.0.tar.gz file we have just built.
Specify the appropriate version for the artifact, 1.0.0 in this example.
Finally, click the “Upload” button to upload the artifact to the cloud registry. You’ll see a message saying “File uploaded successfully”
Deploy the Artifact on Remote IoT Devices
Now that the artifact has been uploaded to the SocketXP Artifact Registry in the cloud, let’s deploy the artifact on target devices remotely.
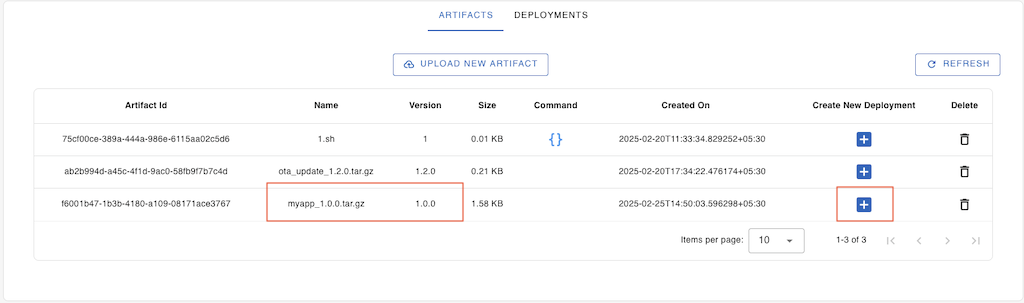
From the Artifacts table, view and select the artifact you have just uploaded.
Note: If you don’t see your artifact yet, click the “Refresh” button to reload the table data.
Click the “+” icon next to the artifact to create a new deployment.
A new window will popup.
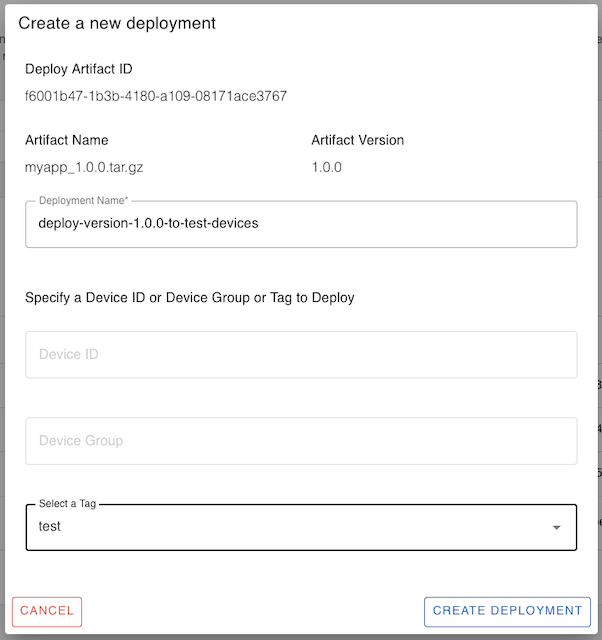
Give a name for the deployment, say for example, “deploy-version-1.0.0-to-test-devices”.
Specify the target device ID or the device group or select a tag to deploy the artifact on.
Note: You can deploy the artifact on a single device ID, or a device group or a device tag. If you want to deploy the artifact on more than one device group or device tag, repeat the “Create New Deployment” process for the different group or tag.
Finally, click the “Create Deployment” button.
Monitor the progress of OTA update deployed on remote IoT devices
Now, go to the “Deployments” tab, hit the refresh button.
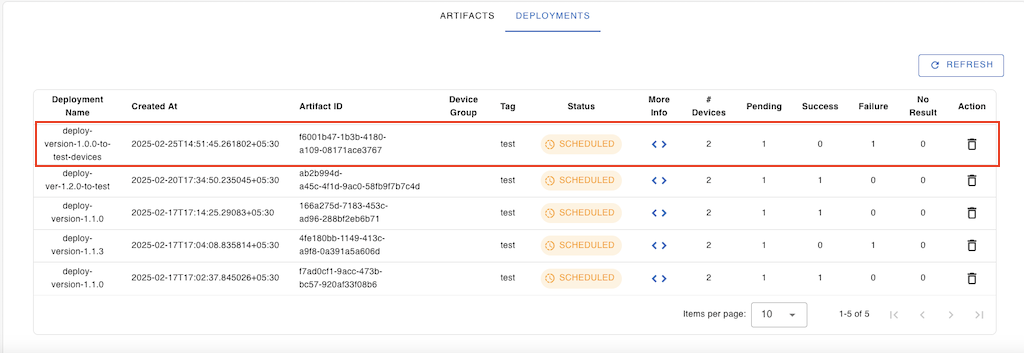
View and select the deployment we just created to see its progress.
Click the “More Info < >” button to view and monitor the progress of the deployment on each target devices (in the device group or tag).
Click the “Refresh” button to view the progress.
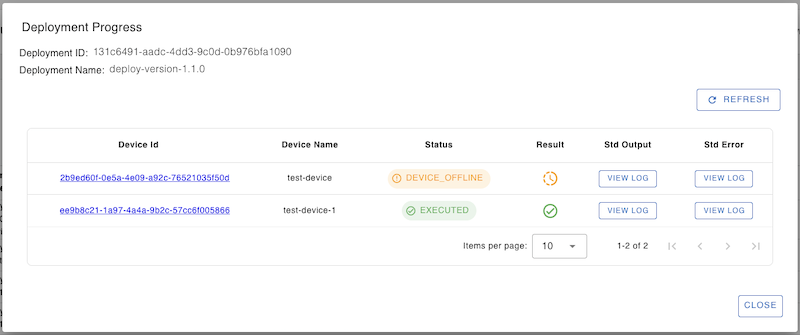
You can check the stdout and stderr logs generated by the update process, by clicking the “view log” buttons.
Let’s login into one of the devices to check if the myapp deployment is successful.
$ systemctl status myapp
● myapp.service - myapp service
     Loaded: loaded (/etc/systemd/system/myapp.service; enabled; vendor preset: enabled)
     Active: active (running) since Tue 2025-02-25 00:25:47 UTC; 2 seconds ago
   Main PID: 486462 (myapp)
      Tasks: 1 (limit: 3301)
     Memory: 152.0K
        CPU: 291ms
     CGroup: /system.slice/myapp.service
             └─486462 /usr/bin/myapp

Feb 25 00:25:47 ubuntu myapp[486462]: Hello, OTA update! Version 1.0.0
We can also view the app logs using journalctl.
$ journalctl -u myapp -n 10
Feb 24 02:00:52 ubuntu myapp[486462]: Hello, OTA update!
Feb 25 00:25:47 ubuntu myapp[486462]: Hello, OTA update! Version 1.0.0
Congratulations! We have successfully updated the native app binary in the remote IoT devices using SocketXP OTA update.
Now that you have learnt how to create and publish native app binary as OTA updates to remote IoT devices, you can learn to create and deploy OTA updates for the following types of artifacts:
- Firmware
- Debian Package
- Config File
- Script File
- Docker Container
Frequently Asked Questions
What types of updates can be deployed via SocketXP OTA?
SocketXP OTA supports deploying application binaries, firmware files, Debian/APT packages, Docker container images, configuration files, and shell scripts. Any update that can be applied via a Linux shell script can be delivered through SocketXP OTA.
How does SocketXP ensure OTA updates are secure?
All update packages are delivered over the SocketXP encrypted agent tunnel using SSL/TLS. Only authenticated devices registered in your account can receive updates. You can also sign update packages and verify signatures in your installation script for an additional layer of integrity verification.
Can I deploy an OTA update to only a subset of my IoT fleet?
Yes. You can target specific device groups, individual devices, or use a staged rollout (e.g., deploy to 10% of devices first, then expand). This allows canary deployments to catch issues before rolling out to the full fleet.