
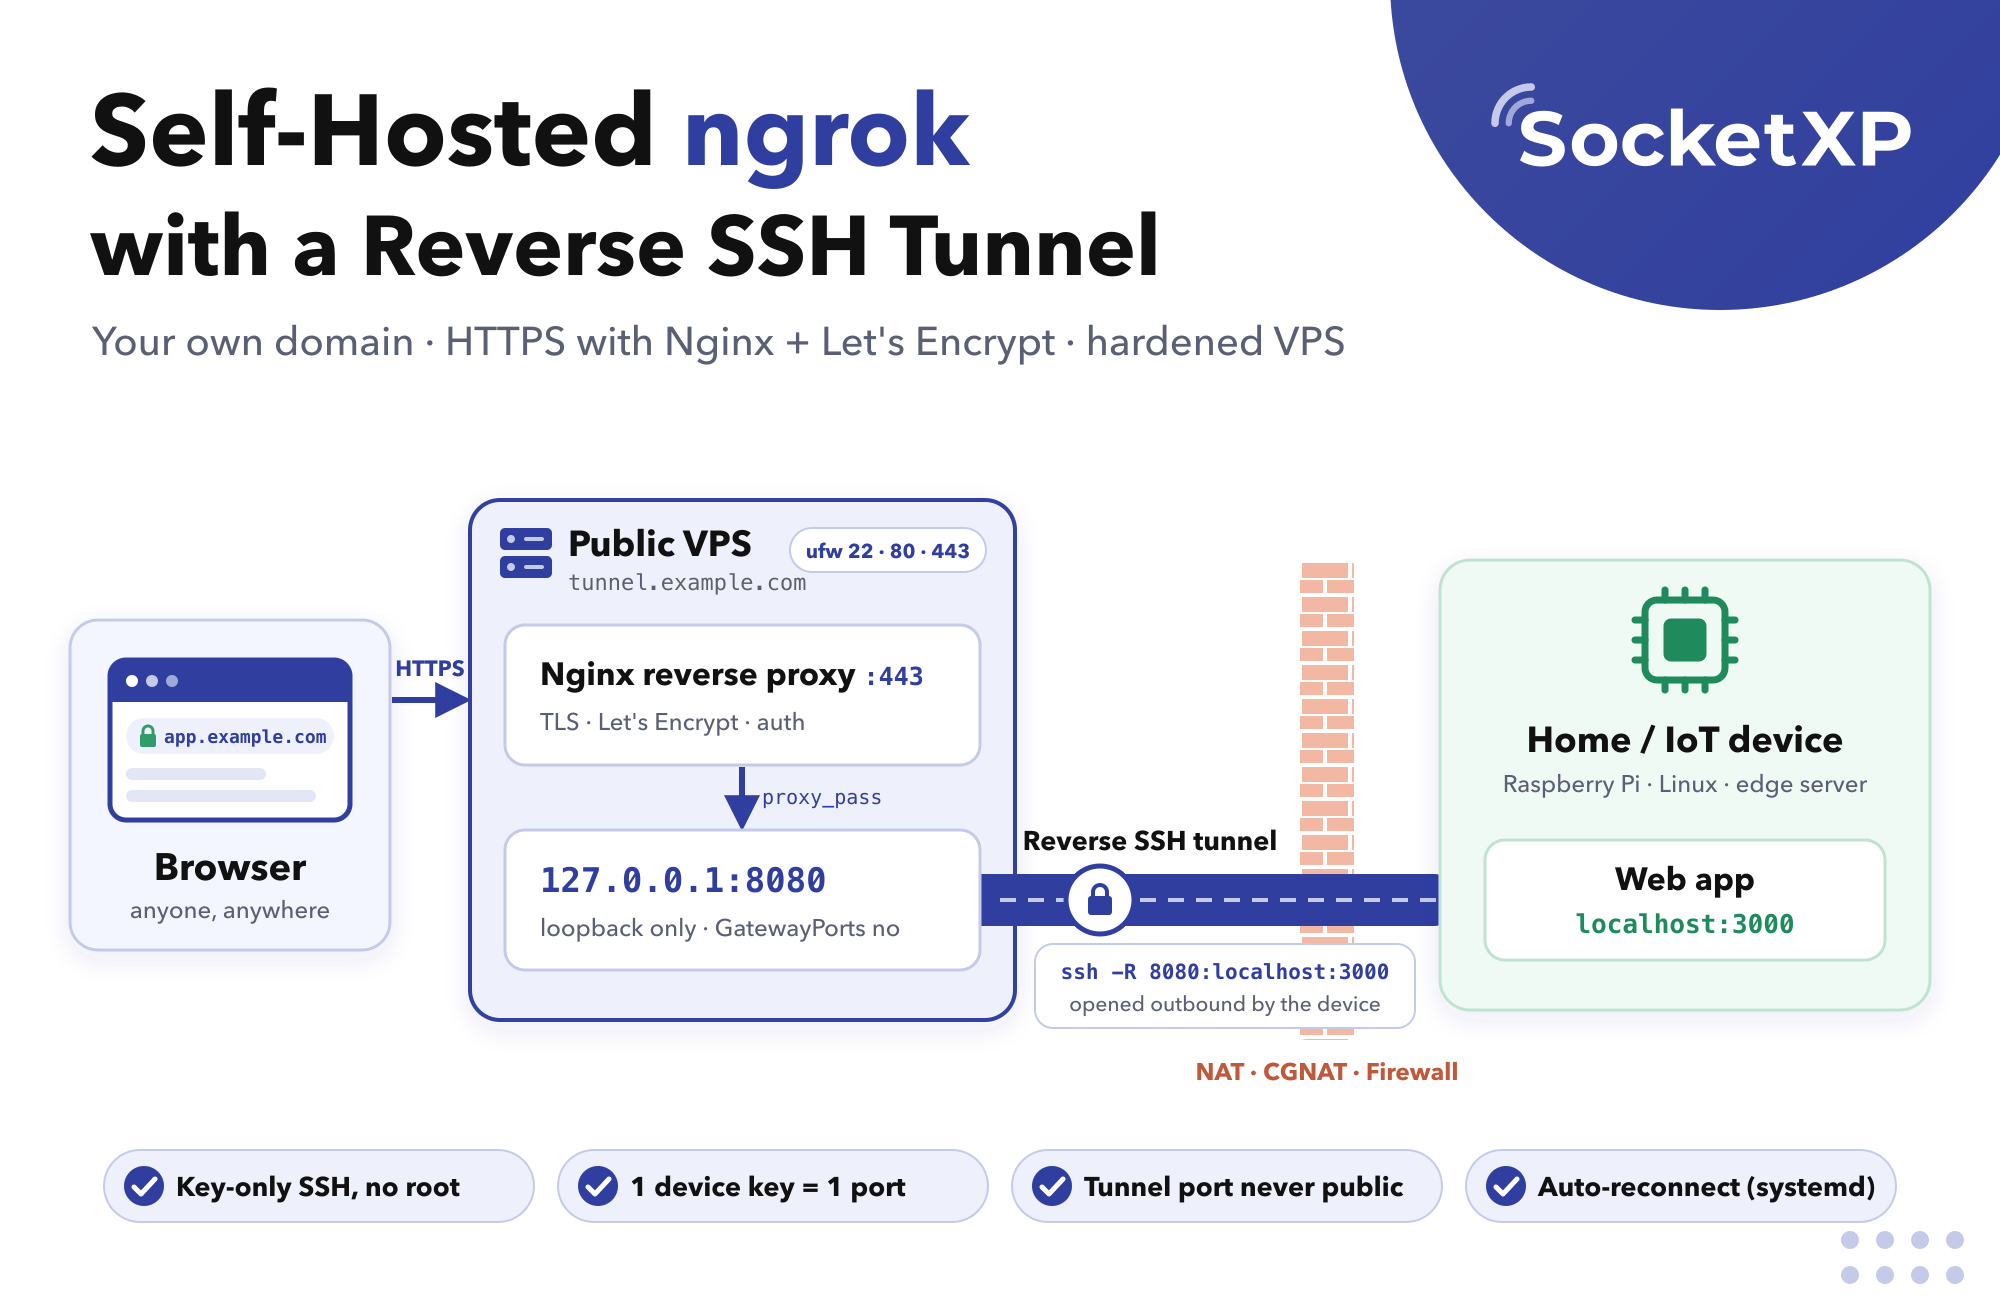
ngrok gives a web app on your laptop or home device a public HTTPS URL in one command. You can build the same thing yourself with tools that are already on most Linux systems: a reverse SSH tunnel, a small VPS, Nginx and a free Let’s Encrypt certificate. The result is a URL like https://app.example.com on your own domain that reaches a web app running on a Raspberry Pi, IoT device or home server behind NAT, CGNAT or a firewall.
This guide sets up the VPS, hardens it, opens the tunnel and puts Nginx with HTTPS in front of it. Every config file here was tested on Ubuntu 24.04 (OpenSSH 9.6, Nginx 1.24) in a Docker lab with a VPS, two devices and an outside client. You can run the same lab yourself.
Get the code: ampaslabs/socketxp-blog-tutorials on GitHub, in the self-hosted-ngrok-reverse-ssh-tunnel folder (MIT licensed, includes every config file in this guide, the Docker Compose lab and the test script)
If you are new to ssh -R, read Reverse SSH Tunnel: How to Set Up ssh -R With Examples first.
What You’ll Build
Browser ==>
https://app.example.com==> Nginx on VPS (port 443, TLS) ==>127.0.0.1:8080on VPS ==> reverse SSH tunnel ==> Device ==> Web app onlocalhost:3000
The device opens an outbound SSH connection to the VPS and asks it to listen on port 8080. Nginx accepts public HTTPS traffic for app.example.com and proxies it to that port, and SSH carries it back to the device.
The key security decision is that the tunnel port never faces the internet. It listens on the VPS’s loopback address only, and Nginx is the only public entry point. That lets you add HTTPS, authentication and access logs in one place. You do not need GatewayPorts, and you should leave it off.
What You Need
- A VPS with a public IP address, running Ubuntu 22.04 or 24.04. The smallest plan from any provider is enough.
- A domain name where you can create DNS records. This guide uses
example.com. - A device running a web app, such as a Flask, Node.js or Grafana service on
localhost:3000. - OpenSSH 7.8 or newer on the VPS, for
PermitListen.
Step 1: Point Your Domain at the VPS
Create these DNS A records at your DNS provider, using your VPS’s public IP:
| Name | Type | Value | Purpose |
|---|---|---|---|
tunnel.example.com | A | 203.0.113.10 | Devices connect here over SSH |
app.example.com | A | 203.0.113.10 | Public URL for the web app |
Both names point to the same server. Using a separate name for SSH lets you move the tunnel endpoint later without changing your public URLs.
Step 2: Harden the VPS
Do this before you open any tunnels. Keep one SSH session open the whole time, so a mistake in the sshd config can’t lock you out.
Firewall: allow only SSH, HTTP and HTTPS
$ sudo apt update && sudo apt install -y nginx ufw fail2ban
$ sudo ufw allow OpenSSH
$ sudo ufw allow 'Nginx Full'
$ sudo ufw enable
You do not open the tunnel ports (8080, 8081 and so on). They listen on loopback only and Nginx reaches them locally.
On Ubuntu, the fail2ban package enables the sshd jail by default, so repeated failed logins get banned without extra setup.
Create a locked-down tunnel user
Create one shared account that devices log in to. It has no password and no usable shell:
$ sudo useradd -m -s /usr/sbin/nologin tunnel
$ sudo install -d -m 700 -o tunnel -g tunnel /home/tunnel/.ssh
Harden sshd
Create /etc/ssh/sshd_config.d/10-tunnel.conf:
PermitRootLogin no
PasswordAuthentication no
KbdInteractiveAuthentication no
PubkeyAuthentication yes
X11Forwarding no
AllowAgentForwarding no
AllowTcpForwarding no
GatewayPorts no
ClientAliveInterval 30
ClientAliveCountMax 3

Match User tunnel
    AllowTcpForwarding remote
    PermitListen 8080 8081 8082
    PermitTTY no
    ForceCommand /usr/sbin/nologin
What each part does:
- No passwords, no root. Only SSH keys work. Before you reload, make sure your own admin account has a working key.
AllowTcpForwarding noglobally,remotefor the tunnel user. Devices can create reverse (-R) tunnels but can’t use local forwarding (-L) to reach services on the VPS itself. This also blocks-Lfor your admin account. If you need it, setAllowTcpForwarding yesin aMatch User youradminblock.PermitListen 8080 8081 8082. This lists the only ports the tunnel user may ask the VPS to listen on. Add a port here for each new app.GatewayPorts no. Forwarded ports bind to127.0.0.1only.ClientAliveInterval 30andClientAliveCountMax 3. The VPS closes a dead tunnel after about 90 seconds and frees its port, so the device can reconnect.
The file name starts with 10- on purpose. sshd uses the first value it reads for each setting, and files in sshd_config.d are read in alphabetical order. Some cloud images ship 50-cloud-init.conf with PasswordAuthentication yes, and your file needs to load before it.
Use the port-only form of
PermitListen. When a device runsssh -R 8080:..., it asks the server to listen onlocalhost:8080. A rule likePermitListen 127.0.0.1:8080doesn’t match the stringlocalhost, and sshd refuses the tunnel withremote port forwarding failed. Port-only rules are still safe, becauseGatewayPorts noforces the bind to loopback.
Test the config, then reload:
$ sudo sshd -t && sudo systemctl reload ssh
Check the settings that sshd actually applies to the tunnel user:
$ sudo sshd -T -C user=tunnel,host=x,addr=1.2.3.4 | grep -E 'passwordauth|gatewayports|allowtcpforwarding|permitlisten|permittty|forcecommand'
passwordauthentication no
permittty no
gatewayports no
allowtcpforwarding remote
forcecommand /usr/sbin/nologin
permitlisten *:8080 *:8081 *:8082
From a second terminal, confirm you can still log in with your admin key before you close the first session.
Step 3: Give Each Device Its Own Key and Port
On the device, create a dedicated local user and an SSH key for the tunnel:
$ sudo useradd -m tunnel-client
$ sudo -u tunnel-client ssh-keygen -t ed25519 -N "" -C device-01 -f /home/tunnel-client/.ssh/id_ed25519
$ sudo cat /home/tunnel-client/.ssh/id_ed25519.pub
On the VPS, add the public key to /home/tunnel/.ssh/authorized_keys, restricted to that device’s port:
restrict,port-forwarding,permitlisten="8080" ssh-ed25519 AAAA... device-01
restrict,port-forwarding,permitlisten="8081" ssh-ed25519 AAAA... device-02
$ sudo chown tunnel:tunnel /home/tunnel/.ssh/authorized_keys
$ sudo chmod 600 /home/tunnel/.ssh/authorized_keys
restrict turns off everything (PTY, agent and X11 forwarding, and so on), port-forwarding turns forwarding back on, and permitlisten limits each key to one port. If someone steals device-01’s key, they can’t take over device-02’s port. In our tests, device-01’s key was refused when it asked for port 8081, even though sshd allows 8081 for the tunnel user.
Step 4: Open the Reverse Tunnel From the Device
First, pin the VPS host key on the device, so it never connects to an impostor server:
$ sudo -u tunnel-client sh -c 'ssh-keyscan -t ed25519 tunnel.example.com >> ~/.ssh/known_hosts'
$ sudo -u tunnel-client ssh-keygen -lf /home/tunnel-client/.ssh/known_hosts
Compare the fingerprint with the output of ssh-keygen -lf /etc/ssh/ssh_host_ed25519_key.pub on the VPS. They must match.
Then open the tunnel:
$ sudo -u tunnel-client ssh -NT \
    -o ServerAliveInterval=30 -o ServerAliveCountMax=3 \
    -o ExitOnForwardFailure=yes -o StrictHostKeyChecking=yes \
    -R 8080:localhost:3000 tunnel@tunnel.example.com
On the VPS, check that port 8080 is listening on loopback only:
$ sudo ss -tlnp | grep 8080
LISTEN 0  128  127.0.0.1:8080  0.0.0.0:*
If you see 0.0.0.0:8080, the port is exposed to the internet. Check that GatewayPorts is no.
Step 5: Put Nginx and HTTPS in Front of the Tunnel
Create /etc/nginx/sites-available/app.example.com:
map $http_upgrade $connection_upgrade {
    default upgrade;
    ''      close;
}

server {
    listen 80;
    server_name app.example.com;

    location / {
        proxy_pass http://127.0.0.1:8080;
        proxy_http_version 1.1;
        proxy_set_header Host $host;
        proxy_set_header X-Real-IP $remote_addr;
        proxy_set_header X-Forwarded-For $proxy_add_x_forwarded_for;
        proxy_set_header X-Forwarded-Proto $scheme;
        proxy_set_header Upgrade $http_upgrade;
        proxy_set_header Connection $connection_upgrade;
        proxy_read_timeout 3600s;
    }
}
proxy_pass http://127.0.0.1:8080uses the IPv4 loopback address on purpose.localhostcan resolve to::1first, where the tunnel isn’t listening.- The
mapblock and theUpgrade/Connectionheaders let WebSockets through, which many dashboards and dev servers need. proxy_read_timeout 3600sstops Nginx from closing idle WebSocket connections after the default 60 seconds.- The
X-Forwarded-*headers tell the app the real client IP and that the request came in over HTTPS.
Define the map block only once. If you add more sites later, keep it in one file.
Enable the site and add HTTPS with Let’s Encrypt:
$ sudo ln -s /etc/nginx/sites-available/app.example.com /etc/nginx/sites-enabled/
$ sudo nginx -t && sudo systemctl reload nginx
$ sudo apt install -y certbot python3-certbot-nginx
$ sudo certbot --nginx -d app.example.com --redirect
Certbot gets the certificate, adds a listen 443 ssl block with the certificate paths, turns port 80 into a redirect to HTTPS, and sets up automatic renewal. Check renewal with sudo certbot renew --dry-run.
Open https://app.example.com in a browser. You should see the web app running on the device.
Step 6: Keep the Tunnel Running With systemd
A plain ssh command stops when the network drops or the device reboots. Create /etc/systemd/system/reverse-tunnel.service on the device:
[Unit]
Description=Reverse SSH tunnel to tunnel.example.com (app.example.com)
Wants=network-online.target
After=network-online.target

[Service]
User=tunnel-client
ExecStart=/usr/bin/ssh -NT \
  -o ServerAliveInterval=30 \
  -o ServerAliveCountMax=3 \
  -o ExitOnForwardFailure=yes \
  -o StrictHostKeyChecking=yes \
  -i /home/tunnel-client/.ssh/id_ed25519 \
  -R 8080:localhost:3000 \
  tunnel@tunnel.example.com
Restart=always
RestartSec=10

[Install]
WantedBy=multi-user.target
$ sudo systemctl daemon-reload
$ sudo systemctl enable --now reverse-tunnel
$ systemctl status reverse-tunnel
ExitOnForwardFailure=yes makes SSH exit if the VPS refuses the port, instead of staying connected with no tunnel. systemd then retries every 10 seconds until the port is free again. ServerAliveInterval detects a dead connection within about 90 seconds. In our tests, the public URL returned 502 the moment the tunnel was killed and worked again after the 10-second restart, and the tunnel came back up by itself after a reboot.
If you prefer autossh, the equivalent is autossh -M 0 with the same -o options. Set AUTOSSH_GATETIME=0 in its environment, or autossh gives up if the very first connection fails, for example because the VPS is still booting.
Add More Apps on Subdomains
Unlike ngrok, this setup doesn’t create a subdomain when a device connects. Each app needs its own tunnel port on the VPS and a mapping from a hostname to that port:
| Public URL | VPS port | Device | Device app |
|---|---|---|---|
app.example.com | 8080 | device-01 | localhost:3000 |
grafana.example.com | 8081 | device-02 | localhost:3001 |
shop.example.com | 8082 | device-01 | localhost:8000 |
For every new app, whichever option you choose below:
- Add the port to
PermitListenin10-tunnel.confand reload sshd. - Add the device key with
permitlisten="<port>".
Option 1: One server block per app
Copy the Nginx server block from Step 5, change server_name and the proxy_pass port, create a DNS record and run certbot for the new name. This is simple for two or three apps, but each new app means a new DNS record, a new file and a new certificate.
Option 2: One wildcard server block with a port map
With a wildcard DNS record, a wildcard certificate and one Nginx server block, adding an app comes down to one line in a map.
1. Create a wildcard DNS record. Add an A record for *.example.com that points to the VPS. Every subdomain now resolves to it.
2. Get a wildcard certificate. Let’s Encrypt only issues wildcard certificates through the DNS-01 challenge, so use the certbot plugin for your DNS provider. For example, with Cloudflare:
$ sudo apt install -y python3-certbot-dns-cloudflare
$ sudo certbot certonly --dns-cloudflare --dns-cloudflare-credentials /root/.cloudflare.ini -d example.com -d '*.example.com'
3. Replace the per-app Nginx files with a single /etc/nginx/sites-available/tunnels.example.com. It already contains the map $http_upgrade block, so remove any per-app files you created in Step 5:
# One port per subdomain. Add a line here for each new app.
map $host $tunnel_port {
    app.example.com      8080;
    grafana.example.com  8081;
    shop.example.com     8082;
    default              0;
}

# Optional login per subdomain. "off" means no password prompt.
map $host $tunnel_auth {
    grafana.example.com  "Restricted";
    default              off;
}

map $http_upgrade $connection_upgrade {
    default upgrade;
    ''      close;
}

server {
    listen 80;
    server_name example.com *.example.com;
    return 301 https://$host$request_uri;
}

server {
    listen 443 ssl;
    server_name *.example.com;

    ssl_certificate     /etc/letsencrypt/live/example.com/fullchain.pem;
    ssl_certificate_key /etc/letsencrypt/live/example.com/privkey.pem;

    if ($tunnel_port = 0) {
        return 404;
    }

    auth_basic           $tunnel_auth;
    auth_basic_user_file /etc/nginx/.htpasswd;

    location / {
        proxy_pass http://127.0.0.1:$tunnel_port;
        proxy_http_version 1.1;
        proxy_set_header Host $host;
        proxy_set_header X-Real-IP $remote_addr;
        proxy_set_header X-Forwarded-For $proxy_add_x_forwarded_for;
        proxy_set_header X-Forwarded-Proto $scheme;
        proxy_set_header Upgrade $http_upgrade;
        proxy_set_header Connection $connection_upgrade;
        proxy_read_timeout 3600s;
    }
}
$ sudo ln -s /etc/nginx/sites-available/tunnels.example.com /etc/nginx/sites-enabled/
$ sudo nginx -t && sudo systemctl reload nginx
How it behaves (all checked in our test lab):
app.example.comgoes to port 8080 andgrafana.example.comto port 8081, with paths and query strings passed through unchanged. WebSockets work on every subdomain.- Only
grafana.example.comasks for a password. The$tunnel_authmap turns basic auth on or off per subdomain. - A subdomain that isn’t in the map, a request to the VPS’s bare IP address, or a forged
Hostheader gets404. Nginx never forwards it to a loopback port. - If one device goes offline, only its subdomain returns
502. The others keep working.
Adding shop.example.com then takes one line in the map, plus the two sshd steps above, and sudo nginx -t && sudo systemctl reload nginx. You don’t need a new DNS record, certificate or server block.
Don’t calculate the port from the hostname. A regex such as
server_name ~^d(?<port>\d+)\.example\.com$withproxy_pass http://127.0.0.1:$portsaves you themapline, but it lets anyone reach any service listening on the VPS’s loopback address, such as a database or an admin panel, just by guessing a hostname. An explicitmaponly exposes the ports you list.
One device, several apps
To publish two apps from the same device, put both ports in one authorized_keys line for that device’s key:
restrict,port-forwarding,permitlisten="8080",permitlisten="8082" ssh-ed25519 AAAA... device-01
Then pass -R twice in the device’s ssh command (or in the systemd unit):
$ ssh -NT -o ExitOnForwardFailure=yes \
    -R 8080:localhost:3000 -R 8082:localhost:8000 \
    tunnel@tunnel.example.com
Don’t add a second line with the same key and a different permitlisten. sshd uses only the first line that matches a key, so the second line is ignored and the new port is refused with remote port forwarding failed. We hit exactly this in testing.
Protect the Public URL
Without authentication, anyone who finds your URL can use the web app on your device, and scanners look up new hostnames in public certificate transparency logs within minutes. Unless the app has its own login, add one in Nginx.
Basic authentication:
$ sudo apt install -y apache2-utils
$ sudo htpasswd -c /etc/nginx/.htpasswd alice
Add these two lines inside the server block, then reload Nginx:
auth_basic "Restricted";
auth_basic_user_file /etc/nginx/.htpasswd;
Requests without valid credentials get 401, including WebSocket upgrade requests.
IP allowlist, when users come from fixed addresses:
allow 198.51.100.0/24;
deny  all;
For single sign-on, put oauth2-proxy in front of the app with Nginx’s auth_request.
Test Your Setup
Run these checks from a machine outside the VPS:
# Public URL reaches the device
$ curl -s https://app.example.com/

# HTTP redirects to HTTPS
$ curl -s -o /dev/null -w '%{http_code} %{redirect_url}\n' http://app.example.com/
301 https://app.example.com/

# The tunnel port is NOT reachable from the internet
$ nc -zv -w 3 tunnel.example.com 8080
nc: connect to tunnel.example.com port 8080 (tcp) failed: Connection refused

# The tunnel account can't get a shell (run on the device, which has the tunnel key)
$ sudo -u tunnel-client ssh tunnel@tunnel.example.com
This account is currently not available.

# Password logins are off
$ ssh -o PubkeyAuthentication=no you@tunnel.example.com
you@tunnel.example.com: Permission denied (publickey).
If the nc check connects, your tunnel port is exposed. Fix that before anything else.
Try It Yourself With Docker Compose
Every config file in this guide is in the self-hosted-ngrok-reverse-ssh-tunnel folder of the ampaslabs/socketxp-blog-tutorials repo on GitHub (MIT licensed), together with a Docker Compose lab that runs them. You can try the whole setup on your laptop before you touch a real server:
$ git clone --depth 1 https://github.com/ampaslabs/socketxp-blog-tutorials.git
$ cd socketxp-blog-tutorials/self-hosted-ngrok-reverse-ssh-tunnel
$ docker compose up -d --build
$ ./test.sh
...
27 passed, 0 failed
$ docker compose down -v
The lab starts four Ubuntu 24.04 containers on a private Docker network:
| Container | Plays the role of |
|---|---|
vps | The public VPS, running sshd and Nginx as tunnel.example.com and *.example.com |
device1 | device-01, publishing app.example.com (localhost:3000) and shop.example.com (localhost:8000) through one key |
device2 | device-02, publishing a WebSocket dashboard as grafana.example.com behind basic auth |
client | An outside machine on the internet |
The vps container mounts the repo’s 10-tunnel.conf and tunnels.example.com files directly, so the tests run against exactly the files you would copy to your server. To check that a test can fail, set GatewayPorts yes and rerun: the two port-exposure checks (T03 and T04) fail.
What we tested
test.sh runs these 27 checks. All of them passed:
| # | Check | Result |
|---|---|---|
| T01 | sshd config is valid (sshd -t) | ✅ Pass |
| T02 | Nginx config is valid (nginx -t) | ✅ Pass |
| T03 | Tunnel ports 8080–8082 are bound to 127.0.0.1 only | ✅ Pass |
| T04 | Tunnel port 8080 can’t be reached from the internet | ✅ Connection refused |
| T05 | Password logins are refused | ✅ Permission denied (publickey) |
| T06 | Root login is refused, even with a valid key | ✅ ROOT LOGIN REFUSED in the sshd log |
| T07 | The admin account can still log in with its key | ✅ Pass |
| T08 | The tunnel user gets no shell | ✅ This account is currently not available. |
| T09 | The tunnel user can’t use ssh -L to reach services on the VPS | ✅ administratively prohibited |
| T10 | A port not listed in PermitListen is refused | ✅ remote port forwarding failed |
| T11 | The device refuses a VPS whose host key it doesn’t know | ✅ Host key verification failed |
| T12 | https://app.example.com reaches the app on device-01 | ✅ 200 |
| T13 | HTTP redirects to HTTPS | ✅ 301 |
| T14 | Paths and query strings pass through to the device | ✅ Pass |
| T15 | One key with two ports publishes shop.example.com from the same device | ✅ 200 |
| T16 | app.example.com has no password prompt | ✅ 200 |
| T17 | grafana.example.com without a password | ✅ 401 |
| T18 | grafana.example.com with the password | ✅ 200 |
| T19 | WebSocket through Nginx and the tunnel | ✅ Echo received |
| T20 | WebSocket with a wrong password | ✅ 401 |
| T21 | A subdomain that isn’t in the map | ✅ 404 |
| T22 | A request to the VPS’s bare IP address | ✅ 404 |
| T23 | A forged Host: localhost header | ✅ 404 |
| T24 | device-01 offline: its subdomain | ✅ 502 |
| T25 | device-01 offline: device-02’s subdomain keeps working | ✅ 200 |
| T26 | device-02’s key can’t take device-01’s port, even while it’s free | ✅ Refused |
| T27 | device-01 back online: the tunnel reconnects by itself | ✅ 200 |
We also tested the systemd unit from Step 6 separately, in a container running systemd. The tunnel restarted after its process was killed and came back up after a reboot.
The lab does not cover real Let’s Encrypt certificates, which need a public domain (it uses a self-signed wildcard certificate in the same Nginx config), or ufw and fail2ban.
Troubleshooting
502 Bad Gateway
Nginx can’t reach 127.0.0.1:8080. Either the tunnel is down (systemctl status reverse-tunnel on the device, ss -tlnp | grep 8080 on the VPS), or the app on the device isn’t listening on the port in the -R option. Test the app on the device with curl http://localhost:3000.
“Error: remote port forwarding failed for listen port 8080”
The VPS refused the port. There are four common causes:
- The port isn’t in
PermitListen, or the key’spermitlistendoesn’t match it. - The same key appears on two
authorized_keyslines with different ports. sshd only reads the first matching line, so list every port on one line (see One device, several apps). PermitListenuses127.0.0.1:8080instead of the port-only8080(see Step 2).- An old session still holds the port after a network drop. It is freed when
ClientAliveInterval×ClientAliveCountMaxruns out (about 90 seconds with the settings above). Find the old session withsudo ss -tlnp | grep 8080and end it if you can’t wait.
The sshd log on the VPS shows the reason: sudo journalctl -u ssh | grep 'remote forward'.
“bind [::1]:8080: Cannot assign requested address” in the sshd log
sshd tried to bind the IPv6 loopback address too, on a server where IPv6 is off. It’s harmless as long as 127.0.0.1:8080 is listening.
WebSockets disconnect or fail to connect
Check that the server block has proxy_http_version 1.1, the Upgrade and Connection headers, and the map $http_upgrade block, and that proxy_read_timeout is longer than your app’s idle period.
“channel 1: open failed: administratively prohibited”
You used ssh -L and AllowTcpForwarding no blocked it. This is intended for the tunnel user. For your admin account, allow it in a Match User block.
Limitations of a DIY ngrok
This setup works well for a few apps you look after yourself. As it grows, the manual work grows with it:
- No automatic subdomains. Even with the wildcard setup, every new app needs a unique port, a
PermitListenentry, a key entry and amapline, edited by hand on the VPS. You keep the map between them yourself. - Key management. Device keys never expire unless you rotate them. Revoking a lost device means editing
authorized_keyson the VPS. - Access control. Basic auth passwords are shared, and there is no per-user audit trail of who opened which app.
- A server to run. The VPS is a public machine that you patch, monitor and back up. If it goes down, every URL goes down with it.
- Web traffic only. Private SSH, VNC or database access to the devices themselves needs a separate solution.
For more on these risks, see How to Secure a Reverse SSH Tunnel.
Alternatives to a DIY Reverse SSH Tunnel
| DIY SSH + Nginx | sish | frp | SocketXP | |
|---|---|---|---|---|
| Server to run | Your VPS | Your VPS | Your VPS | None (cloud), or self-hosted |
| Client on device | Standard ssh | Standard ssh | frpc | SocketXP agent |
| Public URLs on your domain | Yes, added by hand (one map line per app) | Yes, subdomains assigned automatically | Yes | Yes (custom domains on paid plans) |
| Public ports on the VPS | 80 and 443 only | Depends on setup | Depends on setup | None you manage |
| Private SSH/VNC to devices | Separate setup | Separate setup | TCP tunnels, managed by you | Built in, through the portal |
| Device fleet dashboard | No | No | Basic server dashboard | Yes |
| Cost | VPS only | VPS only | VPS only | Free trial, then from $0.50 per device per month; free self-hosted Community edition |
- sish is a self-hosted server that works with a plain
ssh -Rcommand and hands out subdomains automatically, without a server block per app. - frp is an open-source reverse proxy with its own client and server, supporting TCP, UDP, HTTP and HTTPS.
See Best ngrok Alternatives for a broader comparison.
SocketXP: the same result, without running the relay
SocketXP uses the same outbound-tunnel idea, but you don’t run the relay server. The SocketXP agent on the device opens an outbound TLS tunnel to the SocketXP cloud gateway. One command gives a web app a public HTTPS URL:
$ socketxp connect http://localhost:3000
TCP services such as SSH, VNC or databases stay private: they are reachable only through the SocketXP portal by authenticated users, with no public port opened anywhere. Since SocketXP is an IoT device management and remote access platform, the same agent also gives you a device dashboard, a browser terminal, OTA updates and APIs for fleet automation.
The same tunnel can expose a local LLM server, such as Ollama or vLLM on an edge device. The SocketXP AI Gateway lets edge devices reach your private LLMs without a public IP.
If you chose a DIY setup because you want to host everything yourself, SocketXP can be self-hosted too:
- Community edition: free, self-hosted, for non-commercial use. Up to 100 devices, device management, browser-based SSH, VNC and SFTP access, and 2 team members, with community forum support.
- Enterprise edition: self-hosted on-premise or in your private cloud for commercial, data-residency and air-gapped deployments. See Self-Hosted Cloudflare Tunnel Alternative for Linux IoT.
Conclusion
A reverse SSH tunnel, Nginx and Let’s Encrypt make a working self-hosted ngrok on your own domain. The settings that matter are GatewayPorts no, so the tunnel port stays on loopback behind Nginx; a no-shell tunnel user with port-only PermitListen rules; one key and one port per device; and authentication on every public URL. For a handful of apps, that’s all you need. Once you are tracking ports, keys and access across many devices, a platform like SocketXP handles the relay, the URLs and the access control for you.
Frequently Asked Questions
Can I build my own ngrok with SSH?
Yes. Rent a VPS with a public IP, point a domain such as app.example.com at it, and run 'ssh -R 8080:localhost:3000 tunnel@your-vps' on the device. Nginx on the VPS receives HTTPS requests for app.example.com and proxies them to 127.0.0.1:8080, which the SSH tunnel carries back to the web app on the device. Let's Encrypt provides the certificate.
Do I need GatewayPorts enabled to expose a web app through a reverse SSH tunnel?
No. Keep 'GatewayPorts no'. The tunnel port then listens only on the VPS loopback address (127.0.0.1), and Nginx, running on the same VPS, proxies public traffic to it. Only ports 80 and 443 face the internet, and you can add HTTPS, authentication and logging in Nginx. Enabling GatewayPorts would expose the raw tunnel port to internet scanners.
Why does sshd refuse my reverse tunnel with 'remote port forwarding failed' when PermitListen is set?
When you run 'ssh -R 8080:localhost:3000', the client asks the server to listen on 'localhost:8080'. A rule such as 'PermitListen 127.0.0.1:8080' does not match the string 'localhost', so sshd denies the request. Use the port-only form, 'PermitListen 8080' and 'permitlisten="8080"'. With GatewayPorts set to no, the port is still bound to loopback only.
How do I get HTTPS for a reverse SSH tunnel on my own domain?
Terminate TLS in Nginx on the VPS. Install certbot and python3-certbot-nginx, create an Nginx server block for your hostname, and run 'sudo certbot --nginx -d app.example.com'. Certbot gets a Let's Encrypt certificate, adds the HTTPS listener and the HTTP to HTTPS redirect, and renews the certificate automatically.
Can I expose several apps or devices on different subdomains?
Yes. Give each app its own tunnel port (8080, 8081, 8082 and so on). With a wildcard DNS record (*.example.com), a wildcard Let's Encrypt certificate from the DNS-01 challenge, and one Nginx server block that uses a 'map $host $tunnel_port' to pick the port, each new app needs only one map line plus its sshd PermitListen and authorized_keys entries.
Does a self-hosted reverse SSH tunnel create a subdomain automatically for each device?
No. Unlike ngrok, nothing is created when a device connects. You add a port to PermitListen, a permitlisten entry for the device key, and a hostname-to-port mapping in Nginx by hand for every new app. Tools like sish assign subdomains automatically, and SocketXP gives each device a public URL with one command and no server edits.
How do I let one device publish two web apps through the same tunnel key?
List both ports on one authorized_keys line, for example 'restrict,port-forwarding,permitlisten="8080",permitlisten="8082" ssh-ed25519 AAAA...', and pass '-R' twice in the ssh command. Don't add a second line for the same key: sshd only uses the first line that matches a key, so the second port is refused.
Do WebSockets work through a reverse SSH tunnel and Nginx?
Yes. The SSH tunnel carries any TCP traffic, so WebSockets pass through it unchanged. Nginx needs 'proxy_http_version 1.1' and the Upgrade and Connection headers set from a 'map $http_upgrade $connection_upgrade' block. Raise 'proxy_read_timeout' so idle WebSocket connections are not closed after 60 seconds.
What happens to the public URL when the device goes offline?
Nginx returns 502 Bad Gateway, because nothing is listening on the tunnel port. When the device reconnects, the URL works again. You can add a custom error page in Nginx with 'error_page 502' to show a friendlier message.
How do I stop the tunnel account from getting a shell on the VPS?
Create the account with '/usr/sbin/nologin' as its shell, and add a 'Match User tunnel' block in sshd_config with 'PermitTTY no', 'ForceCommand /usr/sbin/nologin' and 'AllowTcpForwarding remote'. Also prefix each key in authorized_keys with 'restrict,port-forwarding'. A login attempt then prints 'This account is currently not available.'
Is a self-hosted ngrok with SSH secure?
It can be, if you keep the tunnel port on loopback, allow only key-based logins, restrict each key to one port, and put authentication in front of public URLs. Without authentication, anyone who finds the URL can reach the web app on your device. You are also responsible for patching the VPS, renewing keys and monitoring logs.
What is the difference between this setup and ngrok?
ngrok runs the public relay, assigns URLs and handles TLS for you. In a self-hosted setup you run the relay yourself: a VPS, sshd, Nginx and Let's Encrypt. You get full control and your own domain at the cost of a VPS, but you also manage ports, keys, certificates and access for every device yourself.
Can I test a self-hosted ngrok setup locally before using a real VPS?
Yes. The self-hosted-ngrok-reverse-ssh-tunnel folder of the ampaslabs/socketxp-blog-tutorials repo on GitHub has a Docker Compose lab with a VPS container (sshd and Nginx), two device containers and an outside client. Run 'docker compose up -d --build' and then './test.sh', which runs 27 checks covering sshd hardening, HTTPS routing, WebSockets, basic auth, unknown subdomains, and tunnel recovery after a device goes offline.
What are the alternatives to a DIY reverse SSH tunnel with Nginx?
sish is a self-hosted server that hands out subdomains to standard SSH clients automatically. frp is an open-source reverse proxy with its own client and server. SocketXP is a managed alternative that gives devices public HTTPS URLs or private TCP tunnels without a public port, plus a device dashboard, and it can also be self-hosted.