Table of Content
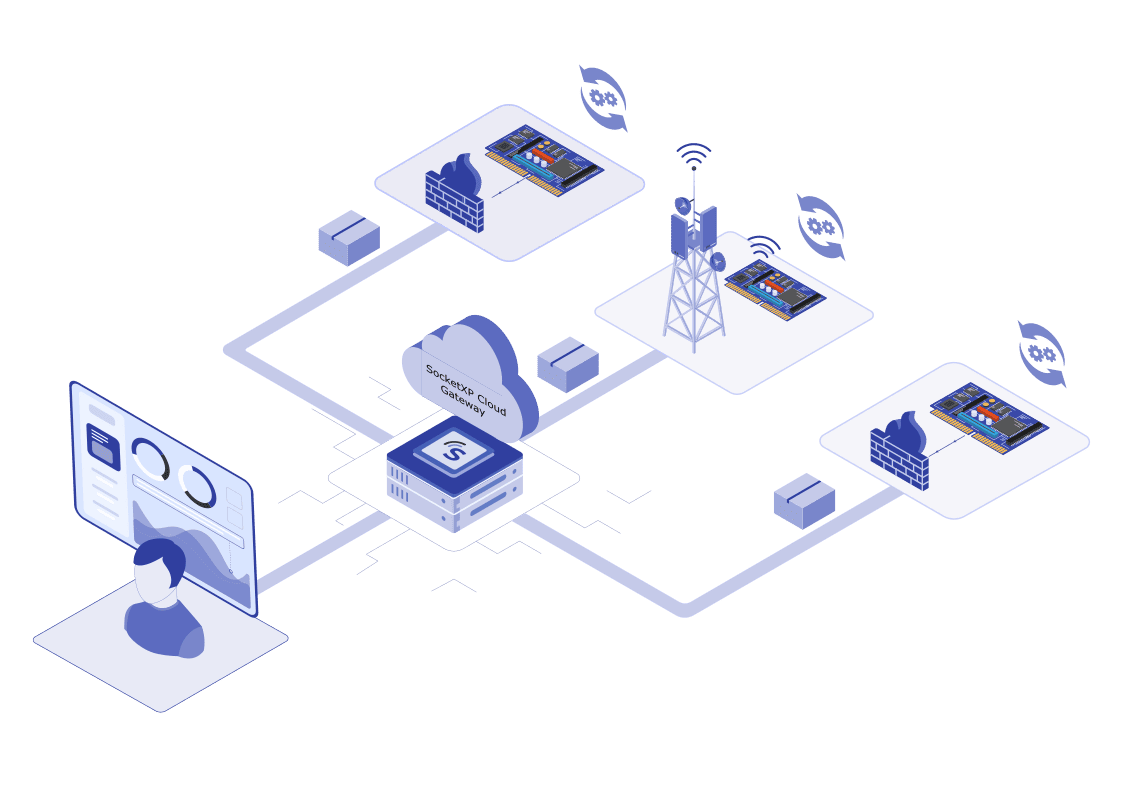
Table of Content
In this article, we will show you how to build and update an IoT application binary running in a fleet of IoT devices using SocketXP’s Over-the-Air(OTA) update feature.
SocketXP is an IoT device management platform that can be used to remotely manage, monitor, access, update and control IoT or any embedded Linux devices at massive scale.
SocketXP’s OTA update feature is extremely useful when you have to deploy software update on a fleet of IoT devices in your customer’s network or out in the field, behind a NAT router or Firewall.
The OTA update feature can be used to update the following types of artifacts:
- Application binaries
- Firmware
- Software Packages
- Docker Container
- Program files
- Config File
- Script File
- Execute a script or command
on multiple remote devices.
Download and Install SocketXP Agent
Before you can deploy software updates on remote IoT fleet, you need to download and install SocketXP agent on the IoT devices.
Follow our instructions to download and install SocketXP agent on the IoT devices.
You can also follow the instructions in our Getting Started guide to setup the SocketXP agent in your IoT fleet.
Now that your IoT fleet is registered and connected to the SocketXP Cloud Gateway, let’s move on to deploy software updates on the IoT fleet using SocketXP OTA update feature.
Creating and Deploying OTA Updates
Creating and deploying OTA updates using the tool is a two step process:
- Create and upload an artifact to the SocketXP Artifact Registry
- Deploy the artifact on a group of devices
The basic concept behind this two-step approach is to reuse the uploaded artifact to deploy OTA updates on different group of devices. It means, we create one or more deployments using the same artifact.
Simple IoT App Example:
We will be using a simple C program to demonstrate SocketXP’s OTA update capabilities.
Note: We are using a C program for our example but the IoT app can be created using any programming language or script. Eg: Java, C++, Golang, Python, Javascript, C# etc.
The app will print “Hello, OTA update!” every 10 minutes.
We also assume that the app is running as a Linux systemd service in the IoT devices.
/*
 * To build: gcc myapp.c -o myapp
 * To run: ./myapp
 * Output: "Hello, OTA update!"
 */

#include <stdio.h>
#include <unistd.h>

int main() {
    while (1) {
        printf("Hello, OTA update!\n");
        fflush(stdout); // Ensure immediate output
        sleep(600); // in seconds
    }
    return 0;
}
The above C program and the build script we will use for this demo can be downloaded from our official git repository here:
Build the App Binary
Let’s first clone the git repository using the link provided above:
$ git clone https://github.com/ampaslabs/ota-update-build-artifacts
For this exercise, we will use the example in the app folder. So let’s get into the app folder.
~/ota-update-build-artifacts$ cd app
~/ota-update-build-artifacts/app$ ls
make_artifact.sh	myapp/	update.sh
The app folder contains the following three items:
- A
myappdirectory containing ourappcode written in the the C language and aMakefileto compile and build the app binary. - An
update.shshell script – the workflow script that runs in the target devices and updates the app binary. - A
make_artifact.shshell script – a packaging script that creates a tar.gz zipped archive file containing the above two items: the myapp binary file and the update.sh script file.
Create a New Version of the App:
Let’s get into the myapp/ directory and start building our app.
Before we do that, we will edit the myapp.c file and make it to print "Hello, OTA update! Version 1.0.0". Let’s call it as the version 1.0.0 of the app.
/*
 * To build: gcc myapp.c -o myapp
 * To run: ./myapp
 * Output: "Hello, OTA update!"
 */

#include <stdio.h>
#include <unistd.h>

int main() {
    while (1) {
        printf("Hello, OTA update! Version 1.0.0\n");
        fflush(stdout); // Ensure immediate output
        sleep(600); // in seconds
    }
    return 0;
}
Next compile and build the app binary.
~/ota-update-build-artifacts/app$ cd myapp
$ make myapp
gcc myapp.c -o myapp
$ ls
makefile	myapp		myapp.c
Now that we have built our app binary, we are ready to create a tar.gz style artifact using it.
Why should we create a tar.gz archive file: SocketXP OTA update expects the artifact to be uploaded as a
tar.gzarchive file containing theapp binaryand the workflow scriptupdate.shin it. When the artifact is downloaded on the target device, the SocketXP agent running in the device will unzip and extract thetar.gzfile contents into the/tmpdirectory and start executing theupdate.shworkflow script contained in themyapp_1.0.0folder.
Let’s go back to the app’s parent directory and execute the make_artifact.sh script.
~/ota-update-build-artifacts/app/myapp$ cd ..
~/ota-update-build-artifacts/app$ sh make_artifact.sh
  myapp_1.0.0
  myapp_1.0.0/myapp
  myapp_1.0.0/update.sh
~/ota-update-build-artifacts/app$ ls
make_artifact.sh	myapp/			myapp_1.0.0.tar.gz	update.sh
Verify the contents of the tar.gz file built.
~/ota-update-build-artifacts/app$ tar -tf myapp_1.0.0.tar.gz
myapp_1.0.0/
myapp_1.0.0/myapp
myapp_1.0.0/update.sh
Workflow Script - update.sh
The OTA update workflow script contains all the instructions required to update the myapp running in the IoT devices.
Let’s quickly look at the contents of the update.sh script
#!/bin/bash

#================================================
# MyApp Update Workflow Script - Example #1
#================================================

# stop the app running as systemd service
systemctl stop myapp

# backup the existing app
mv /usr/bin/myapp /usr/bin/myapp.bkup

# update the new binary
mv myapp /usr/bin/myapp

systemctl start myapp

# verify the app is working fine
service_name="myapp"
if systemctl --quiet is-active "$service_name"; then
  echo "$service_name is running."
  # update success
  # clean up the backup and exit
  rm -f /usr/bin/myapp.bkup
else
  echo "$service_name is not running."
  # update failed
  # restore from the backup
  mv /usr/bin/myapp.bkup /usr/bin/myapp
  # start the previous working version
  systemctl start myapp
fi
Explanation:
What the script does is:
- Stops the
myapp servicerunning in the background (assumption) - Creates a backup of the
myappalready running in the device - Copies over the new version of
myappto the/usr/bindirectory - Starts the
myapp servicewhich will kickstart the new version of the app binary - Verifies if the service is running fine. If the app fails to run properly after the update, the script will restore the previous working version of the app that it backed up initially. And, will start the app service.
- If the app starts running fine after the update, it will delete the backup files and exit.
Upload the artifact
Now that we have built the artifact, let’s upload it to the SocketXP Artifact Registry.
Login to your SocketXP account using the web potal and go to the OTA update page. In the Artifacts table, click the “Upload new artifact” button.
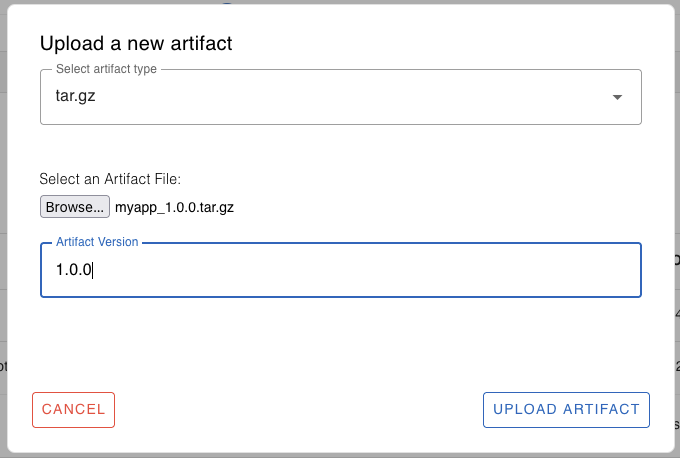
Browse and select the myapp_1.0.0.tar.gz file we have just built.
Specify the appropriate version for the artifact, 1.0.0 in this example.
Finally, click the “Upload” button to upload the artifact to the cloud registry. You’ll see a message saying “File uploaded successfully”
Deploy the Artifact
Now that the artifact has been uploaded to the SocketXP Artifact Registry in the cloud, let’s deploy the artifact on target devices.

From the Artifacts table, view and select the artifact you have just uploaded.
Note: If you don’t see your artifact yet, click the “Refresh” button to reload the table data.
Click the “+” icon next to the artifact to create a new deployment.
A new window will popup.

Give a name for the deployment, say for example, “deploy-version-1.0.0-to-test-devices”.
Specify the target device ID or the device group or select a tag to deploy the artifact on.
Note: You can deploy the artifact on a single device ID, or a device group or a device tag. If you want to deploy the artifact on more than one device group or device tag, repeat the “Create New Deployment” process for the different group or tag.
Finally, click the “Create Deployment” button.
Now, go to the “Deployments” tab, hit the refresh button.
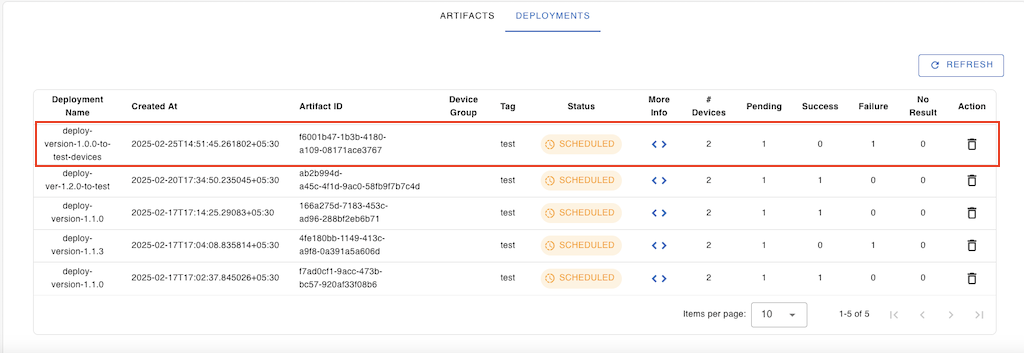
View and select the deployment we just created to see its progress.
Click the “More Info < >” button to view and monitor the progress of the deployment on each target devices (in the device group or tag).
Click the “Refresh” button to view the progress.
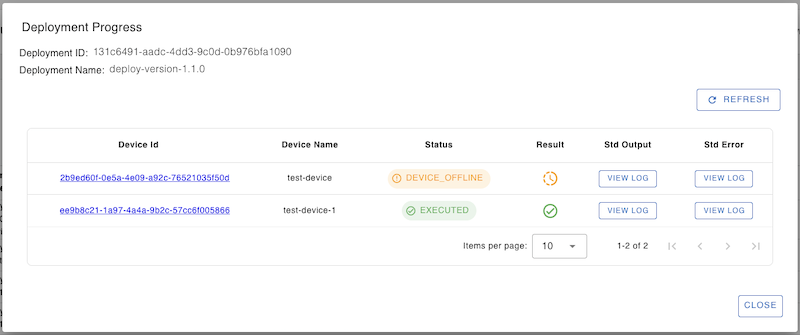
You can check the stdout and stderr logs generated by the update process, by clicking the “view log” buttons.
Let’s login into one of the devices to check if the myapp deployment is successful.
$ systemctl status myapp
● myapp.service - myapp service
     Loaded: loaded (/etc/systemd/system/myapp.service; enabled; vendor preset: enabled)
     Active: active (running) since Tue 2025-02-25 00:25:47 UTC; 2 seconds ago
   Main PID: 486462 (myapp)
      Tasks: 1 (limit: 3301)
     Memory: 152.0K
        CPU: 291ms
     CGroup: /system.slice/myapp.service
             └─486462 /usr/bin/myapp

Feb 25 00:25:47 ubuntu myapp[486462]: Hello, OTA update! Version 1.0.0
We can also view the app logs using journalctl.
$ journalctl -u myapp -n 10
Feb 24 02:00:52 ubuntu myapp[486462]: Hello, OTA update!
Feb 25 00:25:47 ubuntu myapp[486462]: Hello, OTA update! Version 1.0.0
Congratulations! We have successfully updated the native app binary in the remote IoT devices using SocketXP OTA update.
Now that you have learnt how to create and publish native app binary as OTA updates to remote devices, you can learn to create OTA updates for the following types of artifacts:
- Firmware
- Debian Package
- Config File
- Script File
- Docker Container