Table of Content
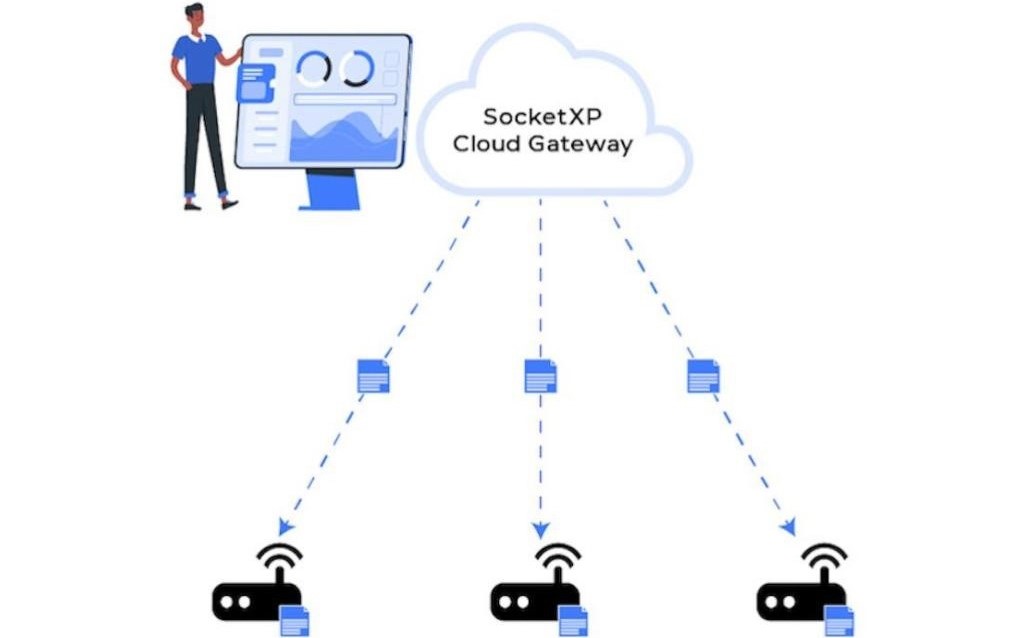
Table of Content
In this article, we will show you how to remotely update firmware (A/B update) on a fleet of IoT or embedded Linux devices using SocketXP’s Over-the-Air(OTA) update feature.
SocketXP is an IoT device management platform that can be used to remotely manage, monitor, access, update and control IoT or any embedded Linux devices at massive scale.
SocketXP’s OTA update feature is extremely useful when you have to deploy software update on a fleet of IoT devices or embedded devices in your customer’s network behind a NAT router or Firewall or out in the field connected via a cellular network.
The OTA update feature can be used to update the following types of artifacts:
- Firmware
- Software packages (Debian, RPM)
- Application binaries
- Docker containers
- Program files
- Config files
- Execute a script or command
on multiple remote devices.
Download and Install SocketXP Agent
Before you can deploy software updates on remote IoT fleet, you need to download and install SocketXP agent on the IoT devices.
Follow our instructions to download and install SocketXP agent on the IoT devices.
You can also follow the instructions in our Getting Started guide to setup the SocketXP agent in your IoT fleet.
Now that your IoT fleet is registered and connected to the SocketXP Cloud Gateway, let’s move on to deploy software updates on the IoT fleet using SocketXP OTA update feature.
Creating and Deploying OTA Updates
Creating and deploying OTA updates using the tool is a two step process:
- Create and upload an OTA update workflow script as an artifact to the SocketXP Artifact Registry
- Deploy the workflow script on a group of devices
The basic concept behind this two-step approach is to reuse the uploaded script to deploy OTA updates on different group of devices.
The workflow script will download firmware images from a third-party registry and update the firmware in the target IoT devices.
Workflow Script - update.sh
The OTA update workflow script contains all the instructions required to update the firmware installed in the IoT devices.
The OTA update workflow script is designed to provide a robust and automated mechanism for updating the root filesystem of an embedded Linux device using U-Boot as its bootloader.
It implements an A/B partitioning scheme, which allows for safe updates and reliable rollbacks in case of failures.
Note: The workflow script is just a blueprint provided for guidance. You should modify the script to suit your hardware and bootloader requirements. The script may not work as-is on many hardware platforms.
The firmware update script we will use for this example can be downloaded from our official git repository.
Let’s quickly look at the contents of the update.sh workflow script.
#!/bin/bash

#================================================
# Firmware Update Workflow Script
#================================================

# The script implements A/B system update with U-Boot boatloader.
# U-Boot's "bootcmd" should refer to the "bootpart" variable to decide
# which boot partition to boot from.
# Performs healthcheck and rollback on failure.

# Configuration
NEW_ROOTFS_IMAGE="$1"
ROOTFS_A="/dev/mmcblk0p2"
ROOTFS_B="/dev/mmcblk0p3"
TEMP_IMAGE="/tmp/new_rootfs.img"
MOUNT_POINT="/mnt/new_rootfs"
HEALTH_CHECK_SCRIPT="/etc/init.d/health_check.sh"
UBOOT_BOOT_PART_VAR="bootpart"
UBOOT_BOOT_COUNT_VAR="bootcount"
UBOOT_BOOT_LIMIT="3"
UBOOT_PART_A_VALUE="1"
UBOOT_PART_B_VALUE="2"

# Function to get current boot partition
get_current_boot_part() {
  local bootpart=$(fw_printenv "$UBOOT_BOOT_PART_VAR" | awk -F '=' '{print $2}')
  echo "$bootpart"
}

# Function to set boot partition
set_boot_part() {
  local part_value="$1"
  fw_setenv "$UBOOT_BOOT_PART_VAR" "$part_value"
}

# Function to reset boot count
reset_boot_count() {
  fw_setenv "$UBOOT_BOOT_COUNT_VAR" "0"
}

# Function to switch boot partition
switch_boot_part() {
  local current_part=$(get_current_boot_part)
  if [ "$current_part" == "$UBOOT_PART_A_VALUE" ]; then
    set_boot_part "$UBOOT_PART_B_VALUE"
  else
    set_boot_part "$UBOOT_PART_A_VALUE"
  fi
  reset_boot_count
}

# Main update process
echo "$(date) - Starting OTA update..."

# Download the new rootfs image
echo "$(date) - Downloading image from $NEW_ROOTFS_IMAGE..."
curl -s -o "$TEMP_IMAGE" "$NEW_ROOTFS_IMAGE"
if [ $? -ne 0 ]; then
  echo "$(date) - Error downloading image."
  rm "$TEMP_IMAGE"
  exit 1
fi

# Download the checksum file
echo "$(date) - Downloading checksum file..."
curl -s -o "$CHECKSUM_FILE" "${NEW_ROOTFS_IMAGE}.sha256"
if [ $? -ne 0 ]; then
  echo "$(date) - Error downloading checksum file."
  rm "$TEMP_IMAGE"
  rm "$CHECKSUM_FILE"
  exit 1
fi

# Verify checksum
echo "$(date) - Verifying checksum..."
if ! sha256sum -c "$CHECKSUM_FILE" 2>/dev/null | grep -q "OK"; then
  echo "$(date) - Checksum verification failed."
  rm "$TEMP_IMAGE"
  rm "$CHECKSUM_FILE"
  exit 1
fi

# Determine the target partition
local current_part=$(get_current_boot_part)
if [ "$current_part" == "$UBOOT_PART_A_VALUE" ]; then
  TARGET_ROOTFS="$ROOTFS_B"
else
  TARGET_ROOTFS="$ROOTFS_A"
fi

# Unmount target rootfs if mounted.
if mount | grep "$TARGET_ROOTFS" ; then
        umount "$TARGET_ROOTFS"
fi

# Write the new image to the target partition
echo "$(date) - Writing image to $TARGET_ROOTFS..."
dd if="$TEMP_IMAGE" of="$TARGET_ROOTFS" bs=4M status=progress
if [ $? -ne 0 ]; then
  echo "$(date) - Error writing image to $TARGET_ROOTFS."
  rm "$TEMP_IMAGE"
  rm "$CHECKSUM_FILE"
  exit 1
fi

# Clean up the downloaded image and checksum file
rm "$TEMP_IMAGE"
rm "$CHECKSUM_FILE"


# Mount the new rootfs to copy health check script
mkdir -p "$MOUNT_POINT"
mount "$TARGET_ROOTFS" "$MOUNT_POINT"
if [ $? -ne 0 ]; then
        echo "$(date) - Failed to mount $TARGET_ROOTFS"
        exit 1
fi

# Copy health check script to the new rootfs
cat <<EOF > "$MOUNT_POINT$HEALTH_CHECK_SCRIPT"
#!/bin/bash

# Configuration
UBOOT_BOOT_COUNT_VAR="bootcount"
UBOOT_BOOT_LIMIT="3"

# Function to get current boot count
get_boot_count() {
  fw_printenv "\$UBOOT_BOOT_COUNT_VAR" | awk -F '=' '{print \$2}'
}

# Function to increment boot count
increment_boot_count() {
  local current_count=\$(get_boot_count)
  local new_count=\$((\$current_count + 1))
  fw_setenv "\$UBOOT_BOOT_COUNT_VAR" "\$new_count"
}

# Function to switch boot partition (rollback)
switch_boot_part() {
  local current_part=\$(fw_printenv "bootpart" | awk -F '=' '{print \$2}')
  if [ "\$current_part" == "1" ]; then
    fw_setenv "bootpart" "2"
  else
    fw_setenv "bootpart" "1"
  fi
  fw_setenv "\$UBOOT_BOOT_COUNT_VAR" "0"
}

# Main health check logic
sleep 60
ping -c 1 google.com > /dev/null
if [ \$? -ne 0 ]; then
  echo "\$(date) - Health check failed."
  increment_boot_count

  local current_count=\$(get_boot_count)
  if [ "\$current_count" -ge "\$UBOOT_BOOT_LIMIT" ]; then
    echo "\$(date) - Boot limit reached. Triggering rollback."
    switch_boot_part
    reboot
  else
    echo "\$(date) - Boot count incremented. Rebooting."
    reboot
  fi
else
  echo "\$(date) - Health check successful. Resetting boot count."
  fw_setenv "\$UBOOT_BOOT_COUNT_VAR" "0"
  rm /etc/init.d/health_check.sh # Remove health check script
  exit 0
fi
EOF

chmod +x "$MOUNT_POINT$HEALTH_CHECK_SCRIPT"
umount "$MOUNT_POINT"
rmdir "$MOUNT_POINT"

# Switch boot to the new rootfs
switch_boot_part

# Reboot to load the new rootfs
reboot
Explanation:
What the update.sh workflow script does is:
The script begins by initializing configuration variables, including the download URL for the new
root filesystem image, the target partitions forA/B updates, temporary file paths,U-Bootenvironment variable names, and boot count limits. It also defines functions to manipulate theU-Bootenvironment, such as getting and setting the boot partition, resetting the boot count, and switching between boot partitions.The script proceeds to download the new
root filesystem imageand its correspondingchecksum filefrom the provided URLs, verifying the integrity of the downloaded image by comparing its checksum against the downloaded checksum file. If the verification fails, the script terminates. Otherwise, it identifies the target partition for the update based on the current boot partition, unmounts the target partition if necessary, and writes the new root filesystem image to it using theddcommand.Following the image write, the script mounts the new root filesystem to a temporary mount point and creates a
health check scriptwithin it. What the health check script does: This health check script, designed to run after the system reboots, verifies basic system functionality (e.g., network connectivity). If the health check fails, the script increments the boot count inU-Bootand initiates arollbackto the previous root filesystem partition if the boot count exceeds the defined limit; otherwise, it reboots. If the health check succeeds, the script resets the boot count, removes itself, and exits.Finally, the main script switches the boot partition in U-Boot to the newly updated partition and reboots the device.
Upload the artifact
We will upload the workflow script update.sh directly to the SocketXP Artifact Registry as a script type artifact.
Login to your SocketXP account using the web potal and go to the OTA update page. In the Artifacts table, click the “Upload new artifact” button.
A new window will popup as show below.
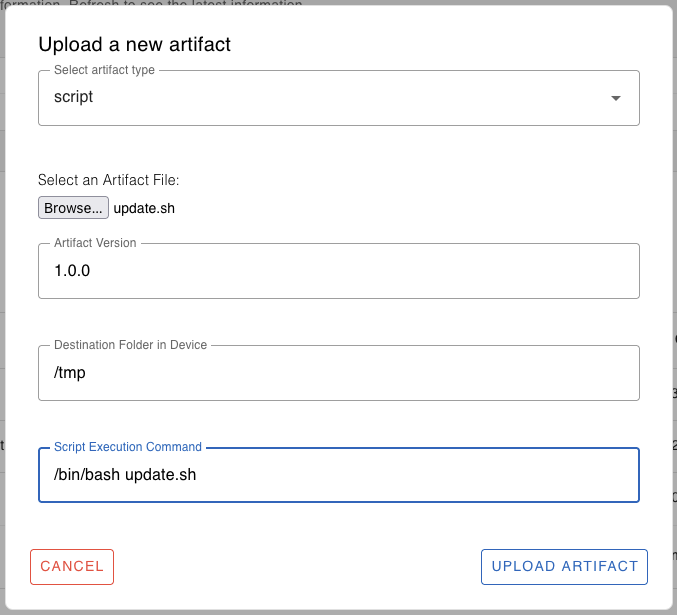
Select the artifact type as "script".
Browse and select the update.sh file.
Specify the appropriate version for the artifact, 1.0.0 in this example.
Specify the destination folder in the target device where the script should be downloaded and executed. For example: /tmp or /home/user/myapp or /usr/bin
Specify the command to execute the script in the target device. For example: /bin/bash update.sh
Finally, click the “Upload” button to upload the artifact to the cloud registry.
You’ll see a message saying “File uploaded successfully”
Deploy the Artifact
Now that the artifact has been uploaded to the SocketXP Artifact Registry in the cloud, let’s deploy the artifact/script to run on target devices.
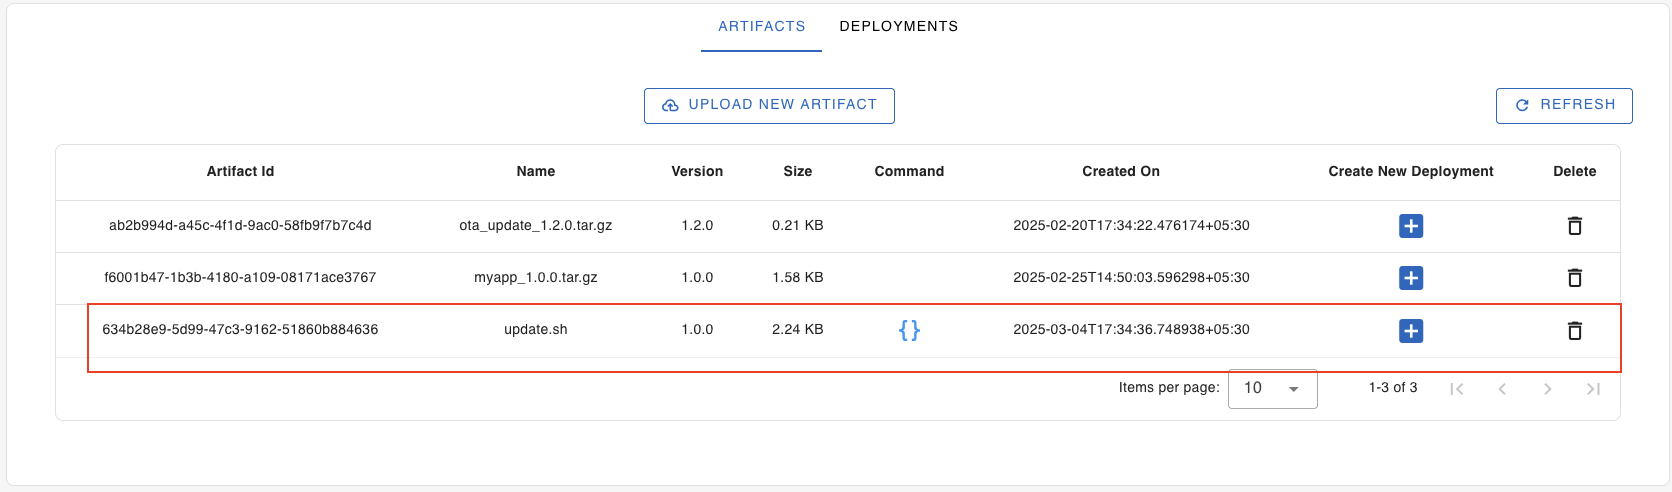
From the Artifacts table, view and select the artifact you have just uploaded.
Note: If you don’t see your artifact yet, click the “Refresh” button to reload the table data.
Click the “+” icon next to the artifact to create a new deployment.
A new window will popup, as shown below.
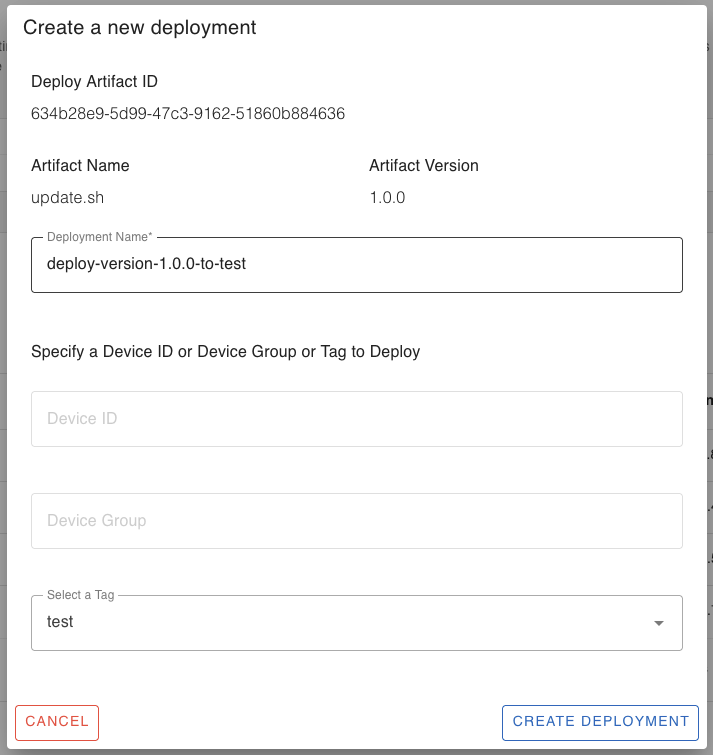
Give a name for the deployment, say for example, “deploy-version-1.0.0-to-test-devices”.
Specify the target device ID or the device group or select a tag to deploy the artifact on.
Note: You can deploy the artifact on a single device ID, or a device group or a device tag. If you want to deploy the artifact on more than one device group or device tag, repeat the “Create New Deployment” process for the different group or tag.
Finally, click the “Create Deployment” button.
Now, go to the “Deployments” tab, hit the refresh button.
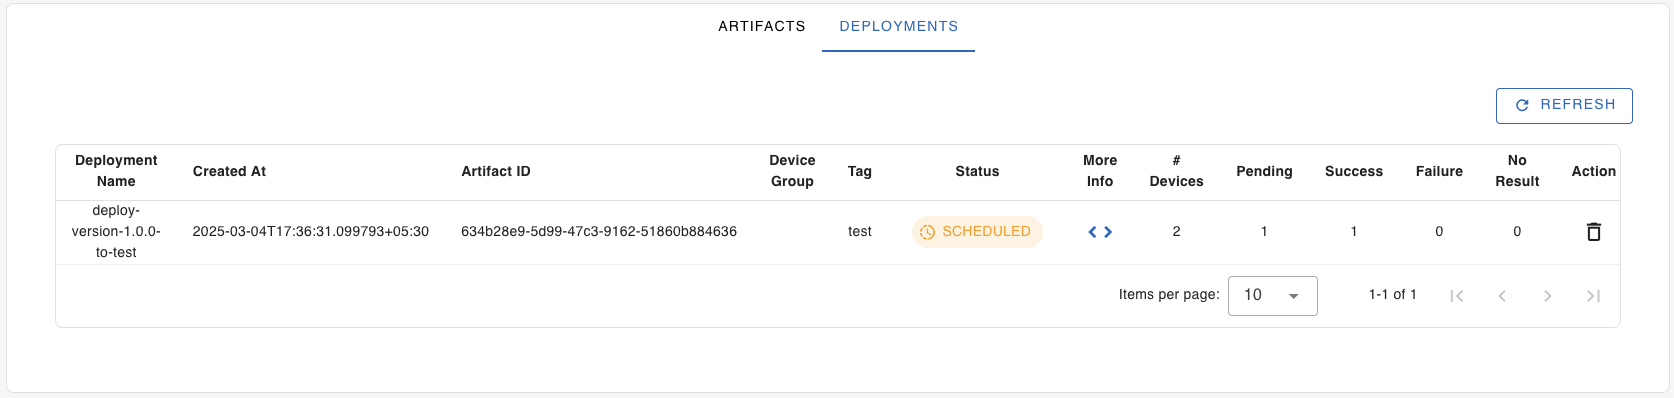
View and select the deployment we just created to see its progress.
Click the “More Info < >” button to view and monitor the progress of the deployment on each target devices (in the device group or tag).
Click the “Refresh” button to view the progress.
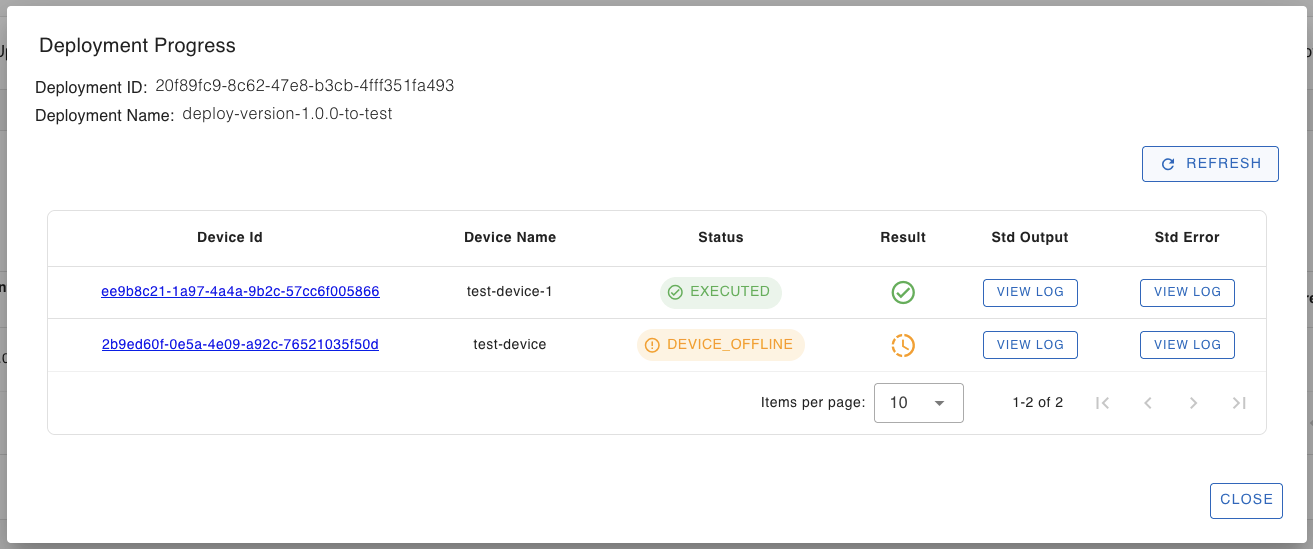
You can check the stdout and stderr logs generated by the update process, by clicking the “view log” buttons.
Login into one of the devices to check if the firmware update is successful.
Congratulations! We have successfully updated the firmware in the remote IoT or embedded Linux devices using SocketXP OTA update.
Now that you have learnt how to deploy firmware OTA updates to remote IoT devices, you can learn to create OTA updates for the following types of artifacts:
- App Binary
- Debian Package
- Docker Container
- Config File
- Script File